
HMS Amethyst (1903)
_IWM_Q_038114.jpg)
| |
| History | |
|---|---|
| Name | HMS Amethyst |
| Builder | Elswick Naval Works |
| Laid down | January 1903 |
| Completed | March 1905 |
| Fate | Sold for scrap in 1920 |
| General characteristics | |
| Class and type | Topaze-class Protected Cruiser |
| Displacement | 3,000 tons |
| Length | 360 ft (110 m) |
| Beam | 40 ft (12 m) |
| Draught | 14 ft 6 in (4.42 m) |
| Propulsion | 12,000 horsepower |
| Speed | 22.5 knots (42 km/h) |
| Armament | list error: <br /> list (help) 12 x QF 4 inch 8 x 3 pounder guns |
| Armour | 1 inch gun shields, 2 0.5 inch deck armour |
| Notes | Sometimes known as the Gem class. The ship had a crew of 296. |
HMS Amethyst was a third-class protected cruiser of the Topaze class of the Royal Navy.
She was laid down in January 1903 at Armstrong, Elswick, she was completed in March 1905.[1]
HMS Amethyst was the first warship larger than a destroyer to be fitted with turbines. These turbines reduced her range by 1500 nautical miles when she was sailing at 10 knots, but it increased her range by 1000 nautical miles when she was traveling at 20 knots.
World War I
Once World War I broke out in 1914, HMS Amethyst was assigned to the Harwich force of the Royal Navy. She participated in the Battle of Heligoland Blight under the command of Commodore Reginald Tyrwhitt. Later that year she was transferred to the 1st Light Cruiser Squadron of the Royal Navy.
Dardanelles Campaign
Minesweeping Operations
Amethyst fought in the Battle of the Dardanelles in 1915.
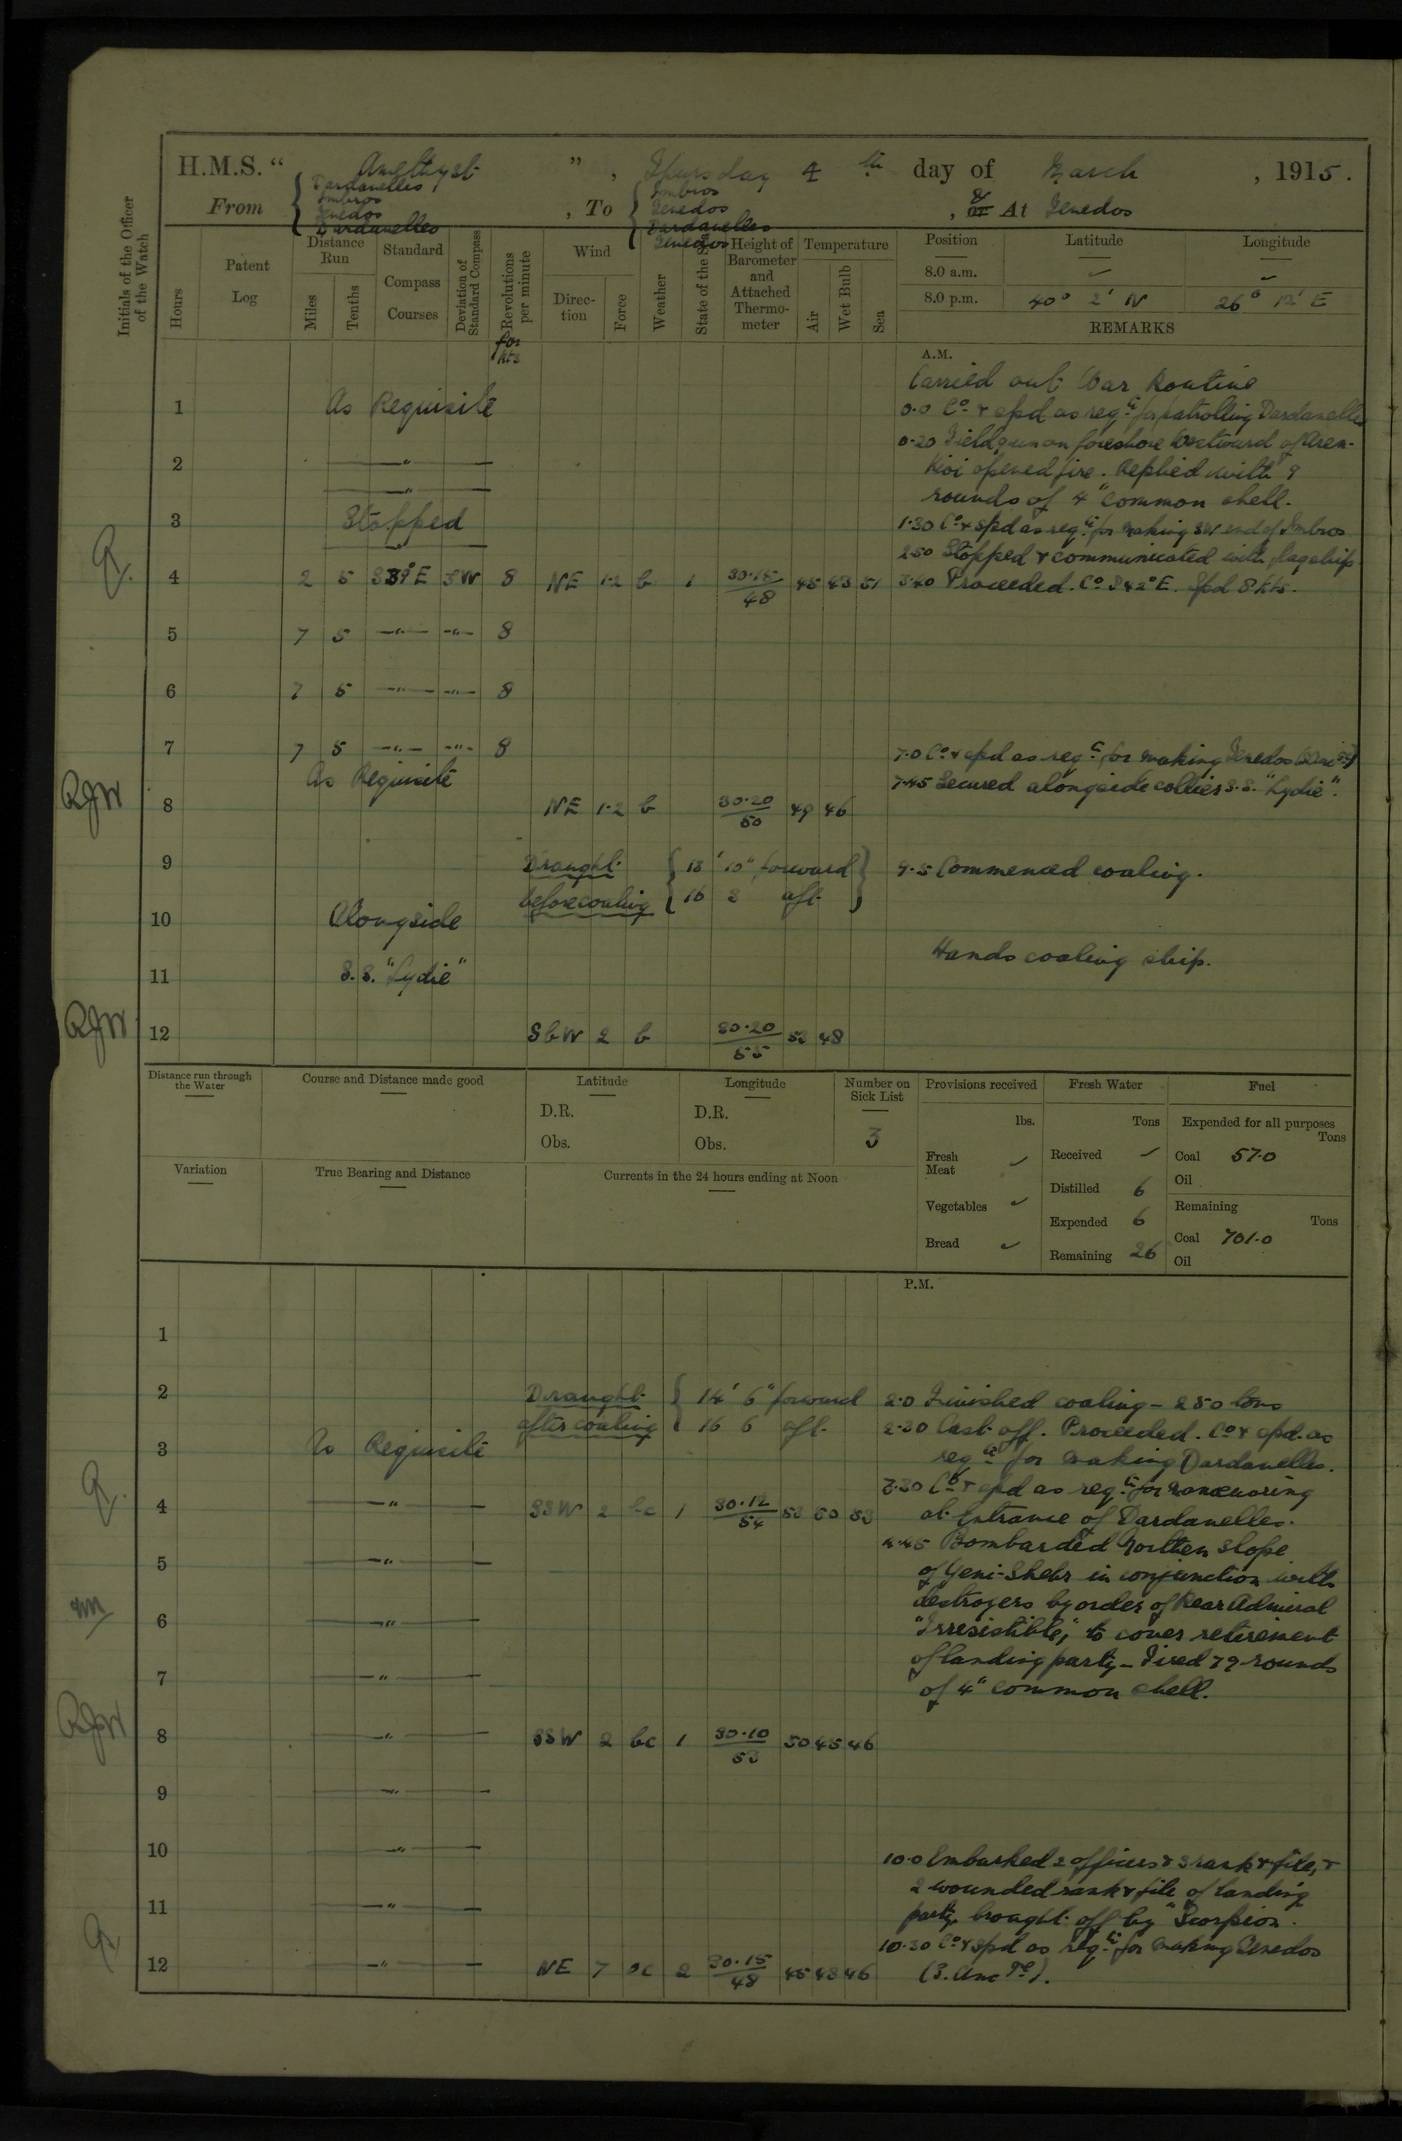
On 1st March, 1915, Amethyst communicated with HMS Ark Royal as they proceeded into the Dardanelles. At 23:15, field guns on the Asiatic shore opened fire on destroyers and minesweepers in the squadron, and they replied, with Amethyst firing three rounds of 4" common shell[2] as they retreated to Rabbit Island, outside the Dardanelles straits. In the early hours of the 4th March, an enemy field gun opened fire on Amethyst and she replied with 9 rounds of 4" common shell. That afternoon, at 16:45, she bombarded the northern slopes of Yeni Shehr, in conjunction with destroyers and the Rear-Admiral's flagship Irresistable as they covered the retreat of a Royal Marine landing party. She fired 79 rounds of 4" common shell. At 22:00, injured officers and men from the landing party were received on board from Scorpion[3]. The next day the wounded were disembarked onto Soudan and Braemar Castle, however, at 18:54 she collided with Minesweeper No. 43, though apparently without consequence[4].
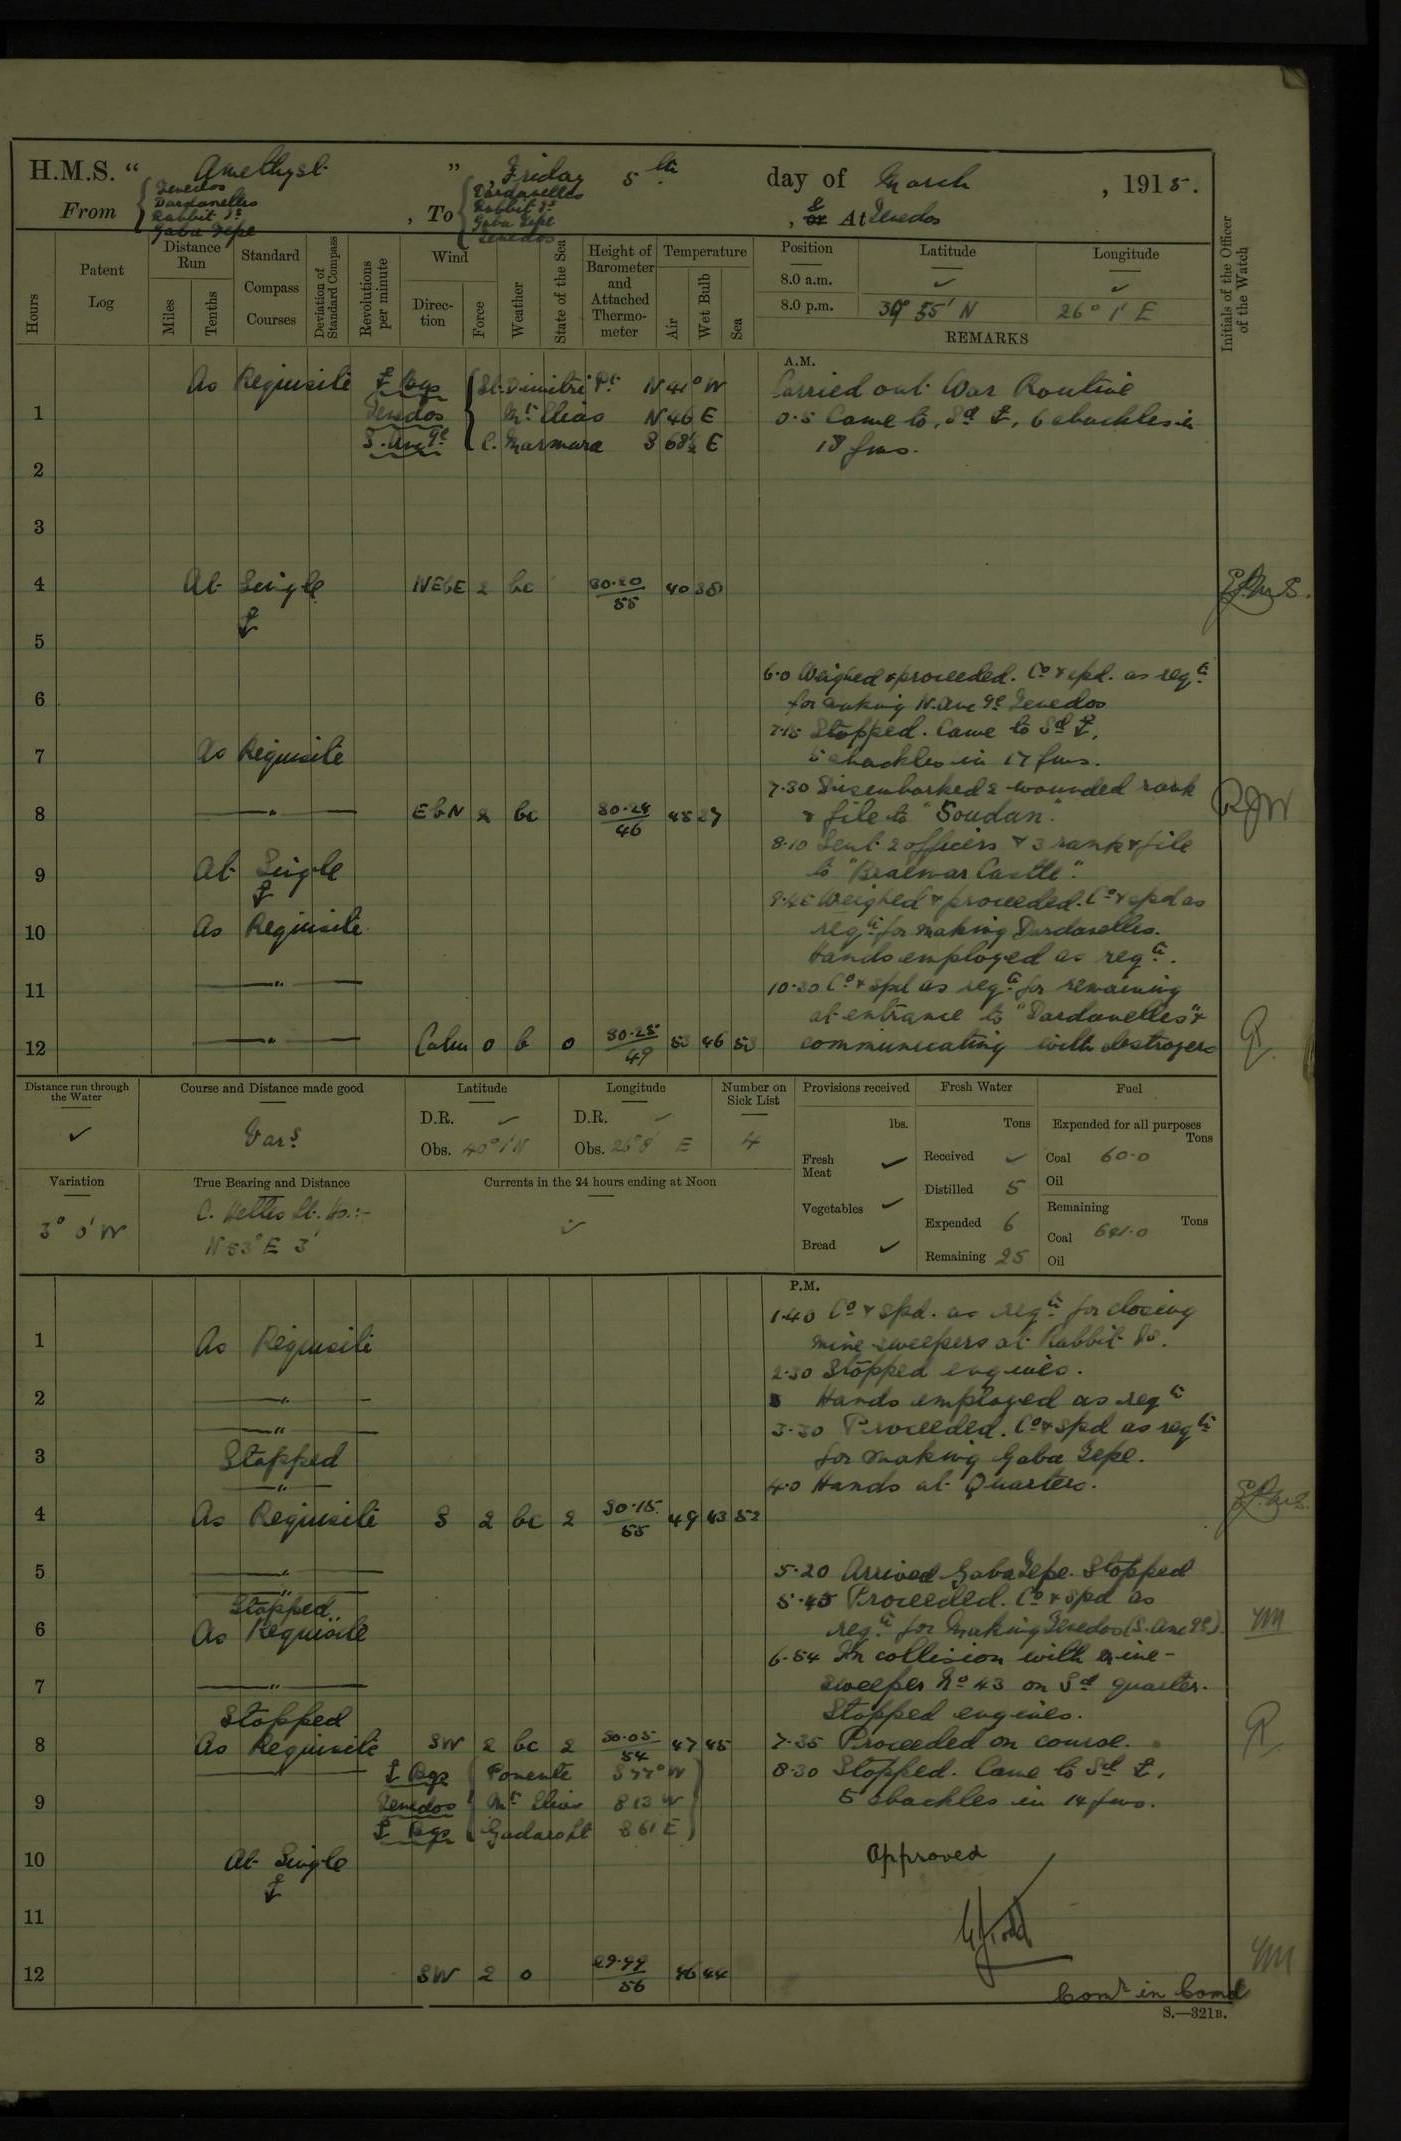
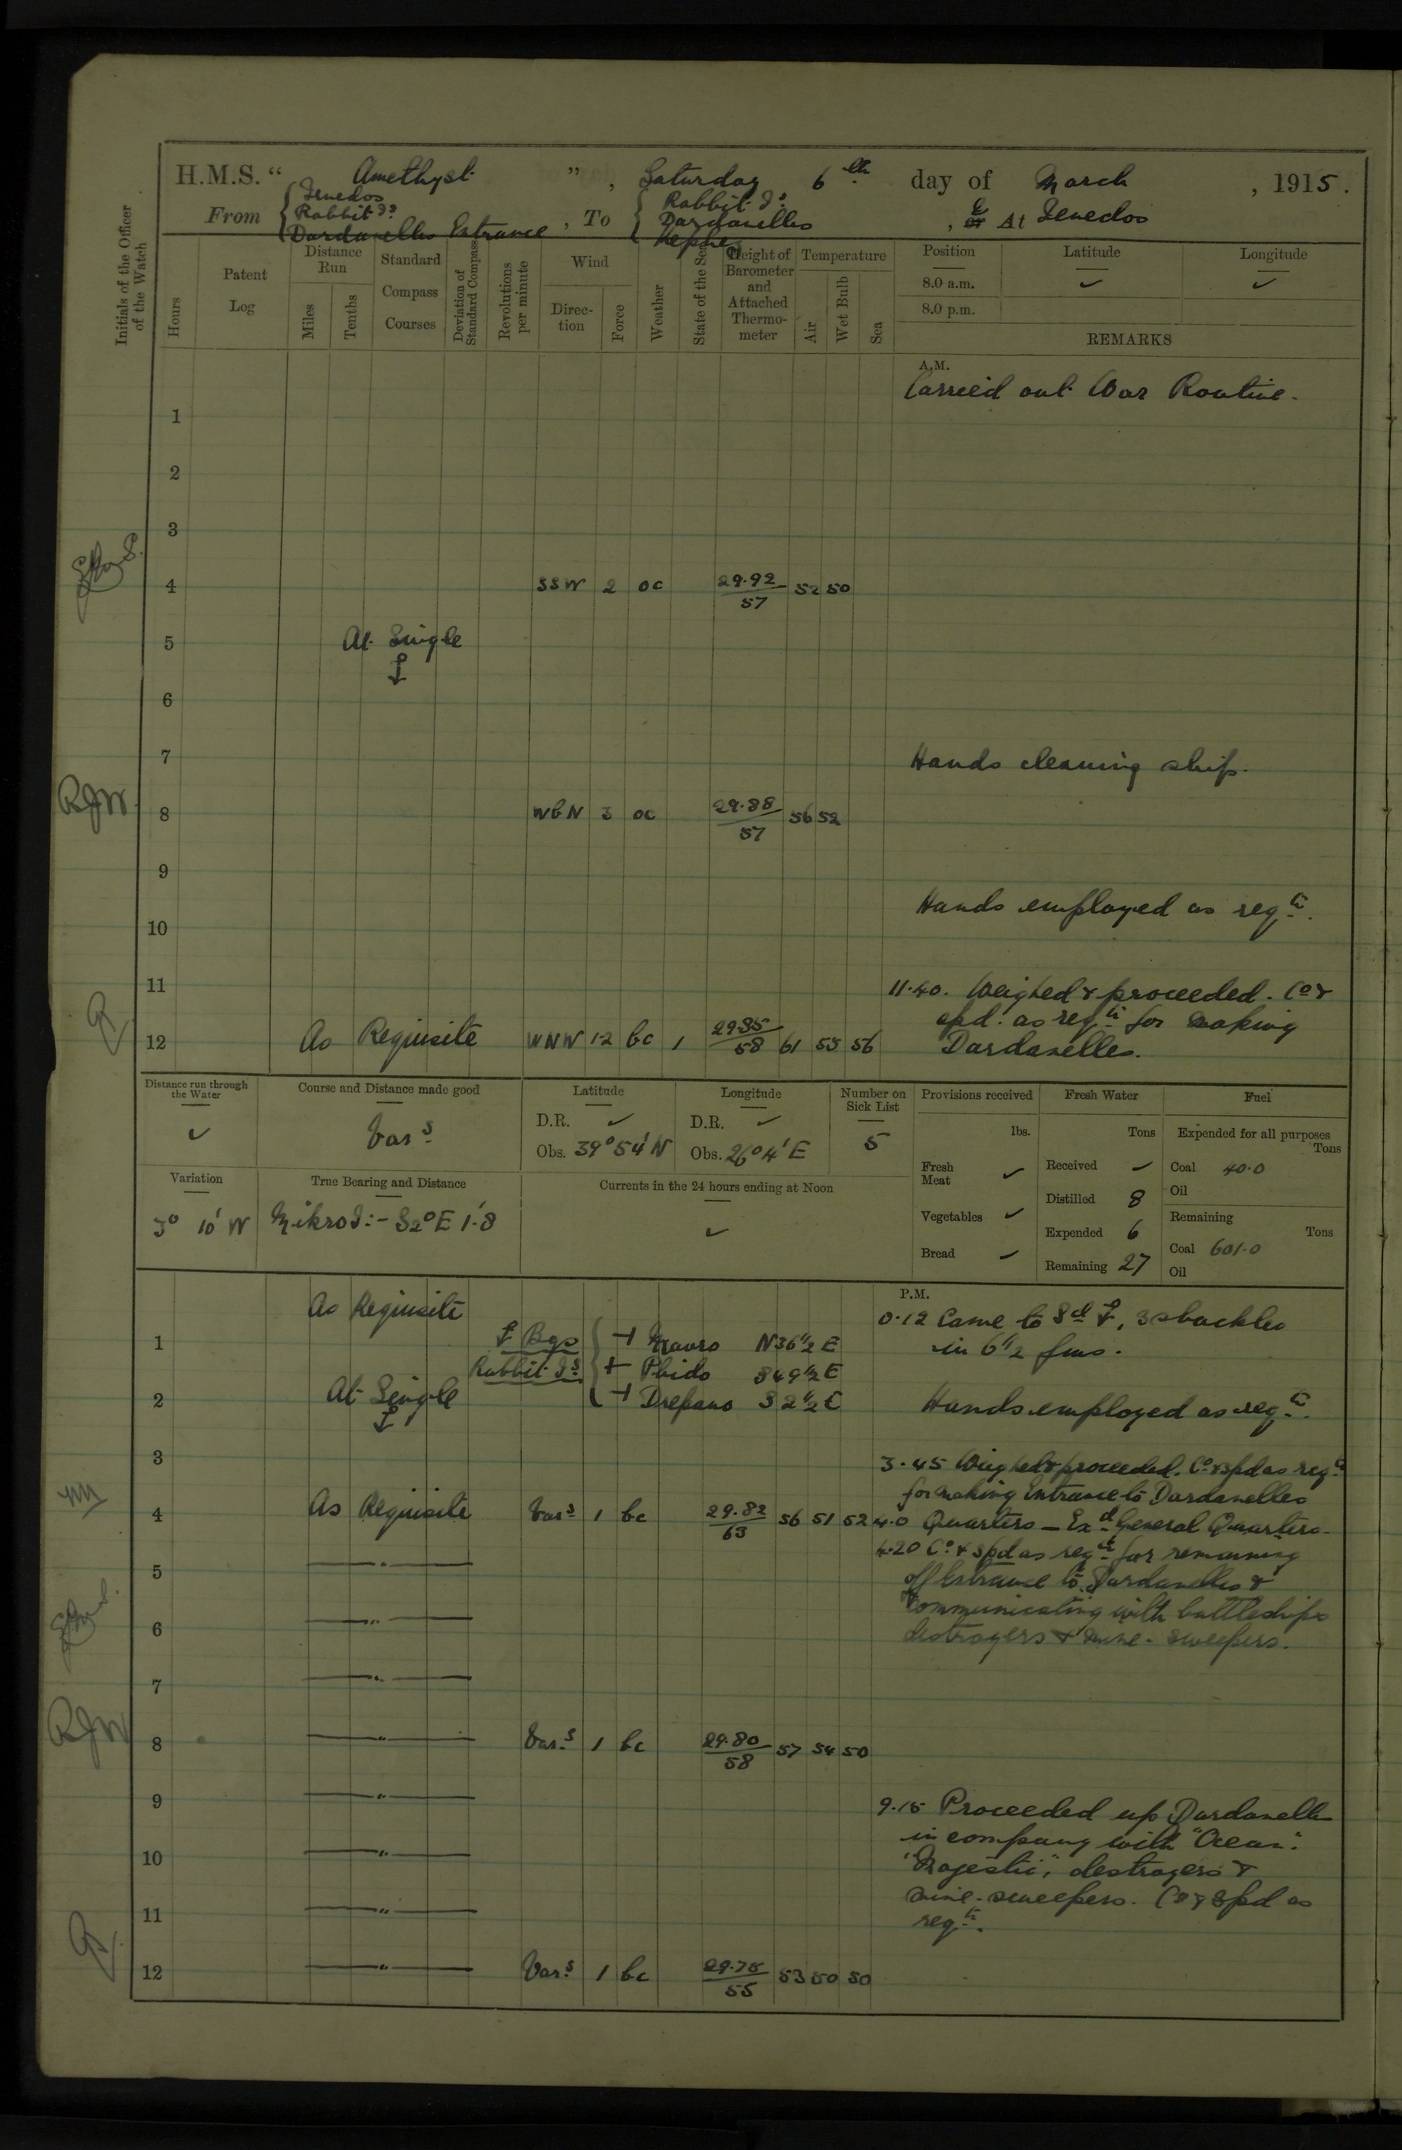
At 21:15 on 6th of March 1915, she entered the Dardanelles alongside Ocean, Majestic, destroyers and minesweepers[5]. At midnight of 7th March, destroyers opened fire on searchlights on the northern shore. At 00:30 a floating mine attached to a buoy was sighted. Amethyst opened fire with maxim rifles but crew were unable to verify whether the mine sank. At 00:40, field guns opened fire on her from the northern shore and she replied with 4" common shells and 4" lyddite shells. At 02:00 the fleet retreated and returned to Tenedos[6].
On 8th March 1915 at 20:50, Amethyst proceeded up the Dardanelles on a mine destroying operation in conjunction with 6 destroyers and 2 picket boats[7]. The operation was unsuccessful owing to picket boats being unable make headway against the strong current. At 04:00 the operation was ordered to retire. At 04:50, field guns opened fire and hit Amethyst with shrapnel and common shells, but there were no casualties. By 05:30 she had made it back to the entrance of the Dardanelles and proceeded back to Tenedos for re-coaling.[8]
On evening of 10th March, Amethyst embarked on another operation to take out mines and searchlights, alongside Canopus, 2nd Division destroyers, 7 minesweepers and 2 picket boats.[9]. That night, minesweeper No. 339 was sunk by a mine explosion, but the crew were saved. Amethyst fired 12 rounds of 4" common shell at 3 searchlights. By 03:00 of the 11th, the flotilla was under heavy fire from numerous shore batteries as they retired back to the entrance of the Dardanelles, which they reached at 06:45.[10]
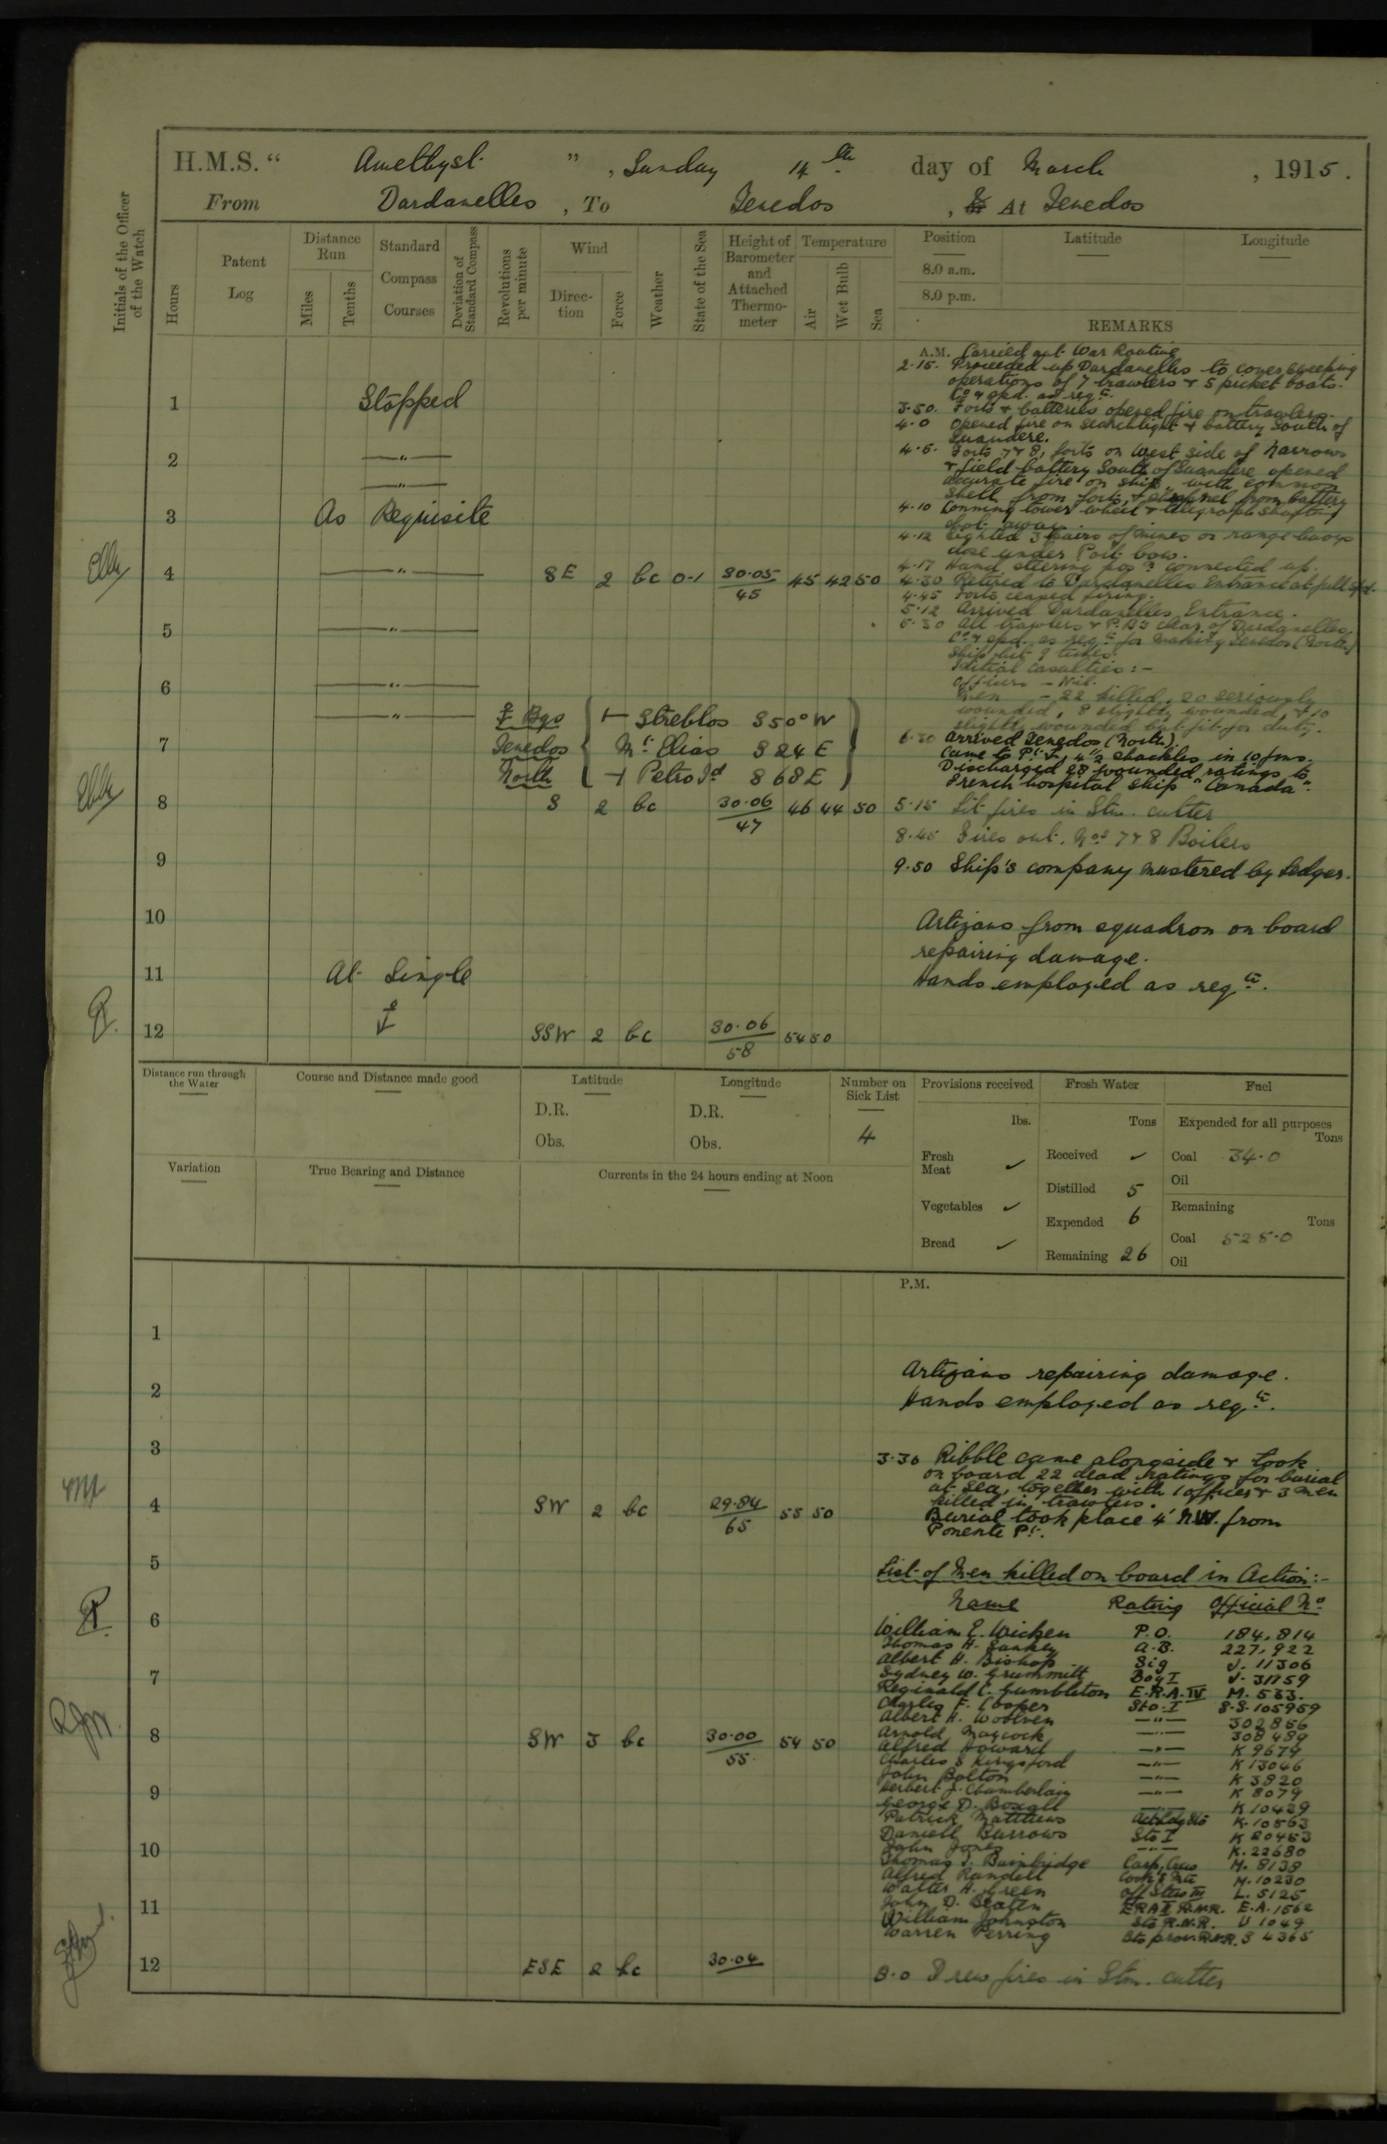
In the early hours of 14th March, Amethyst supported a further minesweeping flotilla of 7 trawlers and 5 picket boats. They came under fire from the Turkish forts and batteries at 03:50. At 04:00 Amethyst opened fire on a searchlight and battery. Forts 7 & 8 and a field battery opened accurate fire on the ship with common shell and shrapnel. At 04:10 the conning tower and other areas of the ship were hit and operation was aborted. 22 men were killed and their bodies transferred to Ribble later that day for burial at sea, along with 1 officer and 3 men killed on the trawlers. 20 men were severely wounded and 8 severely wounded; they were transferred to the French hospital ship Canada, but 4 men died of their wounds over the next few days. 10 were slightly injured but able to continue with their duties.[11]. Whilst being repaired back at Tenedos, Amethyst was joined by Inflexible, damaged by a mine, and HMS Chelmer, damaged by shell fire.[12]
Gallipoli Landings
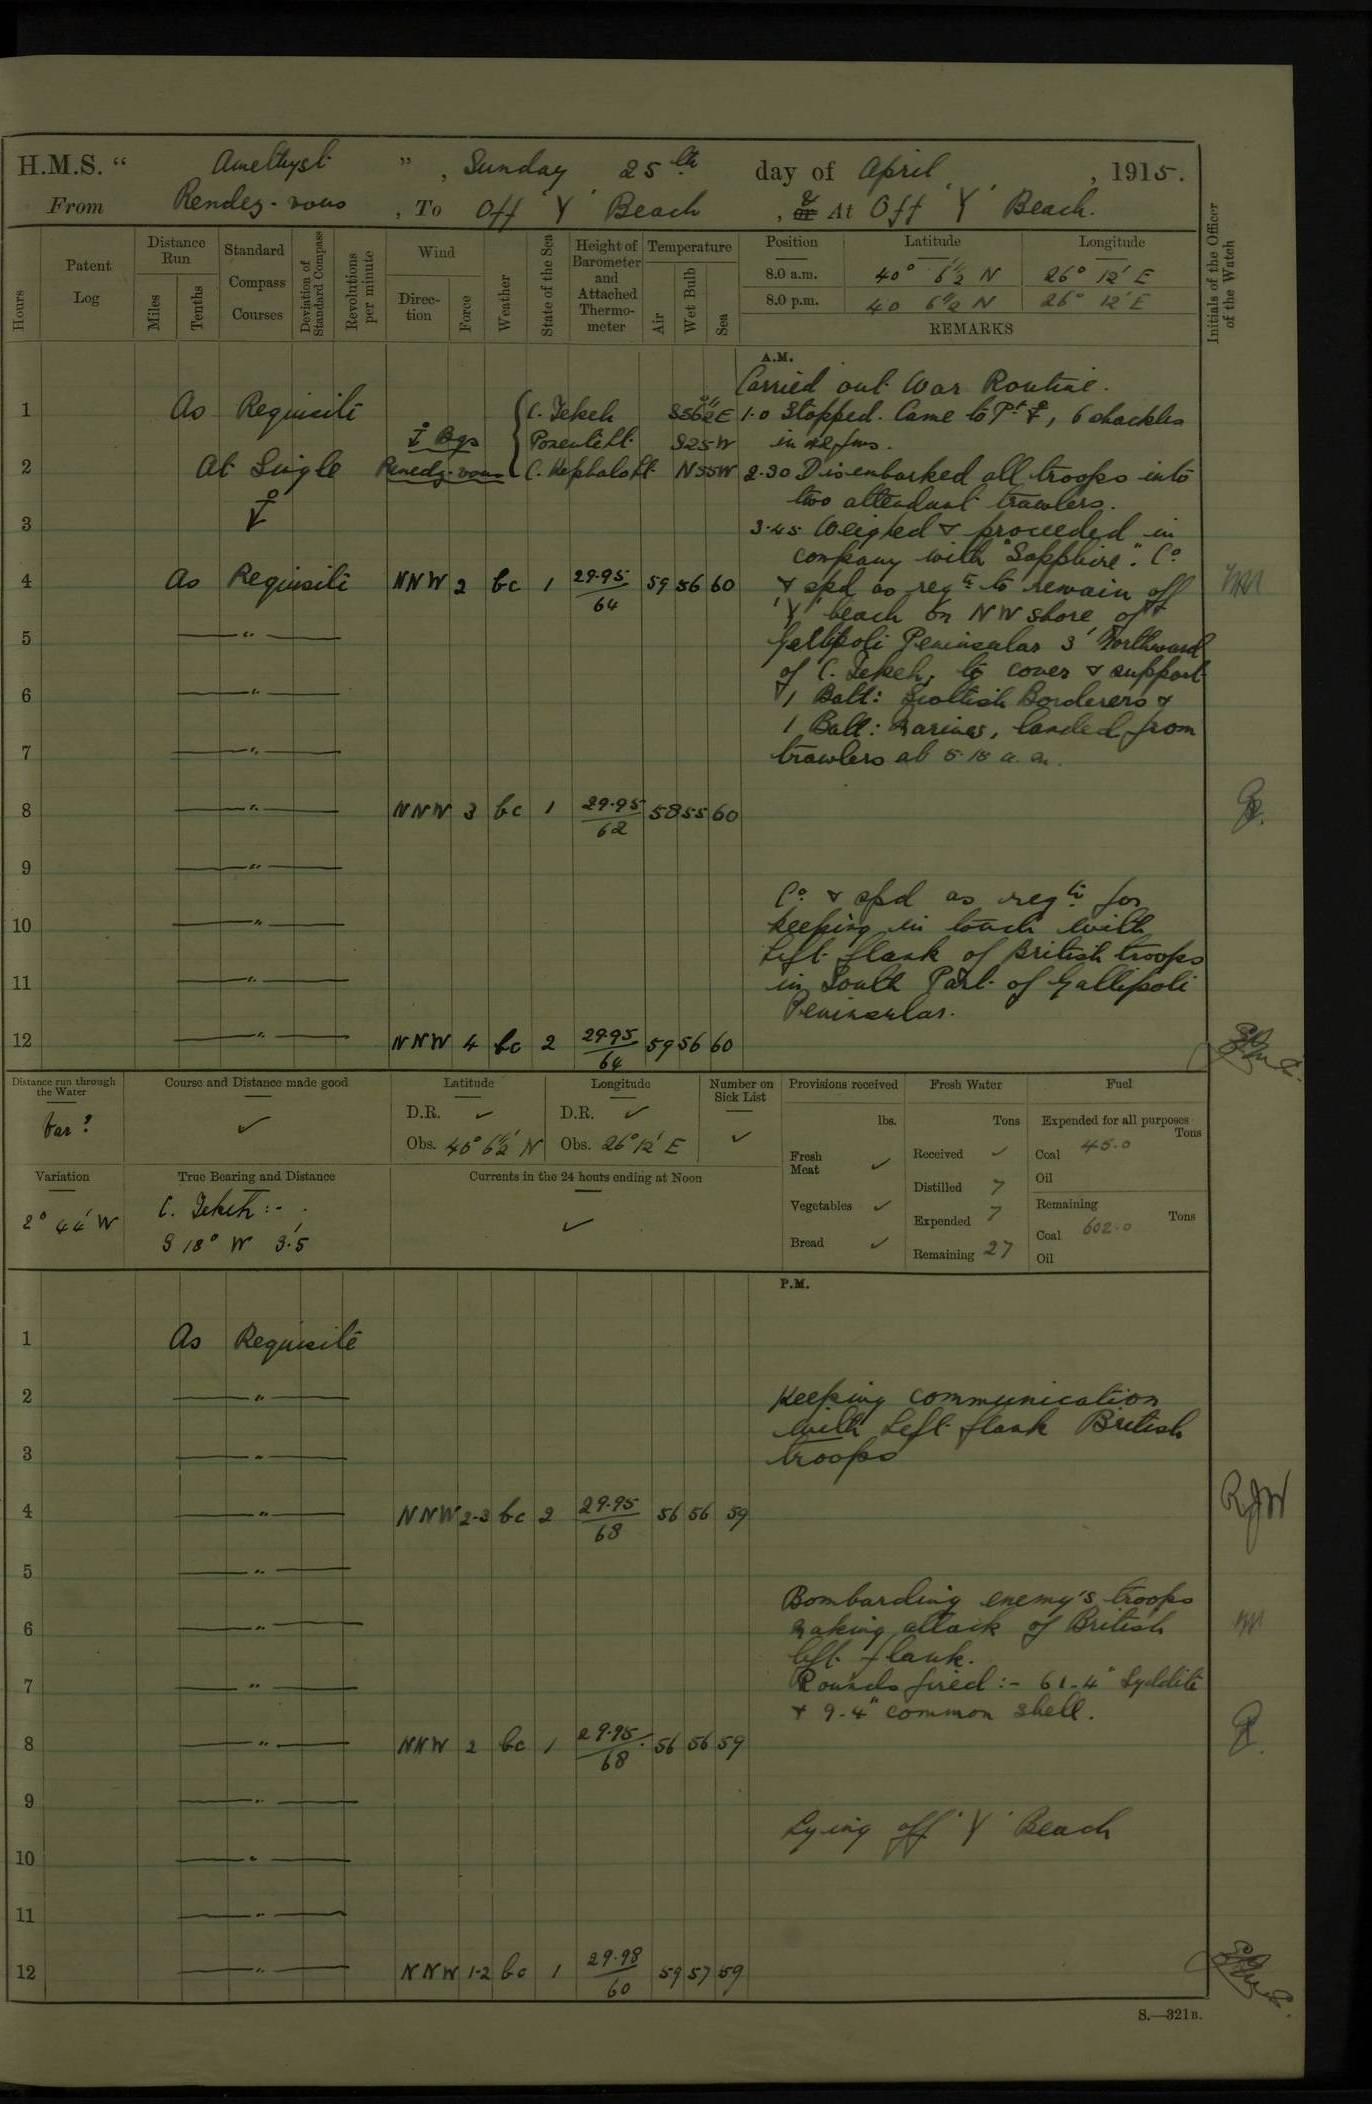
On 24th April 1915, half the 1st Battalion from the Scottish Borderers boarded from transport ship B.11 at 16:15, before weighing anchor and proceeding with her sister ship, HMS Sapphire, transport B.11, N.2 and 7 trawlers[13]. The next day, she was stationed off 'Y-beach' on the northwest shore of the Gallipoli Peninsula. At 02:30 the troops were transferred to trawlers for the landing and then she took up station to support the British troops by bombarding enemy positions with 61 4" lyddite shells and 9 4" common shells.[14]. On the morning of the 27th April, the situation on Y-beach is reported as 'desperate' as Amethyst continued to bombard enemy positions on the cliffs. By mid-morning, surviving troops were beginning to come back on board: 1 officer with 112 non-commissioned officers (NCOs) and men with 5 wounded officers and 60 wounded NCOs and men from the Scottish Borderers and the Royal Marines. A further 2 wounded officers and 73 wounded NCOs and men were received from Sapphire. All the wounded were then transferred to HMS Guilford Castle. That day Amethyst fired 200 4" lyddite shells and 80 4" common shells.[15].
Over the following days, Amethyst continued to provide support to the operations on 'W', 'Y' and 'Z' beaches, generally in support of the dreadnought HMS Queen Elizabeth. On 3rd May, Amethyst lay off 'Z' beach and reported heavy gunfire on shore and large calibre enemy shells landing in the proximity of the British ships. At 11:43 shells fell 100 and 20 yards short of Amethyst and exploded whilst she was being refueled with coal. Fragments hit the ship and coaling was aborted. A further shell struck the coaling ship Nevisbrooke putting the steering gear out of action and inflicting numerous holes in the superstructure. All the ships in the area moved away and the enemy firing ceased.[16]. On the night of 5th May, troops were taken onboard from 'Z' beach for redeployment to 'X' & 'Y' beaches[17].
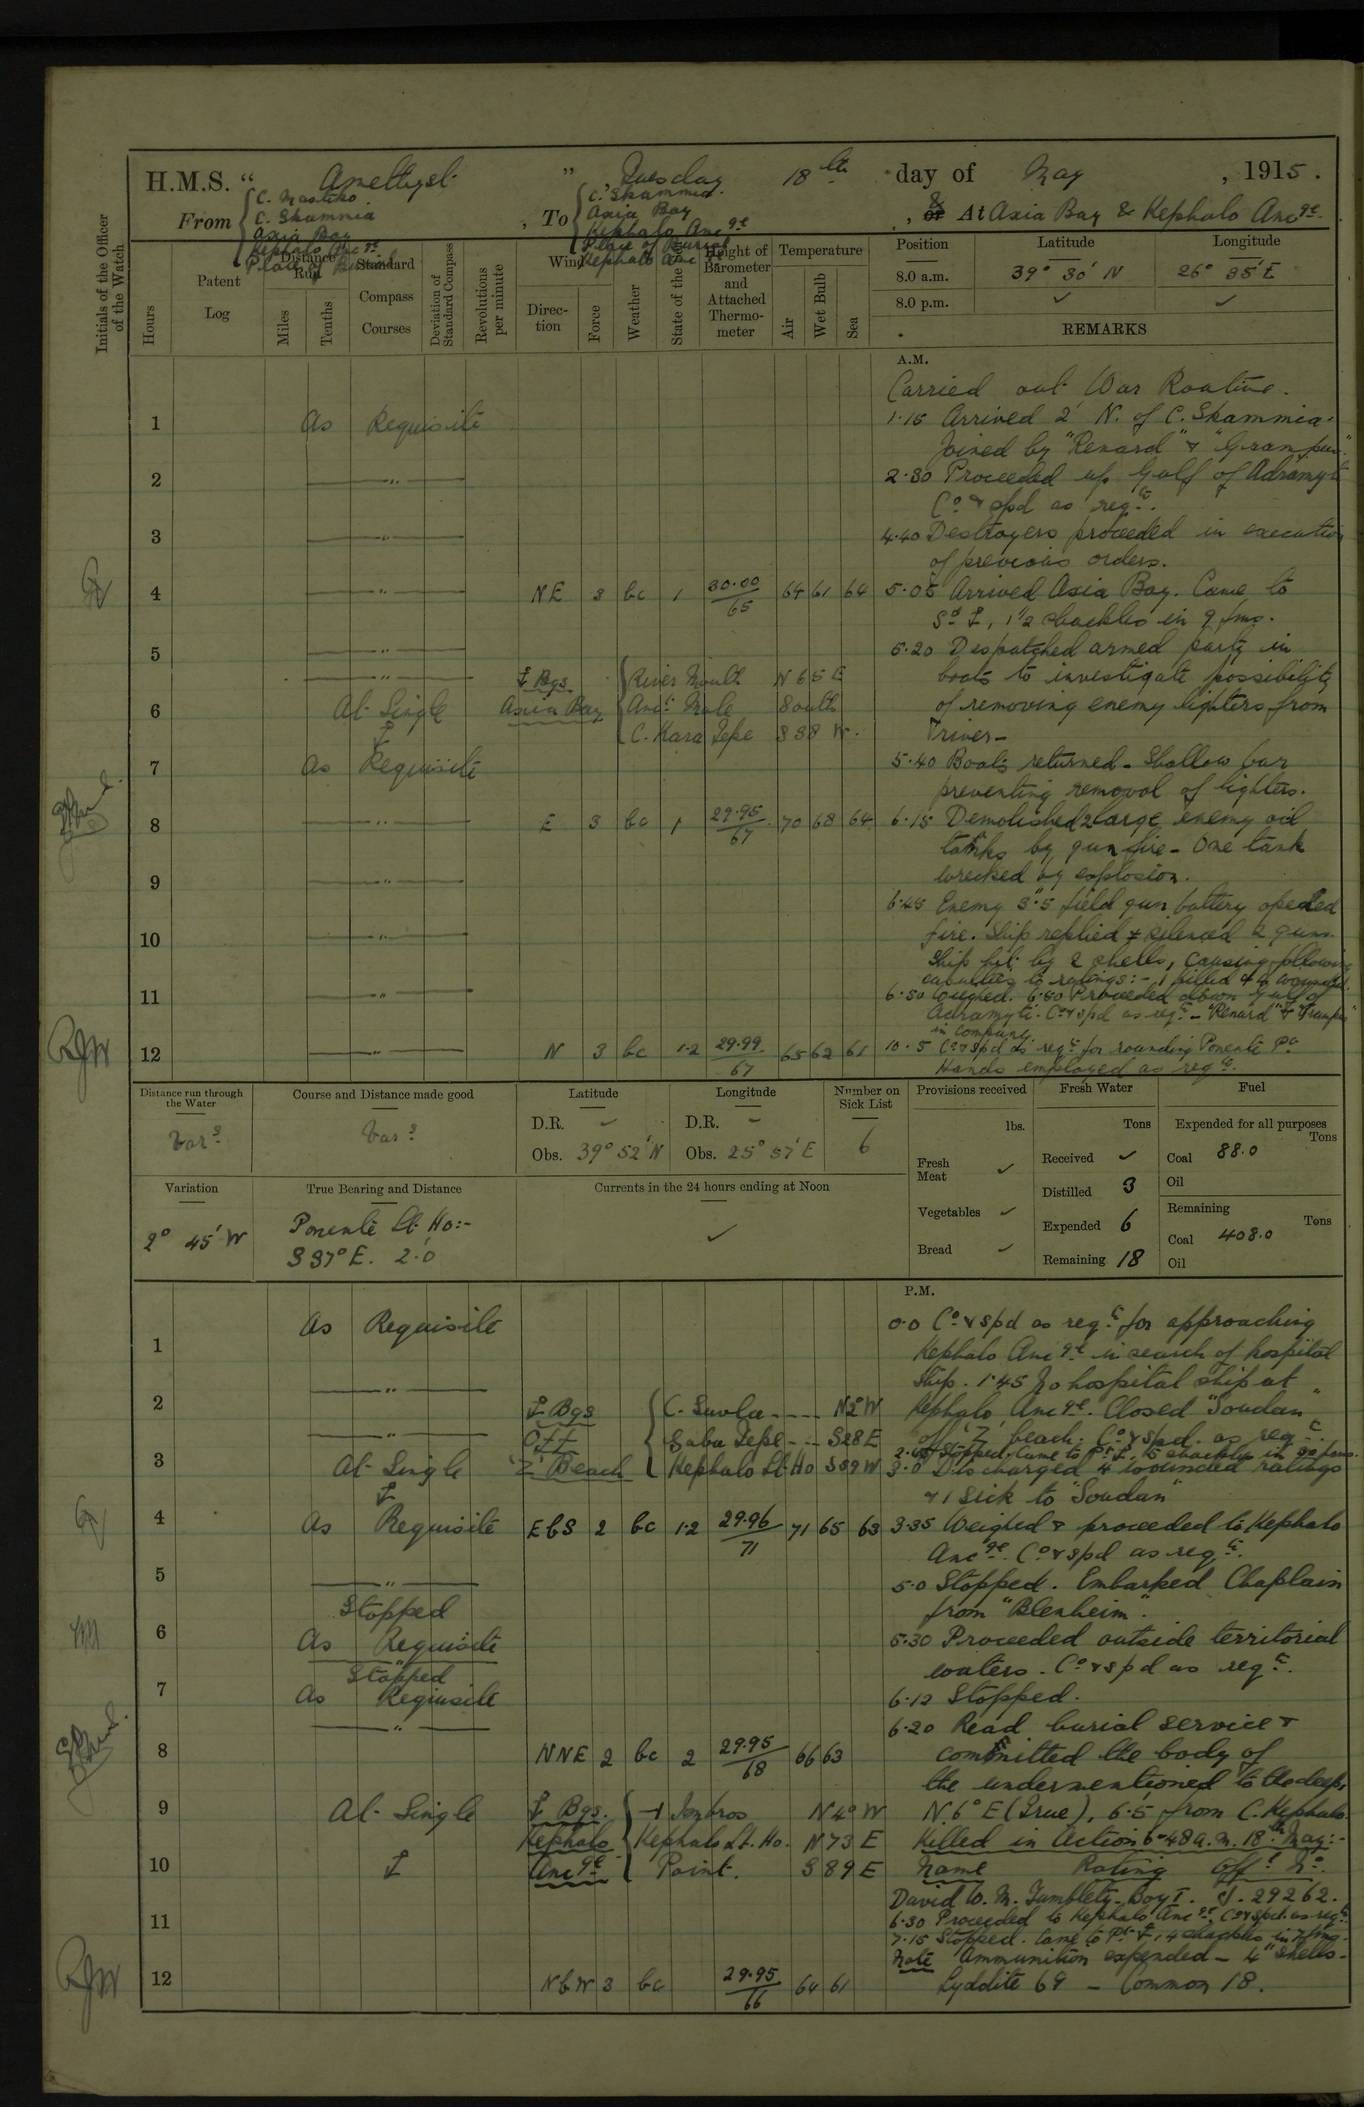
The last action of Amethyst came on the 18th May 1915 when she proceeded up the Gulf of Adramyt in the early hours, accompanied by destroyers, arriving at Asia Bay at 05:05. At 05:20 an armed party was dispatched in boats to investigate the possibility of removing enemy lighters, but they returned 20 minutes later reporting that a sandbar prevented them from being moved. At 06:15 two enemy oil tanks were demolished by gunfire, one exploded. At 6:45 an enemy field gun battery opened fire. "Amethyst" replied with 69 lyddite Shells and 18 common shells, and silenced the guns, but not before she was hit, killing 1 rating and wounding another 4. Amethyst returned to 'Z' beach where the 4 wounded ratings were discharged to the hospital ship Soudan. At 18:20, a chaplain from HMS Blenheim led the funeral service for the rating killed in action, whose body was committed to the sea.[18]
Mediterranean
On 21 May 1915, Amethyst left the Dardanelles theatre[19] for Malta and on the 26th May sailed for Taranto where she stopped briefly before heading to Brindisi. There she met HMS "Dublin" and one of the Amethyst's sister ships, HMS "Sapphire"[20].
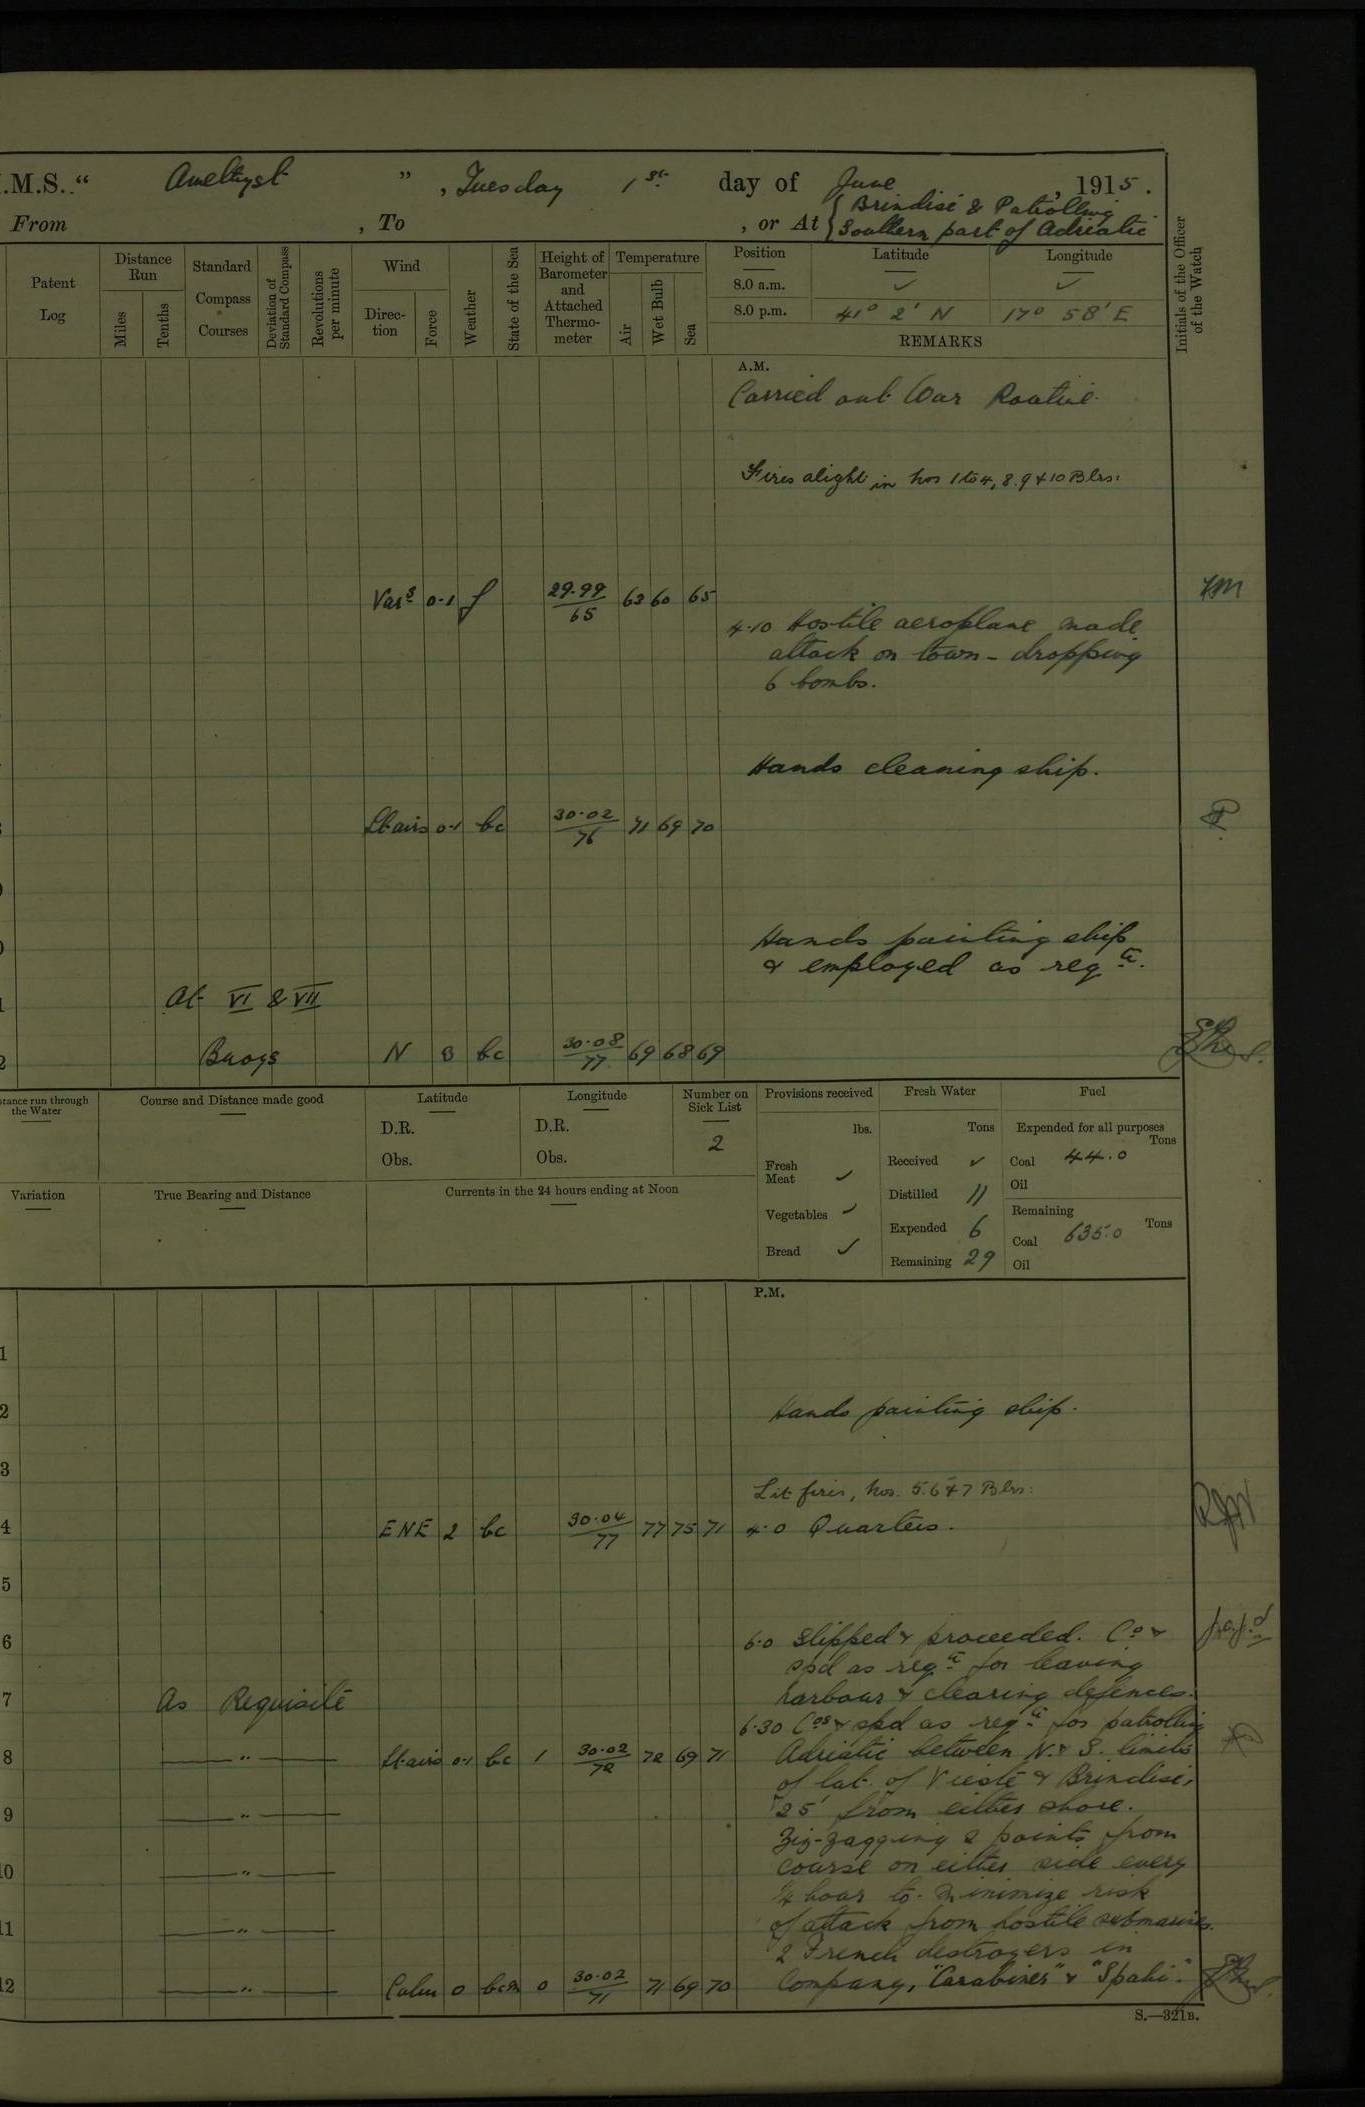
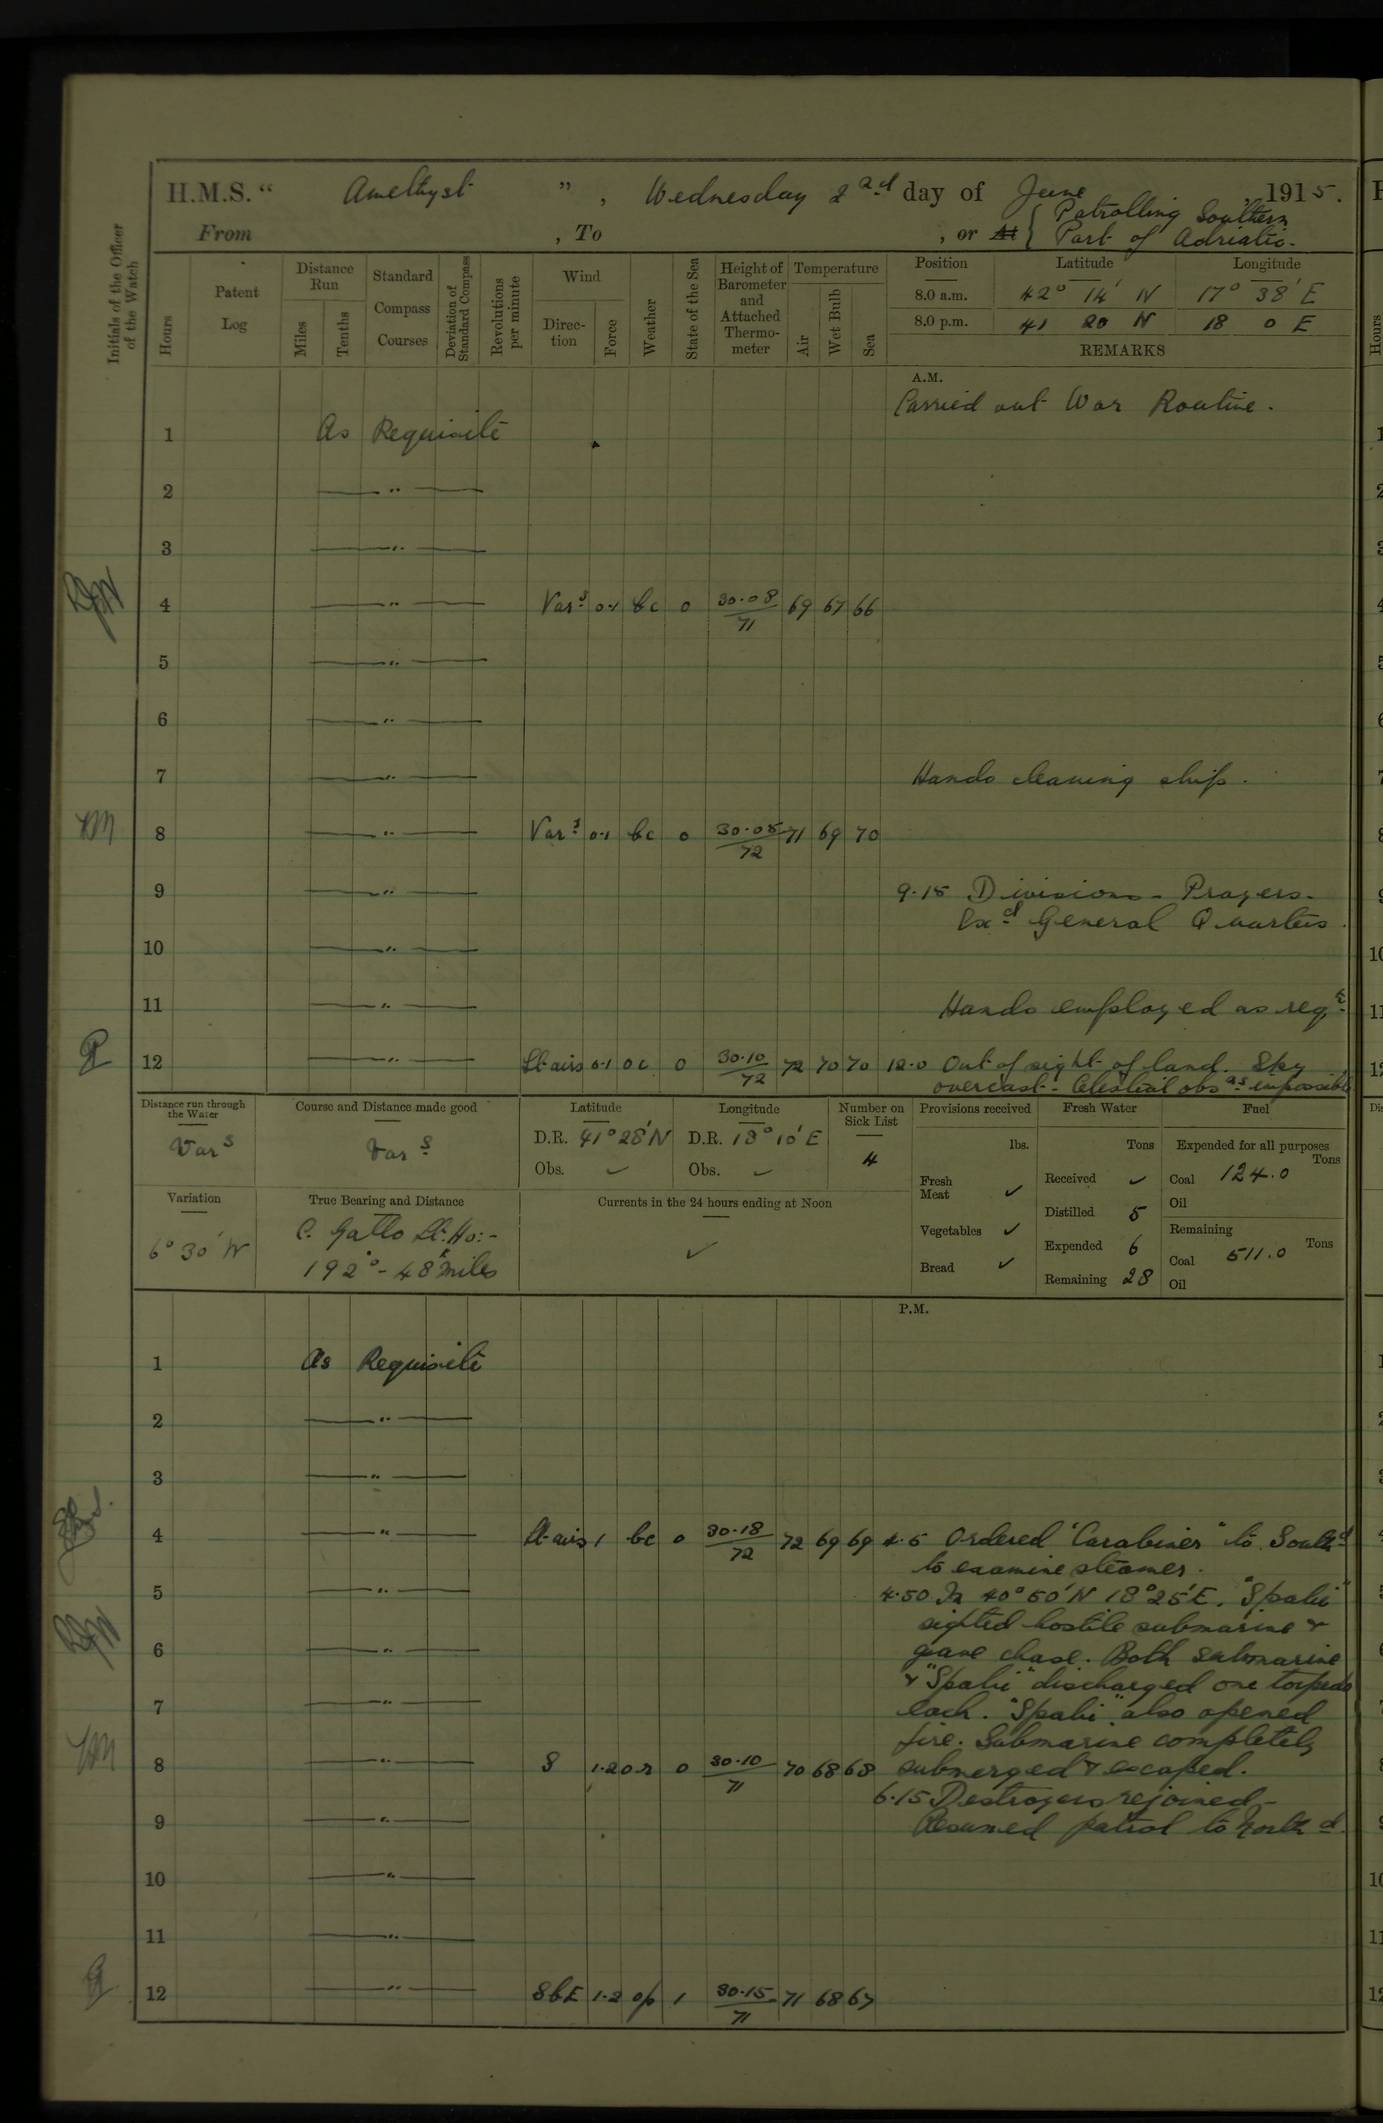
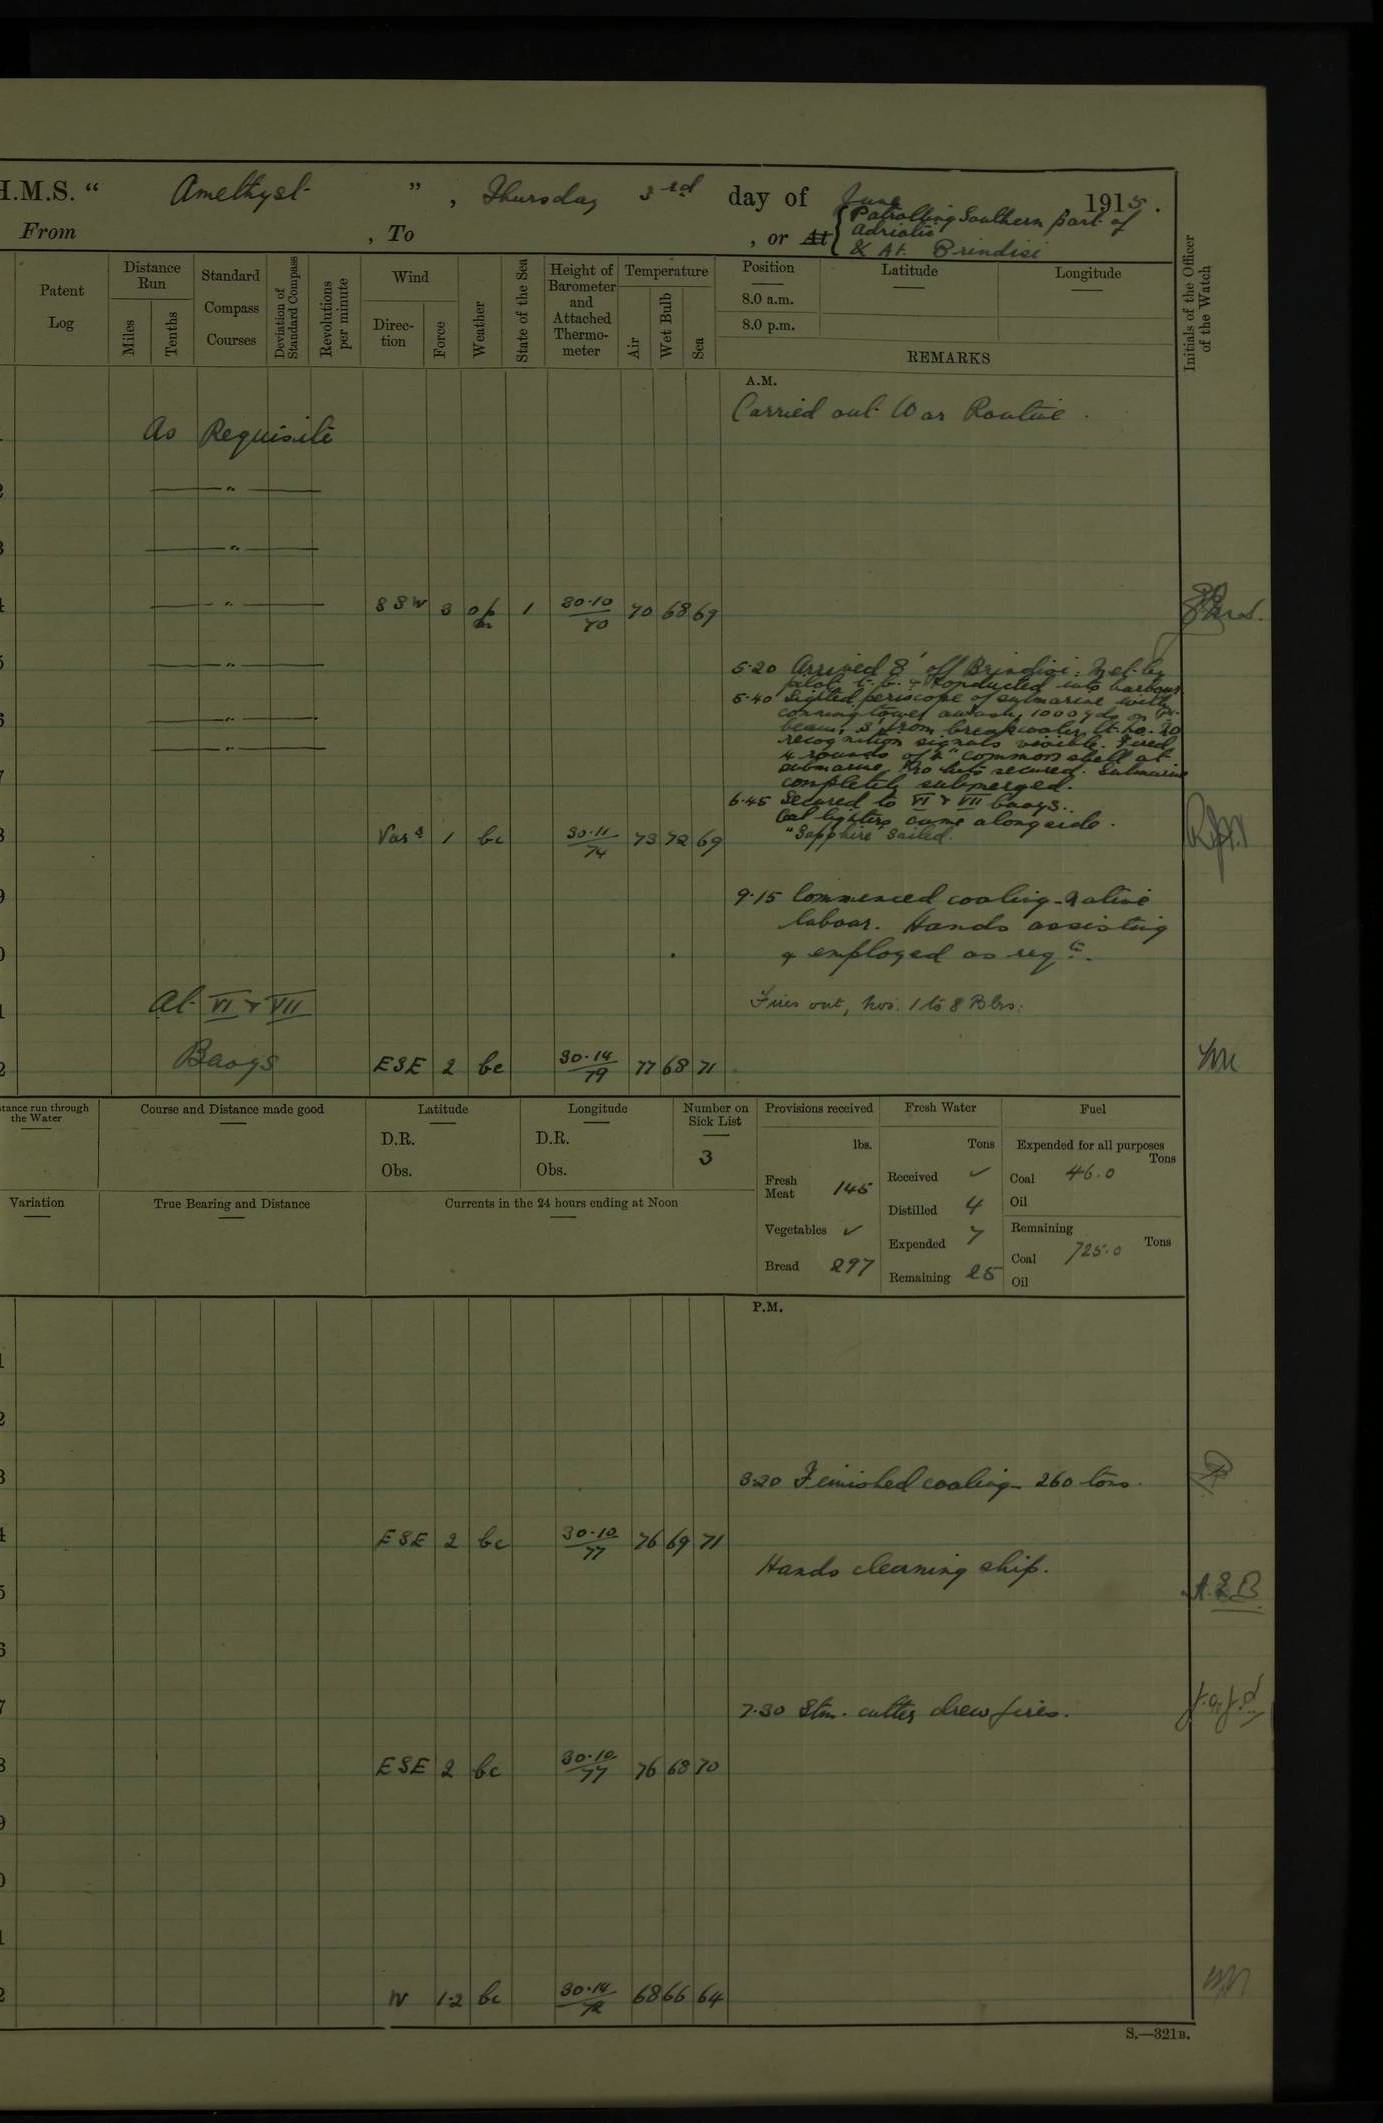
On 1 June 1915, the crew witnessed an enemy aircraft attack Brindisi, dropping 6 bombs. That evening she set sail, in the company of two French destroyers "Carabiner" and "Spalie", and taking care to follow a zig-zag course to minimise the risk of attack from enemy submarines[21]. The next day at 16:50 "Spalie" sighted a hostile submarine and gave chase. Both "Spalie" and the submarine discharged one torpedo each, and "Spalie" also opened fire, but the submarine submerged and escaped[22]. On 3rd June, as the patrol returned to Brindisi harbour, a periscope and conning tower was spotted so "Amethyst" opened fire with 4 rounds of 4" common shell[23].
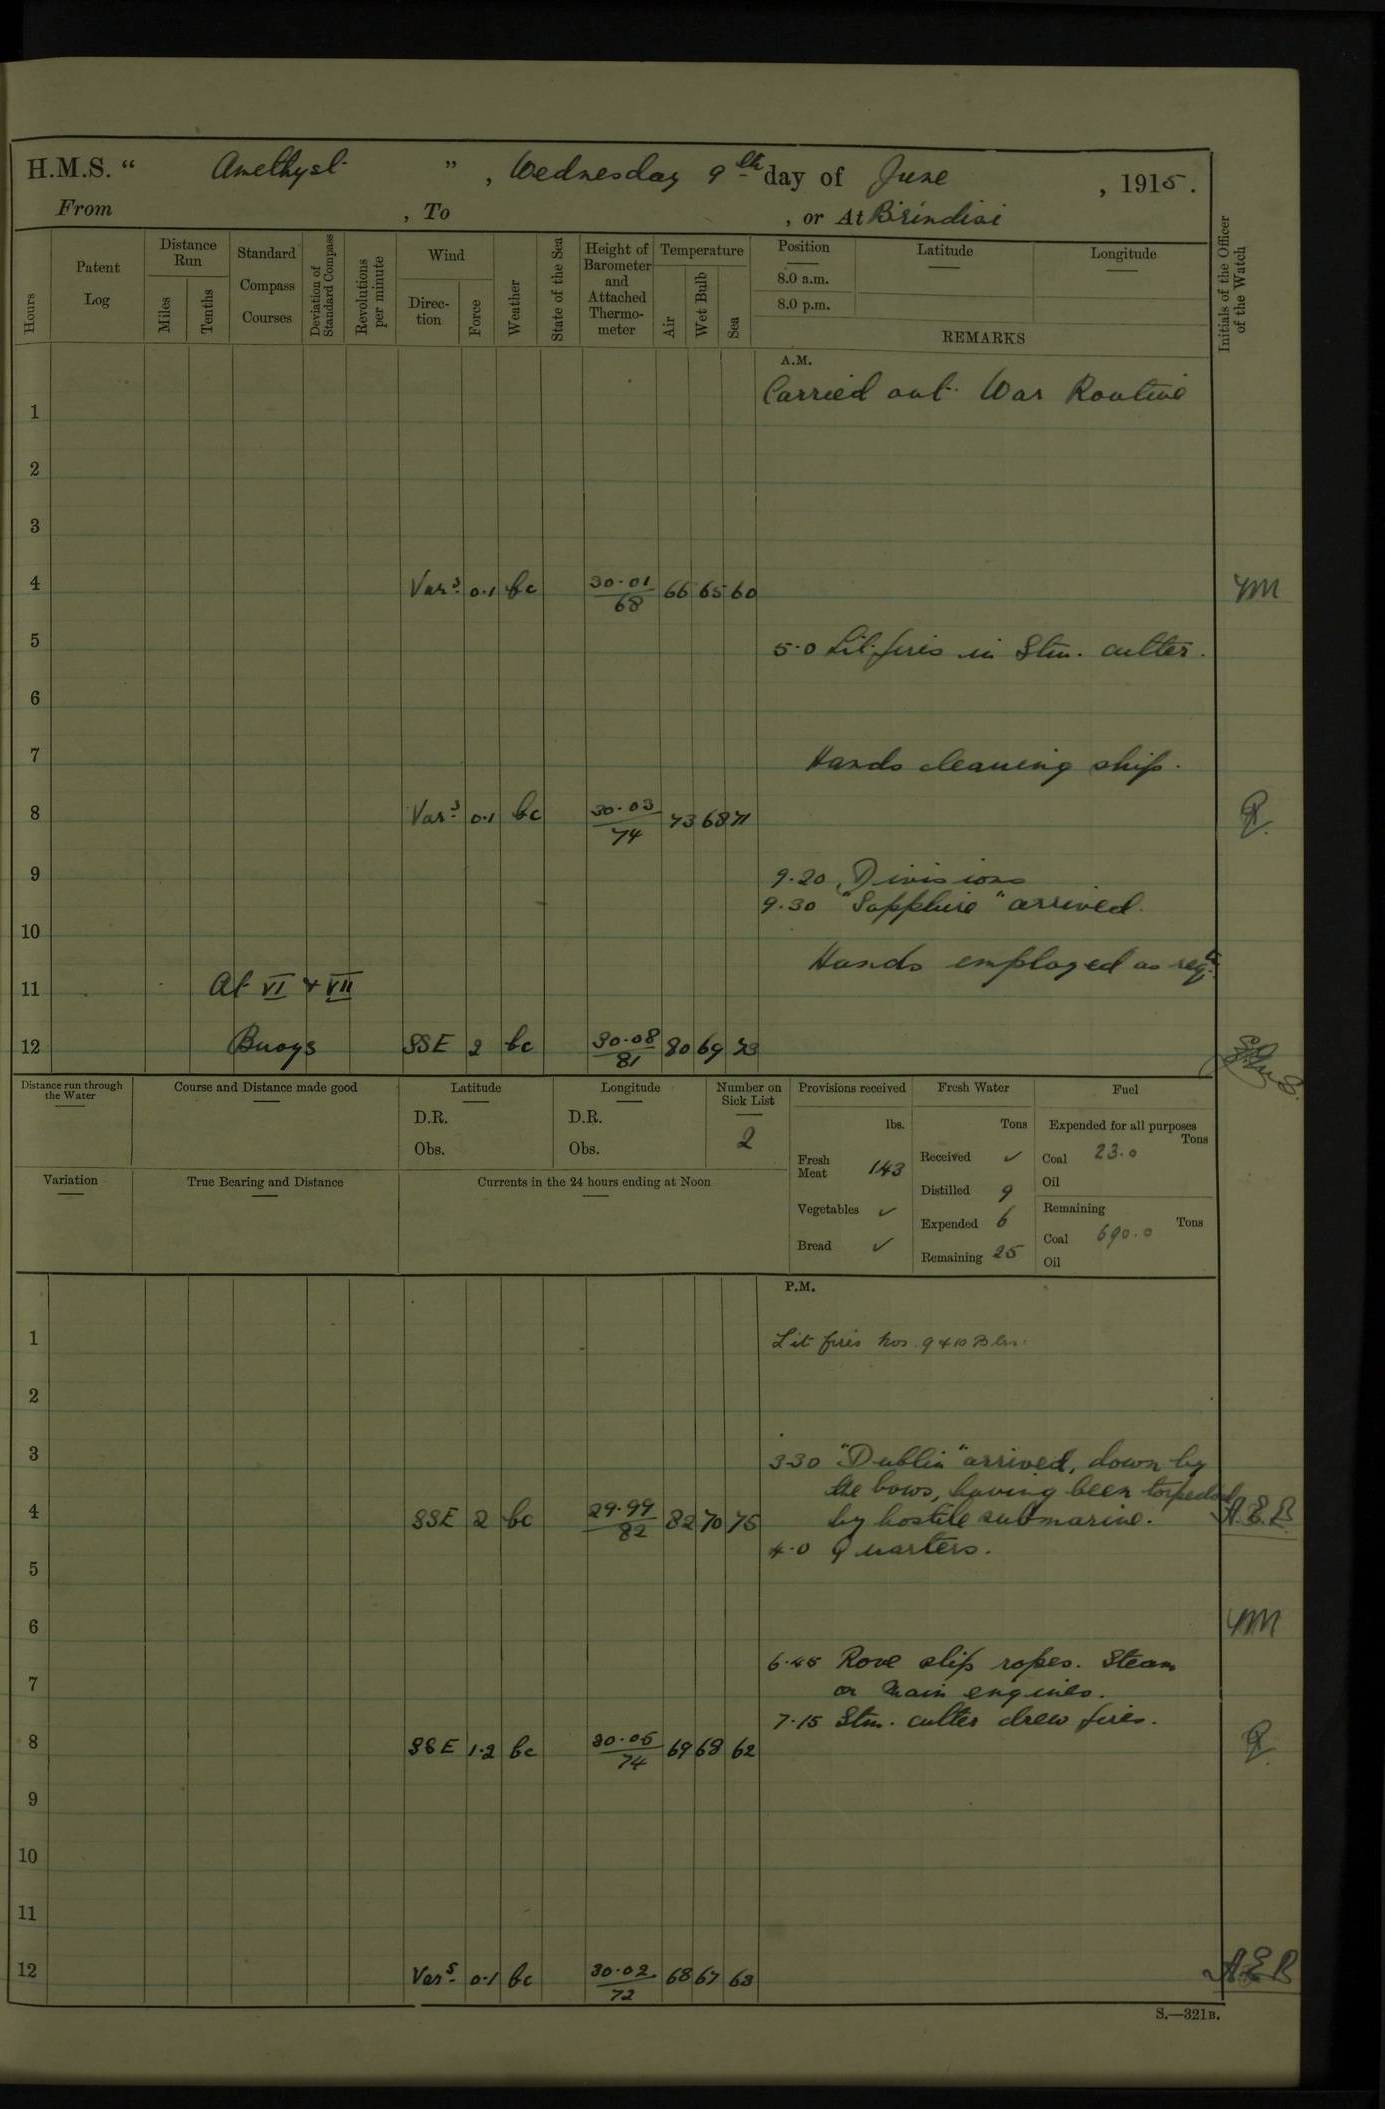
While moored in Brindisi, "Amethyst" witnessed the return of HMS "Dublin" at 15:30 on 9th June. She was down in the bows having been torpedoed by an enemy submarine[24].
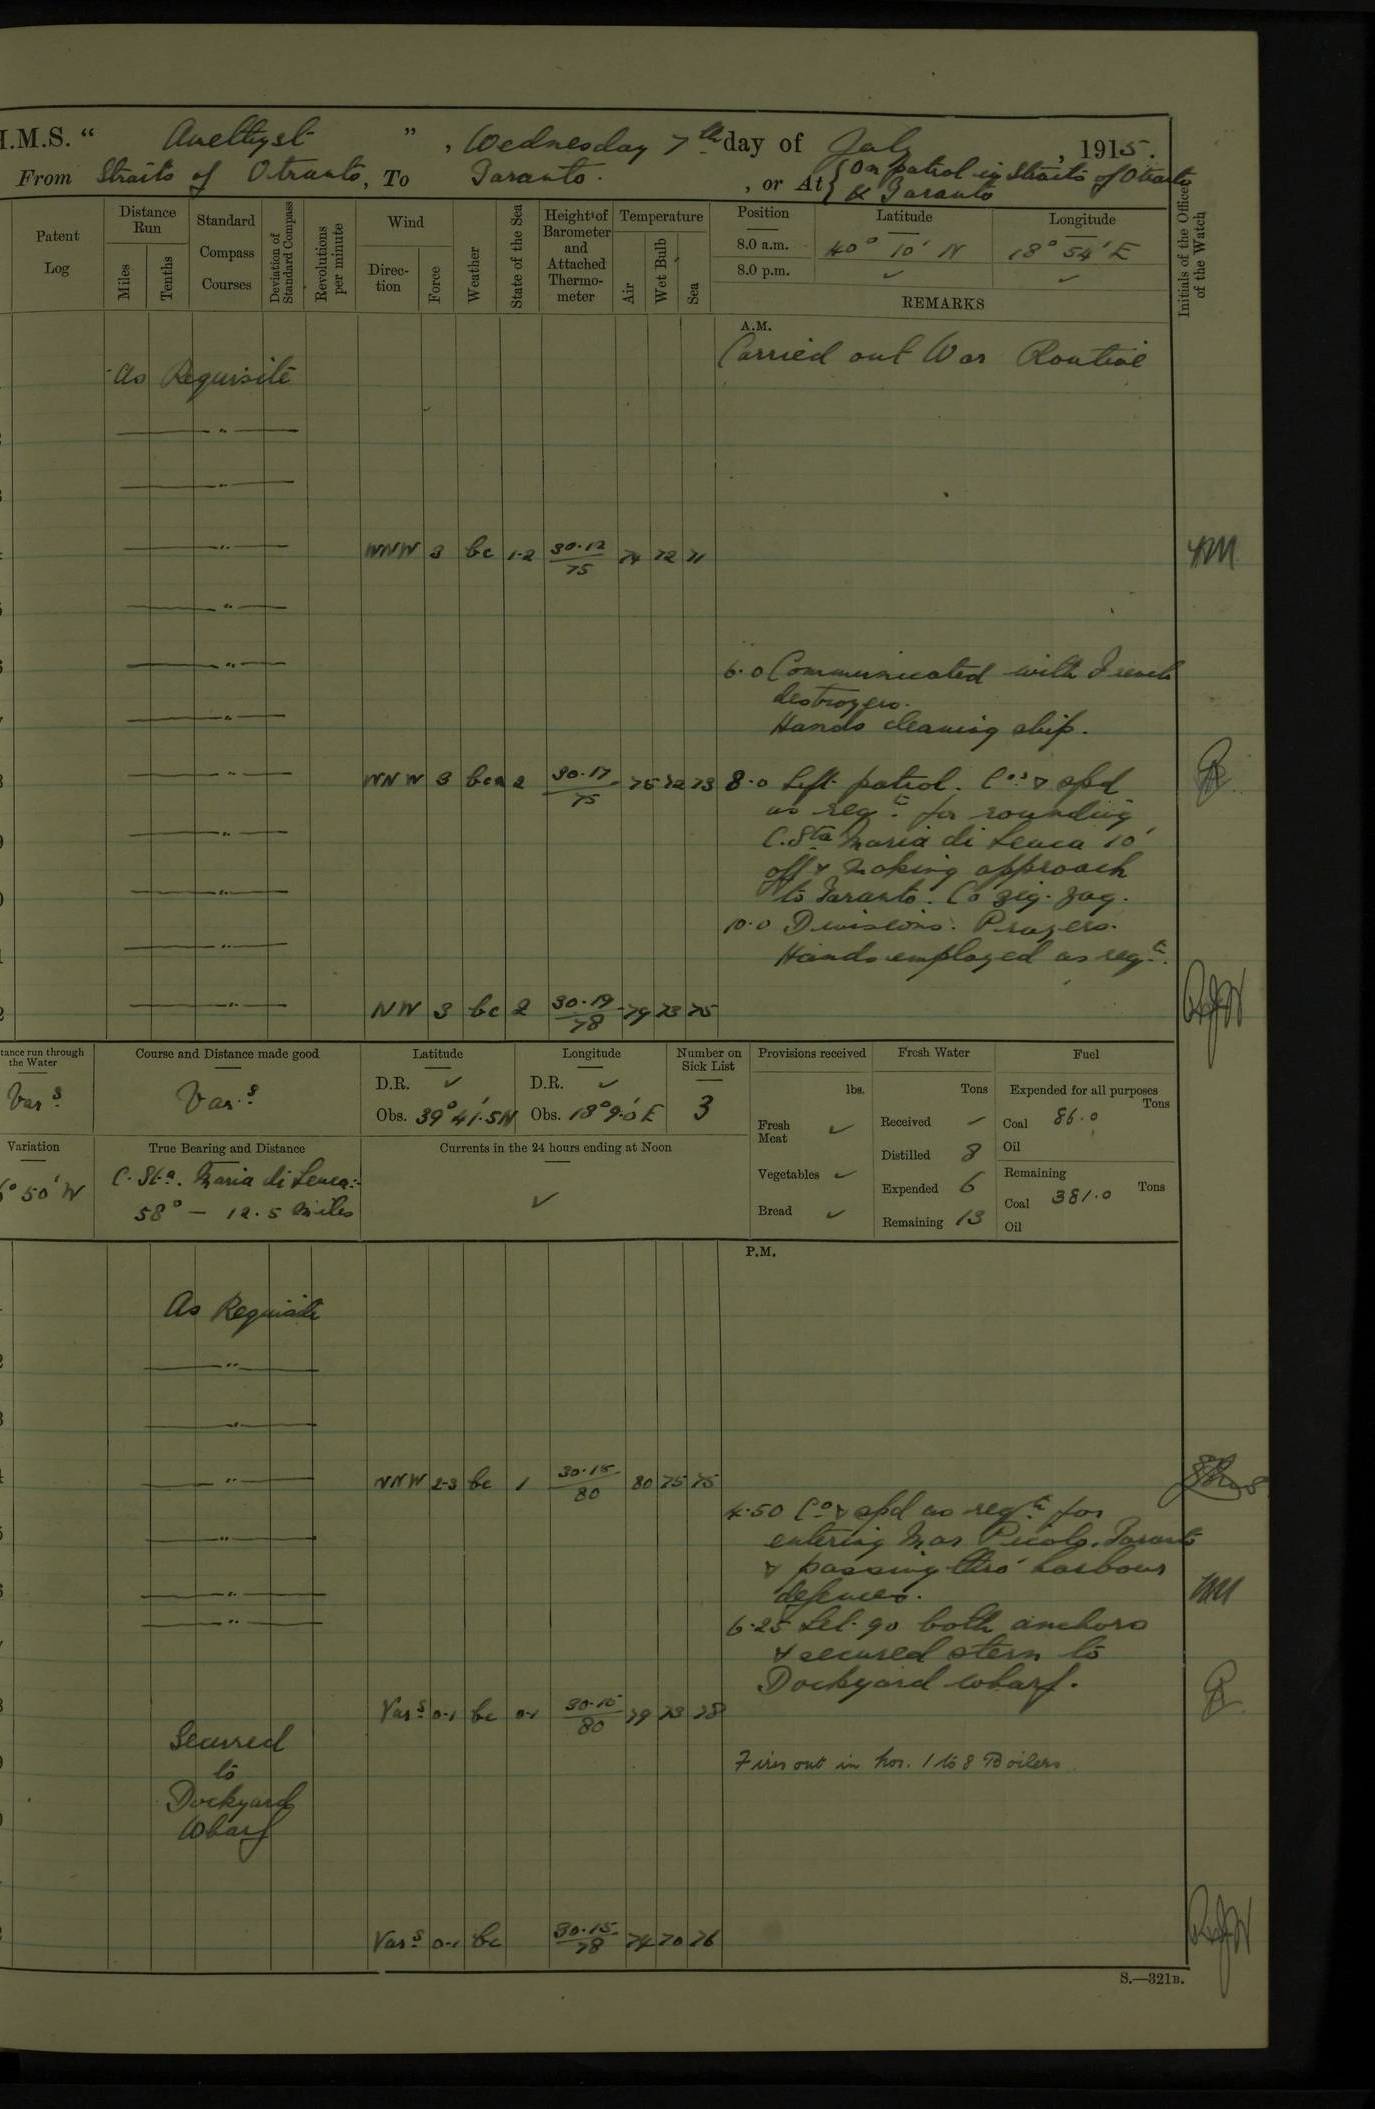
"Amethyst" left port on patrol again from 21st-23rd June in the company of three Italian destroyers, but they only encountered an Albanian sailing ship. On 5th July, she set out again, and passed her sister ship HMS "Topaze"[25] and arrived at Taranto on 7th July[26], where she was later joined by HMS "Dublin"[27] and HMS "Sapphire". On 28th July "Amethyst" went into dry dock for a refit[28] until the 17th August, but did not sail again until 15th September when she returned to Brindisi where she met HMS "Bristol", HMS "Sapphire" and HMS "Topaze"[29]. On 20th September she went on patrol and sighted an enemy submarine but was unable to attack before it submerged.
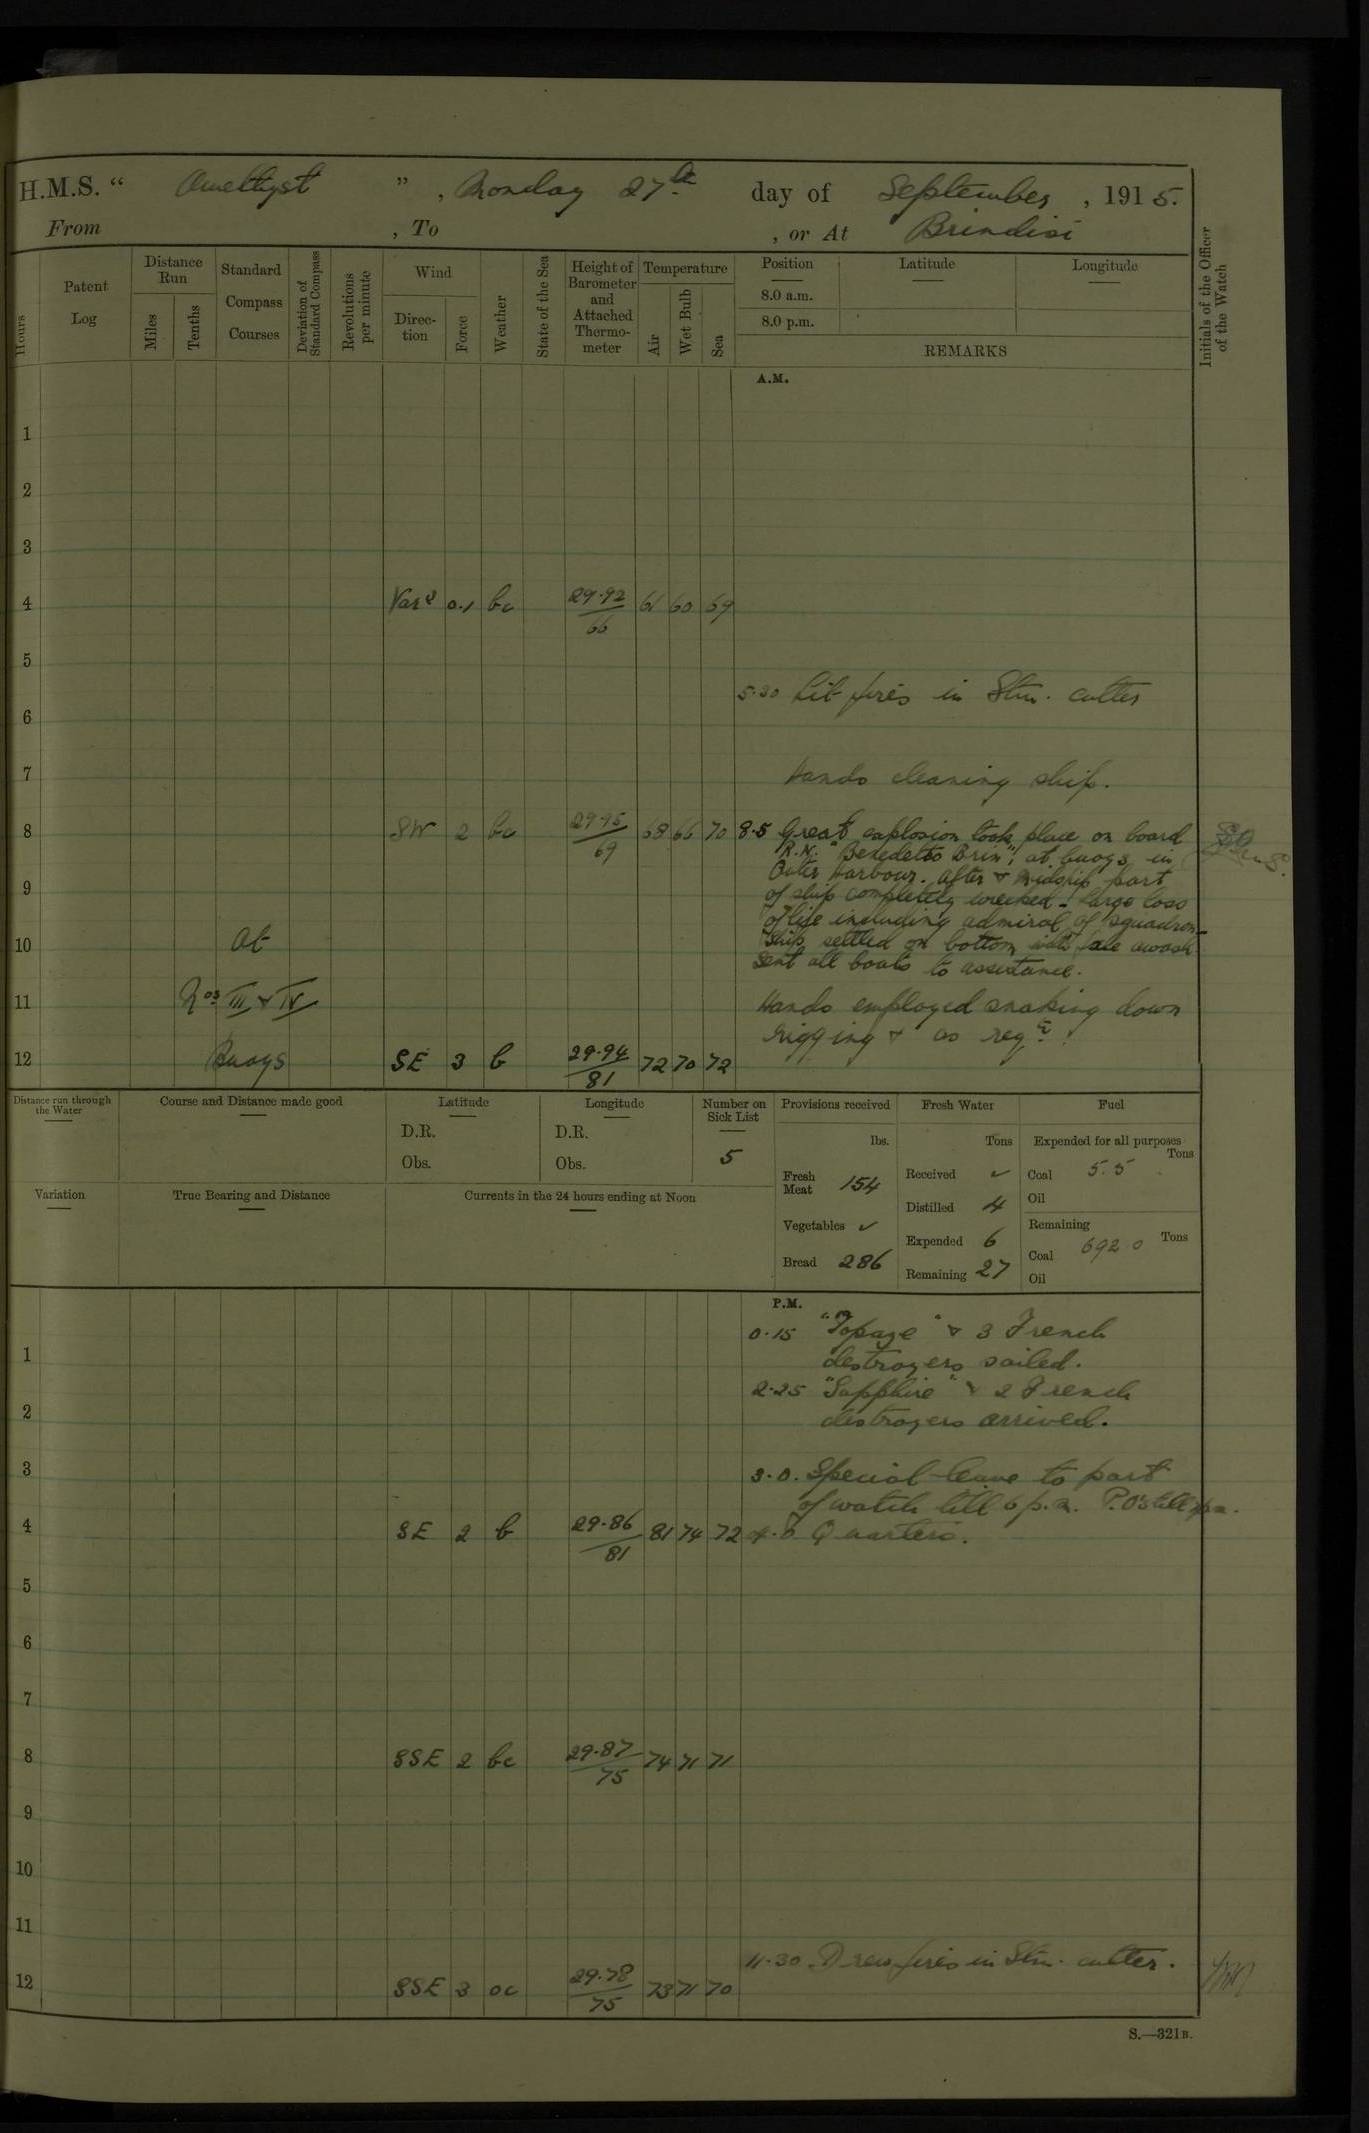
Tragedy struck in Brindisi on 27th September at 08:50 when a great explosion took place on board the Italian Royal Navy Battleship, Benedetto_Brin at buoys in the outer harbour. The aft and midships was completely wrecked. There was a large loss of life, including the rear admiral of squadron, as the ship settled on the bottom. "Amethyst" sent all its boats to assist[30]. The following day, colours were half masted and a funeral party went ashore of the funeral of Rear Admiral Rubin de Cevin, 2 officers and 20 of the men[31].
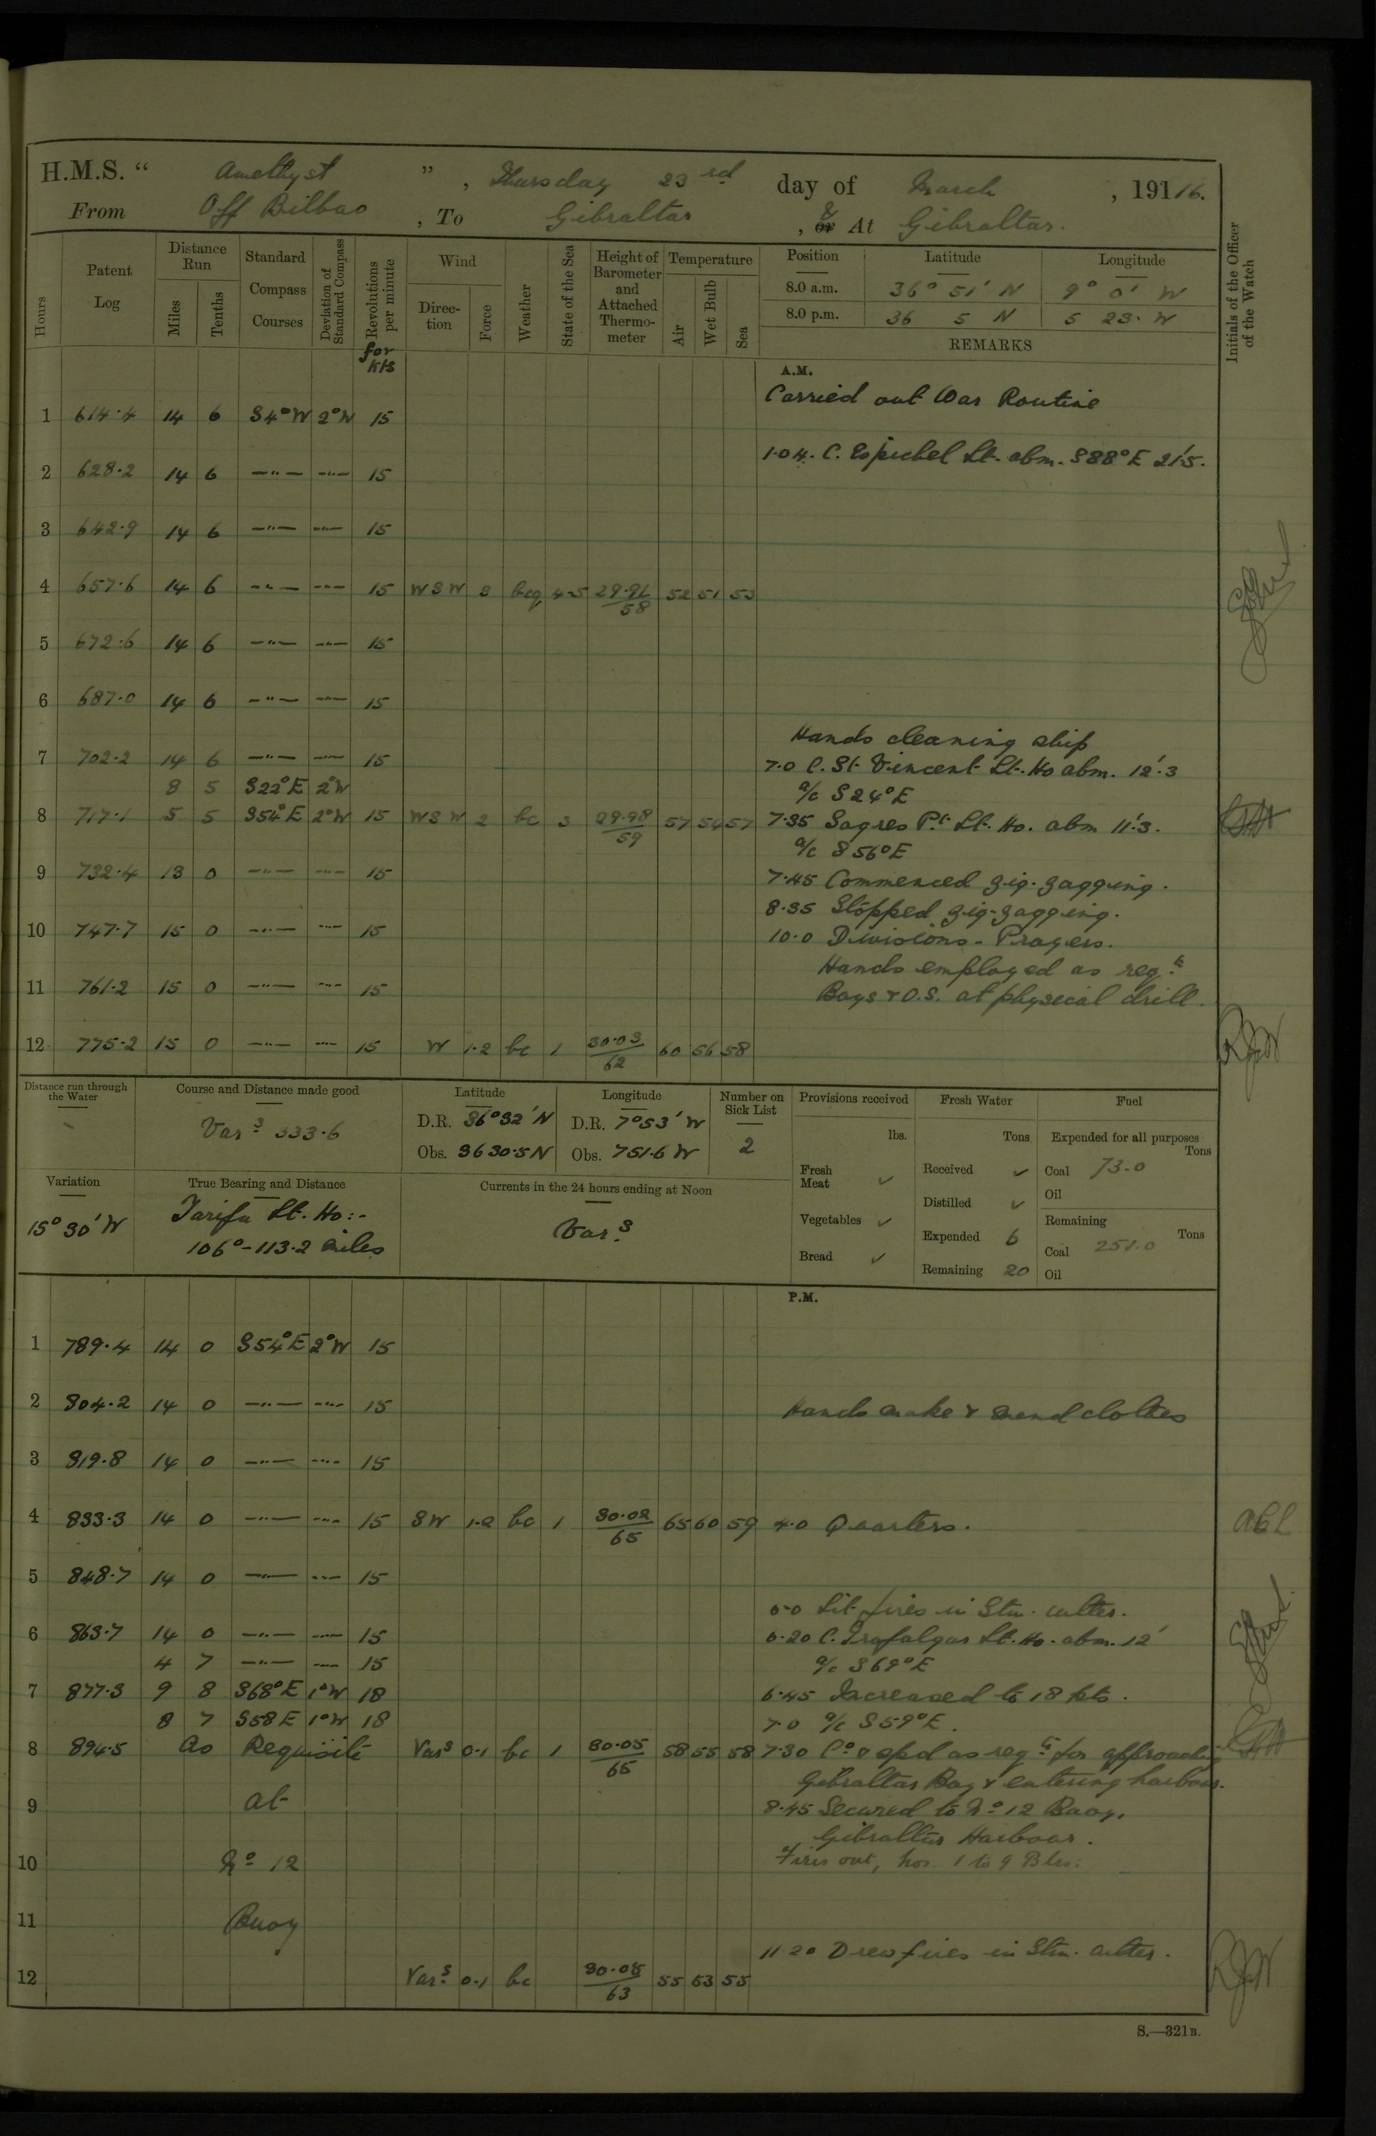
For much of the autumn of 1915, "Amethyst" stayed in port and acted a temporary depot ship for British submarines passing through on patrol. On 19th November, "Amethyst" finally left port and headed towards Malta and thence to Gibraltar, arriving on the 27th. Also in port were HMS Venerable, HMS Pelorus,HMS Sir Thomas Picton, HMS Narcissus and HMS Ophir. On the 1st December, "Amethyst" set out for Portsmouth, and then on 11th December she continued to Barrow-in-Furness where she moored up in Devonshire Dock right through until 14th March when she headed south to Plymouth, then Bilbao and arriving in Gibraltar on 23rd March[32].
South America
In 1916, command was handed over to Edwin Unwin VC, a decorated war hero who made his name in the Gallipoli campaign.
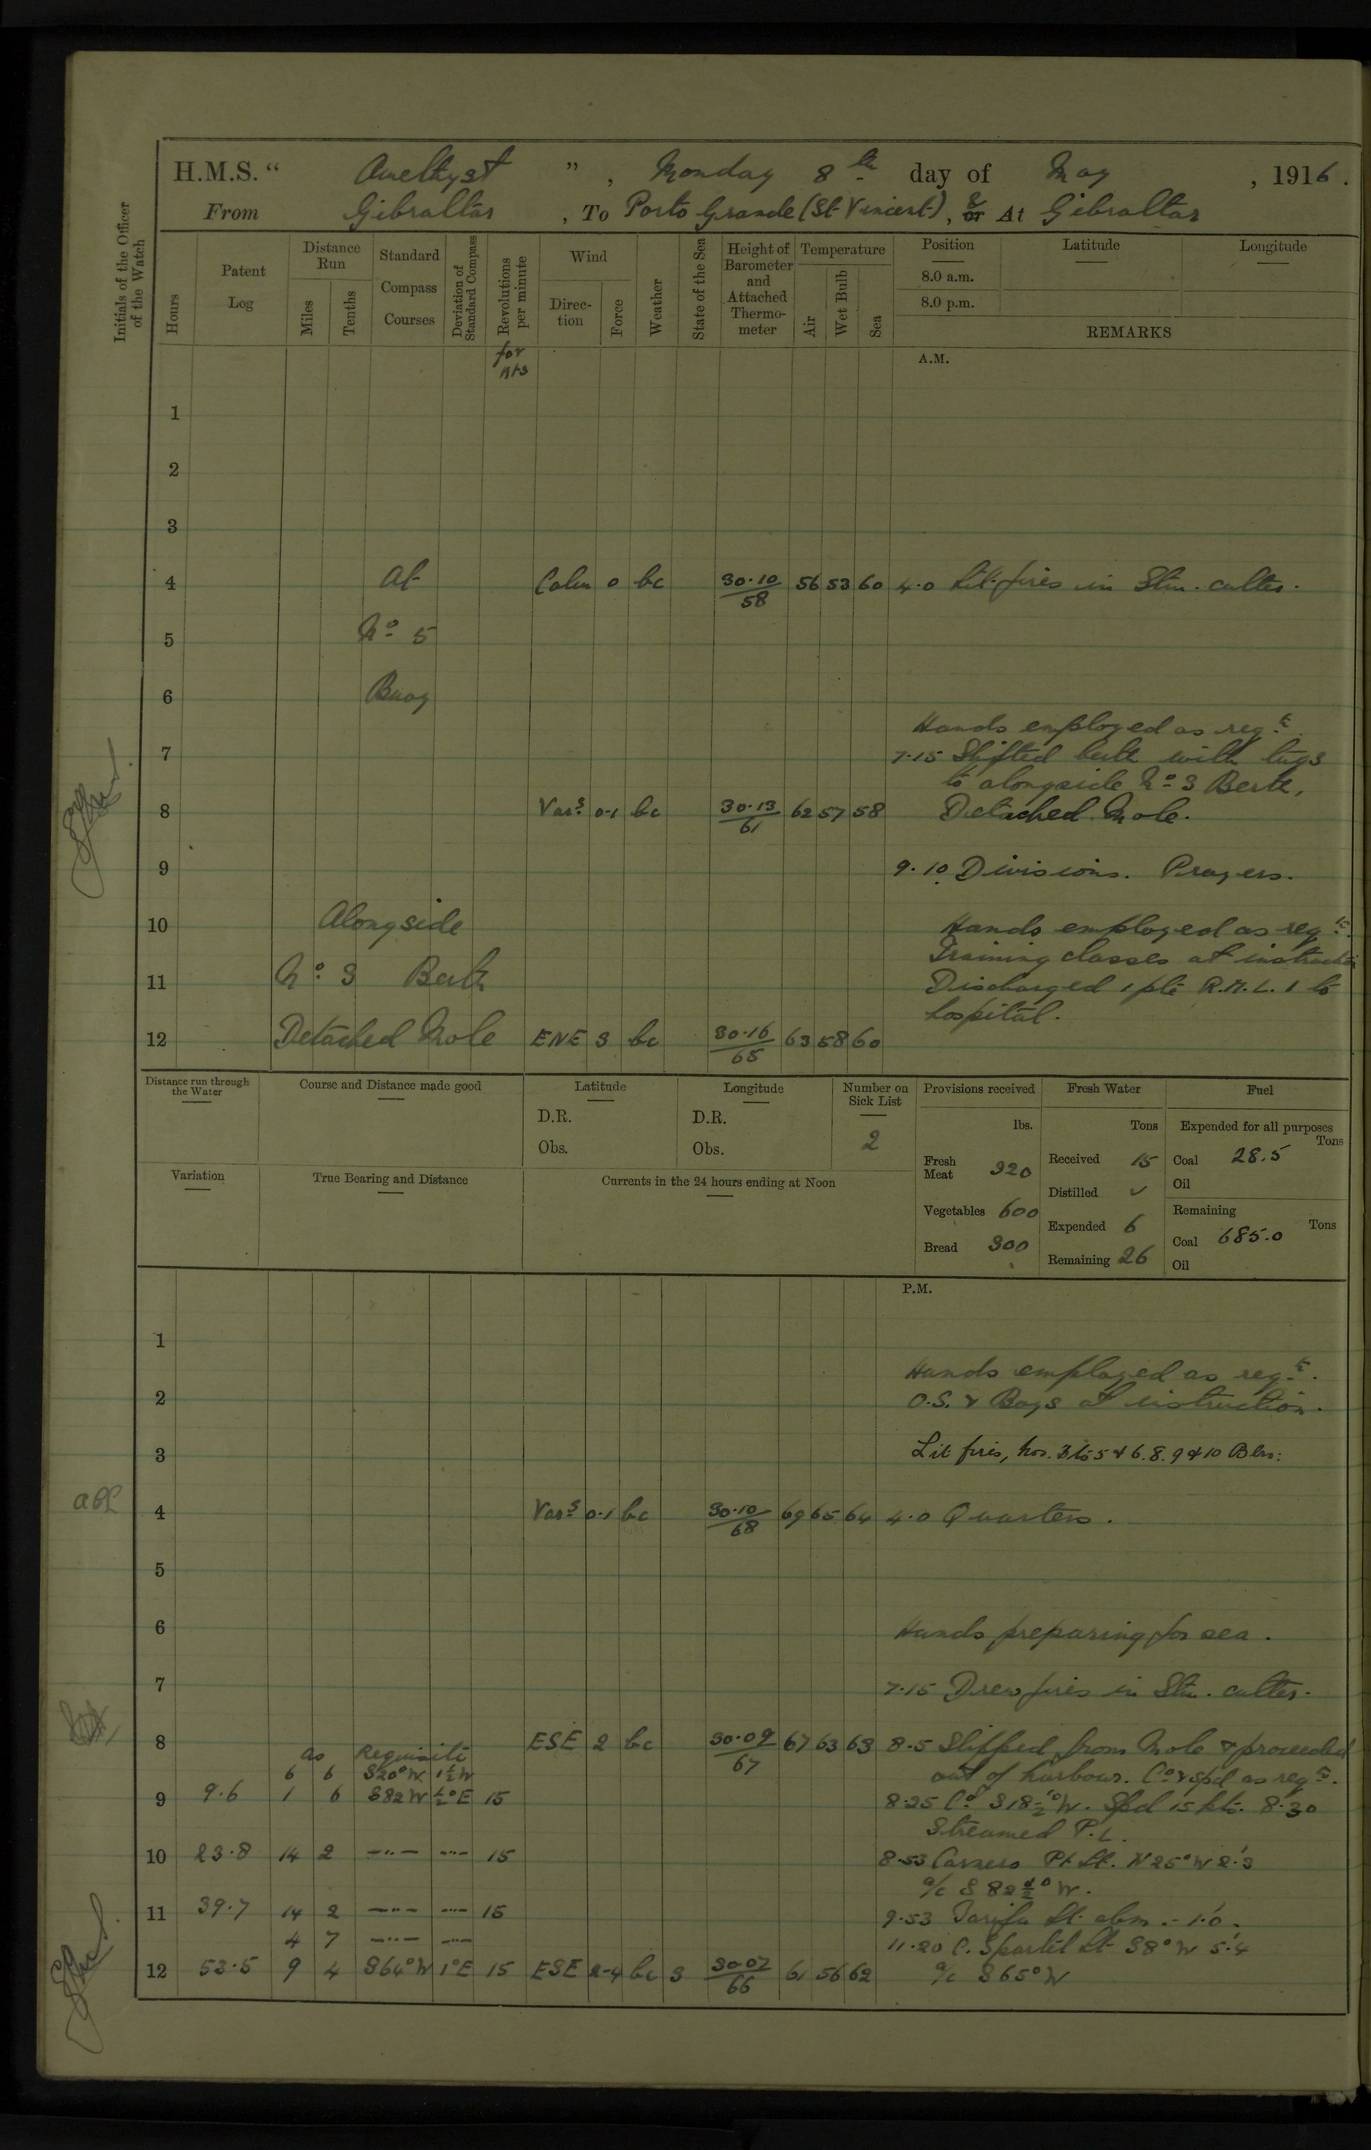
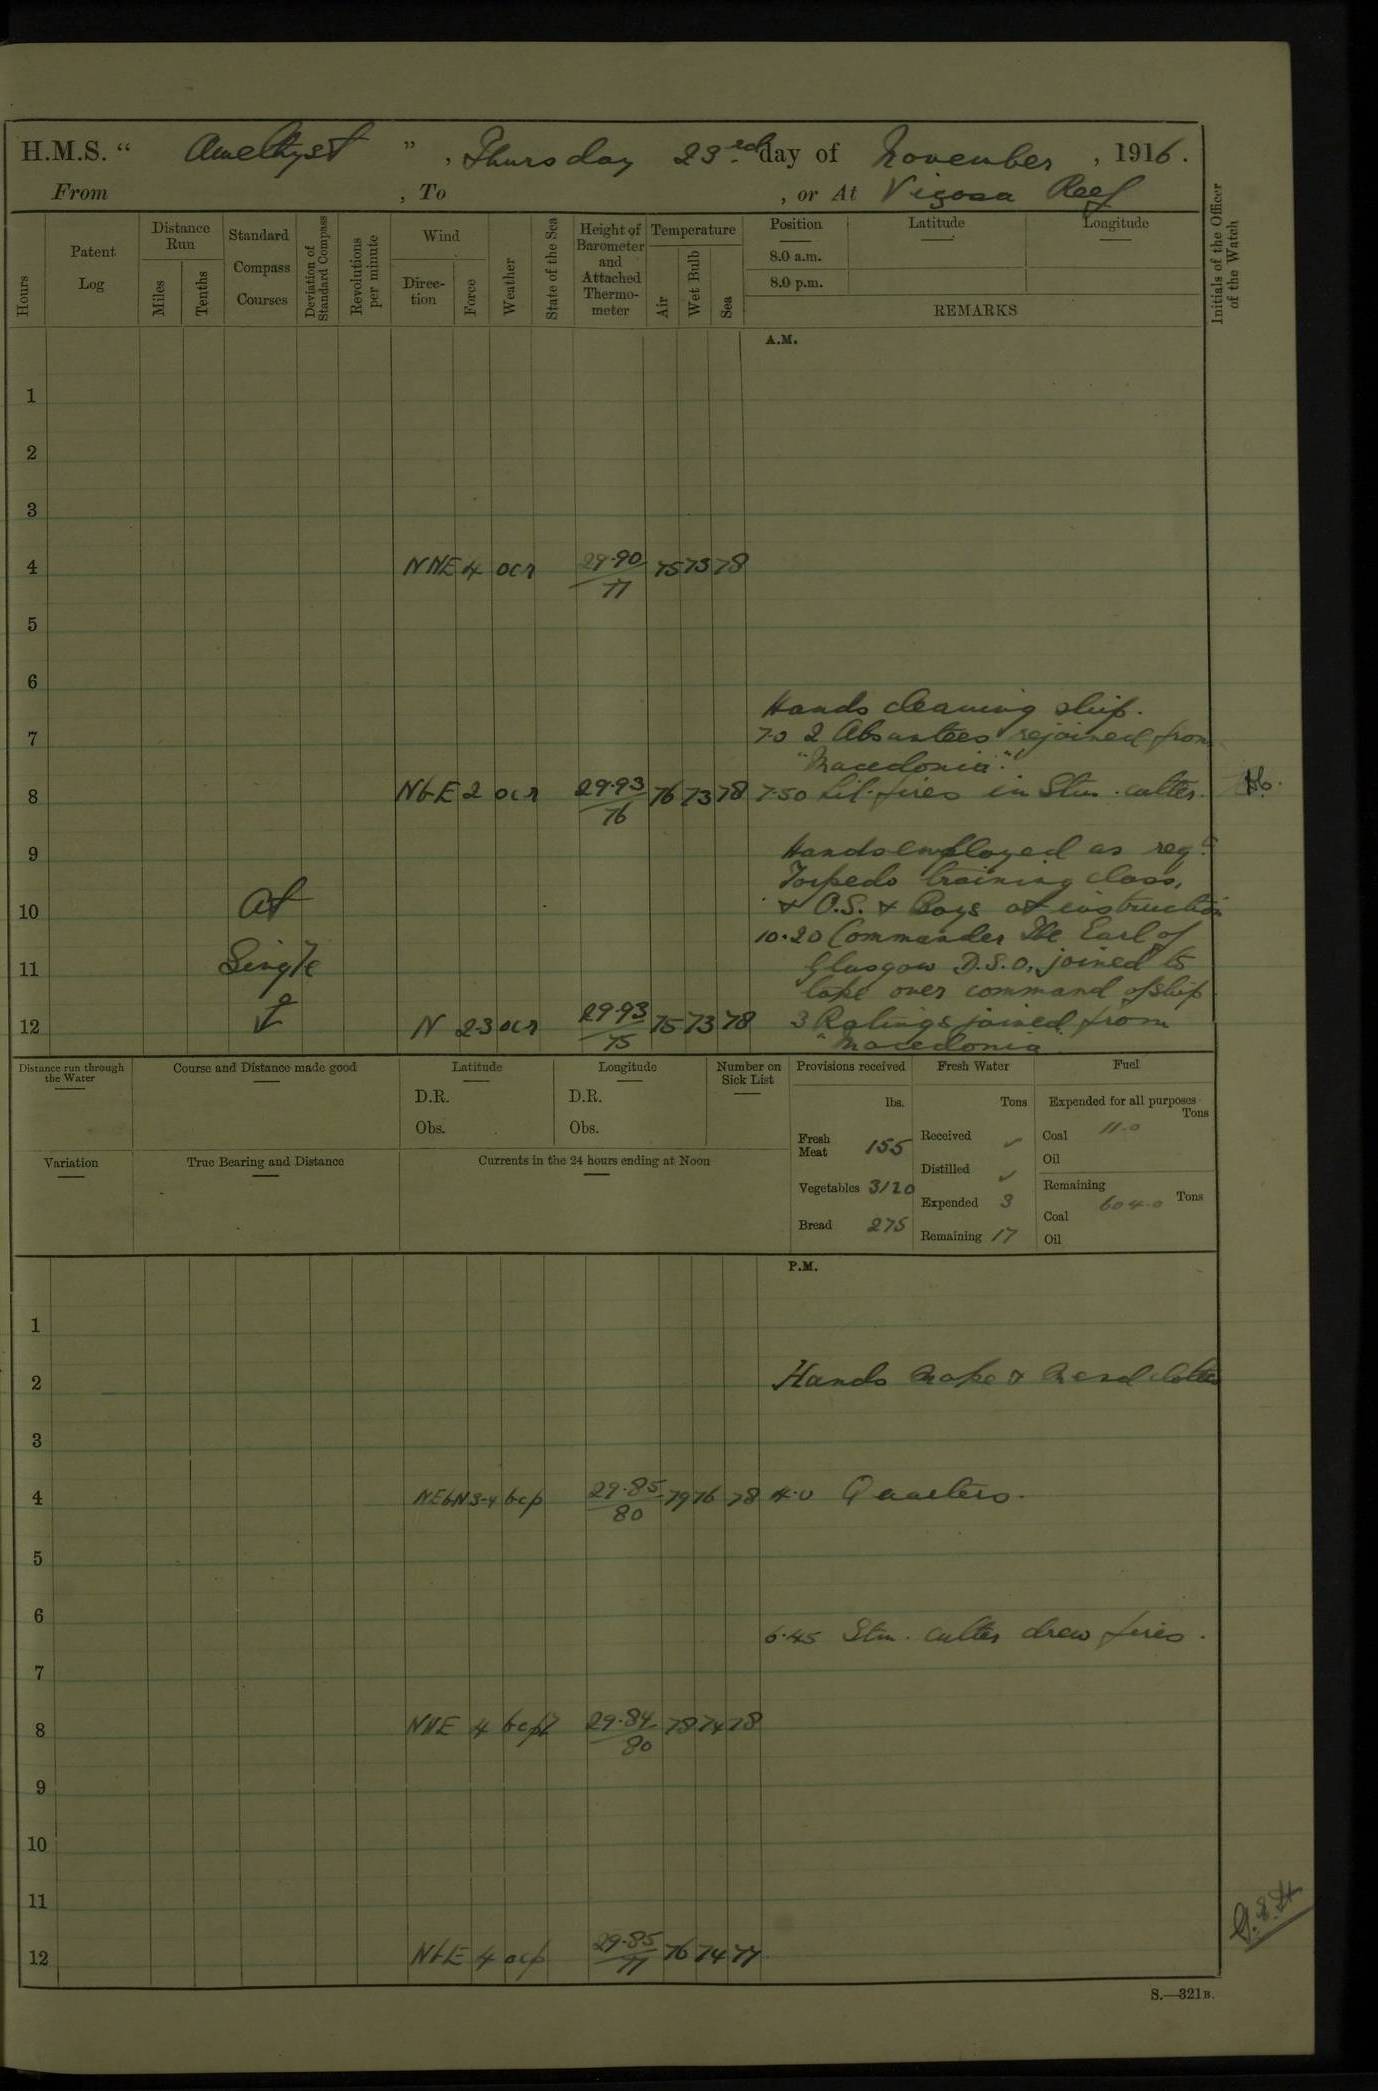
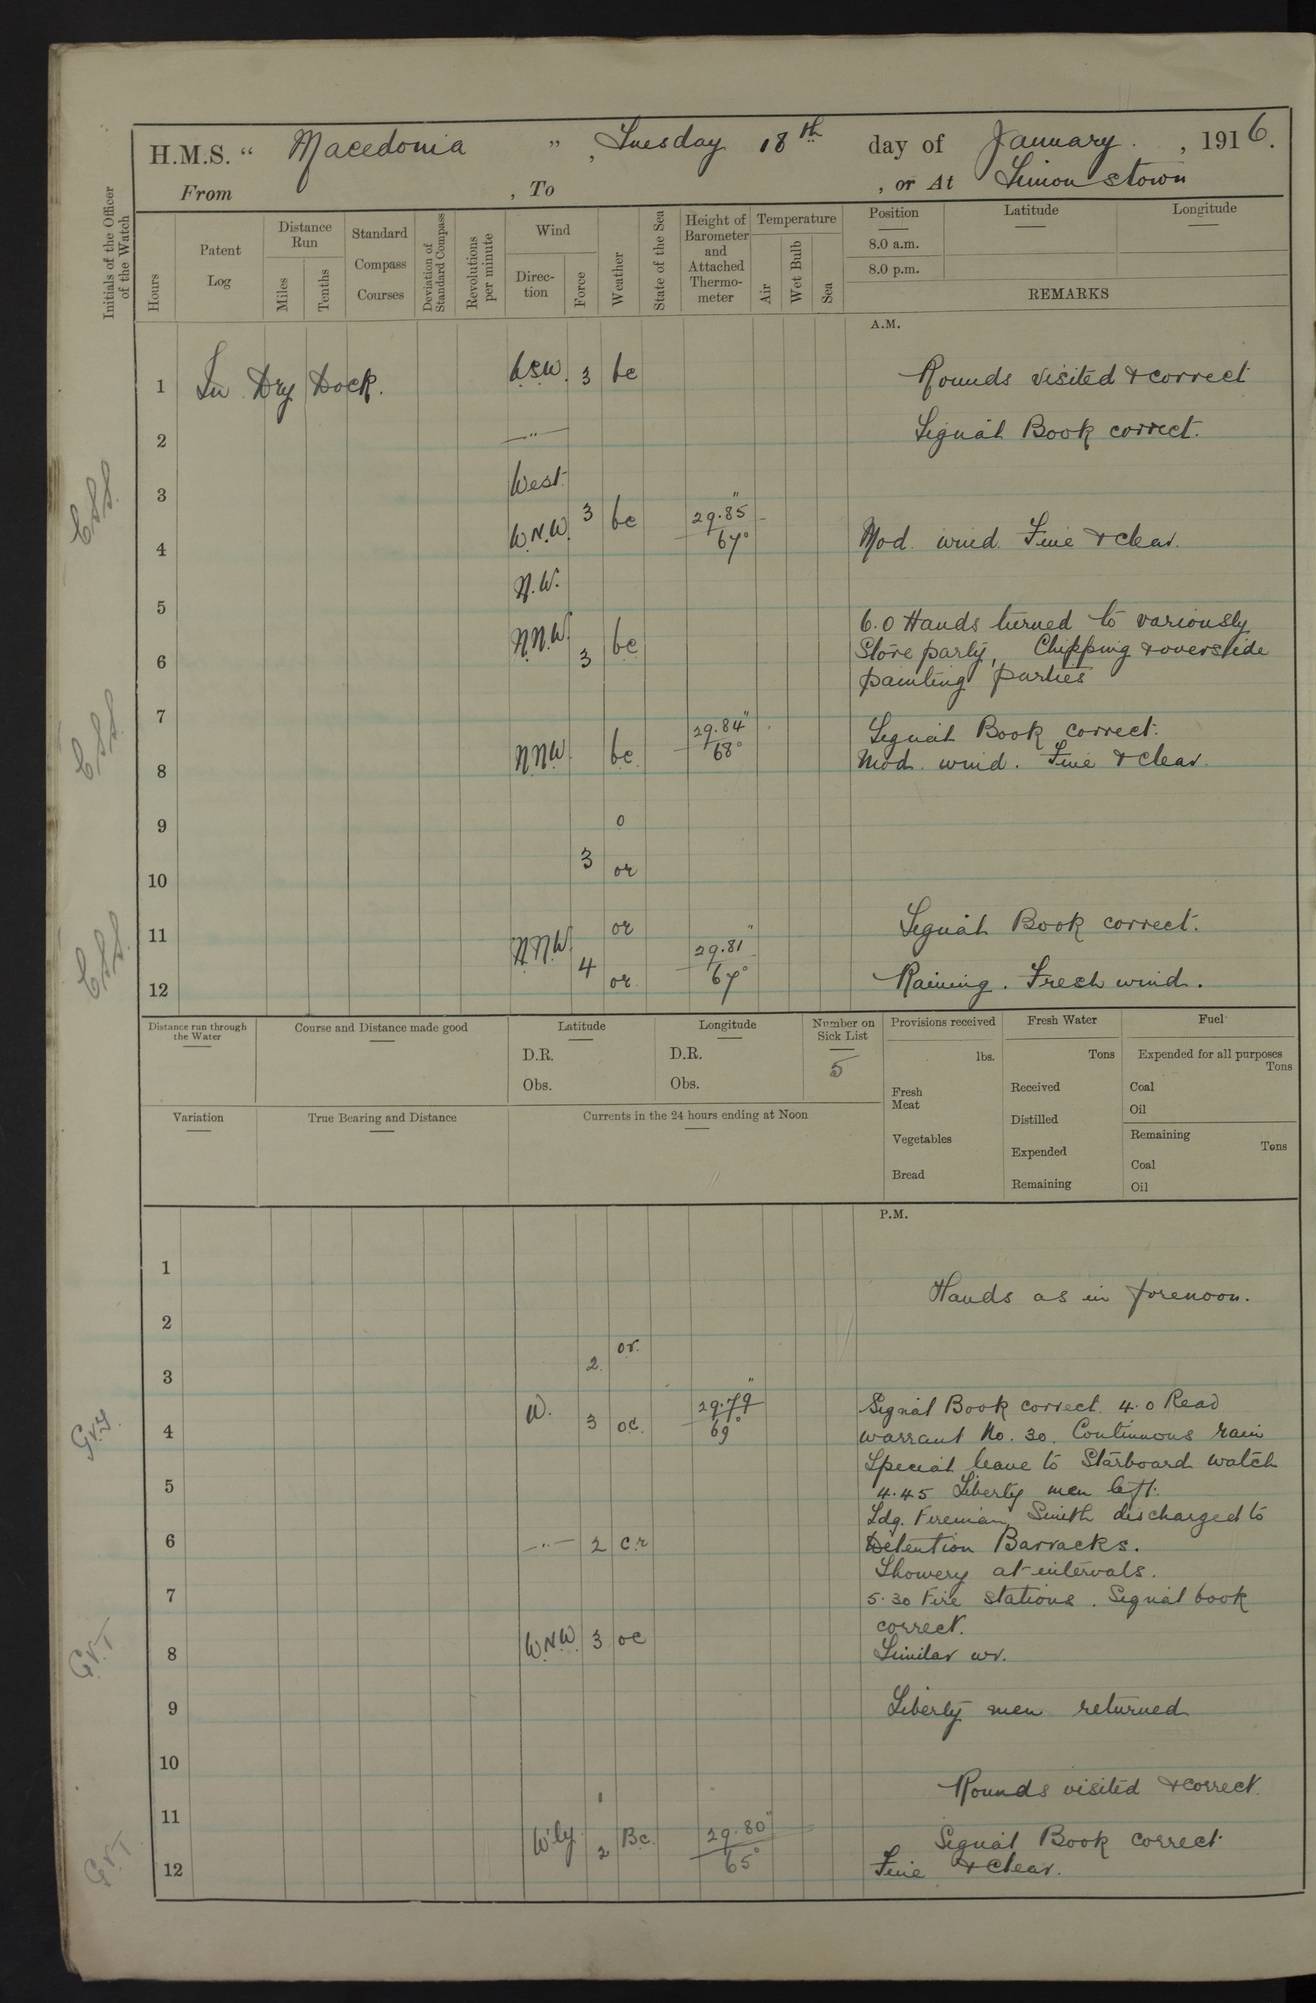
Amethyst was assigned to South America, and left Gibraltar on 8th May 1916[33], for the remainder of the war. On 23 November 1916, Commander, the Earl of Glasgow D.S.O. took over command whilst the ship was stationed at Viçosa Reef, off the coast of Brazil[34]. In December 1916, Amethyst was ordered to hunt down a German Raider, SMS Möwe, which had been reported to be lurking somewhere in the mid-Atlantic. Amethyst was supported by two armed merchant cruisers: HMS Macedonia, HMS Orama, and two colliers SS Minieh and SS Daleham.[35]. On 11th January 1917, collier Minieh failed to rendezvous with the rest of the squadron and a search was begun. Amethyst gave chase after an unknown steamer at 17:26, but gave up and returned to the squadron at 18:00.[36]. On the 13th, having thought they had seen a warship and a collier, the search was abandoned and the squadron returned to the Port of Bahia[37]. Minieh had in fact met SMS Möwe on the 9th January and been sunk[38]. Amethyst last saw her at 06:38 on the 9th and then reported seeing smoke at18:50[39], however, Orama reported this as a Swedish merchant ship[40]. Macedonia reported nothing untoward[41].
On 24th Jan, Amethyst was joined by Glasgow as they resumed the hunt for the enemy raider[42], but gave up on 30th January after meeting up with collier Headcliffe and RMS Edinburgh Castle, an armed merchant cruiser, for resupplies before and heading back to the Brazilian coast.
On 29th April 1917, Amethyst and Glasgow set out from Abrolhos Rocks to patrol for enemy raiders in the mid-Atlantic[43]. They were supported by Edinburgh Castle and SS Ooma a collier. After encountering only a few harmless vessels, Amethyst docked at Port of Bahia on 9th May, and then set out on patrol again, supported by a collier, Langholm until the 18th May[44]. Despite not encountering enemy vessels, on 15th June, 8 German prisoners of war were transferred to Amethyst from Macedonia[45] and then moved onto Glasgow]] on the 19th[46]. Life on board wasn't always about work, on arriving in Rio de Janeiro, on 23rd July 1917, a football party was sent ashore. Sadly, the score isn't recorded in the ship's log[47].
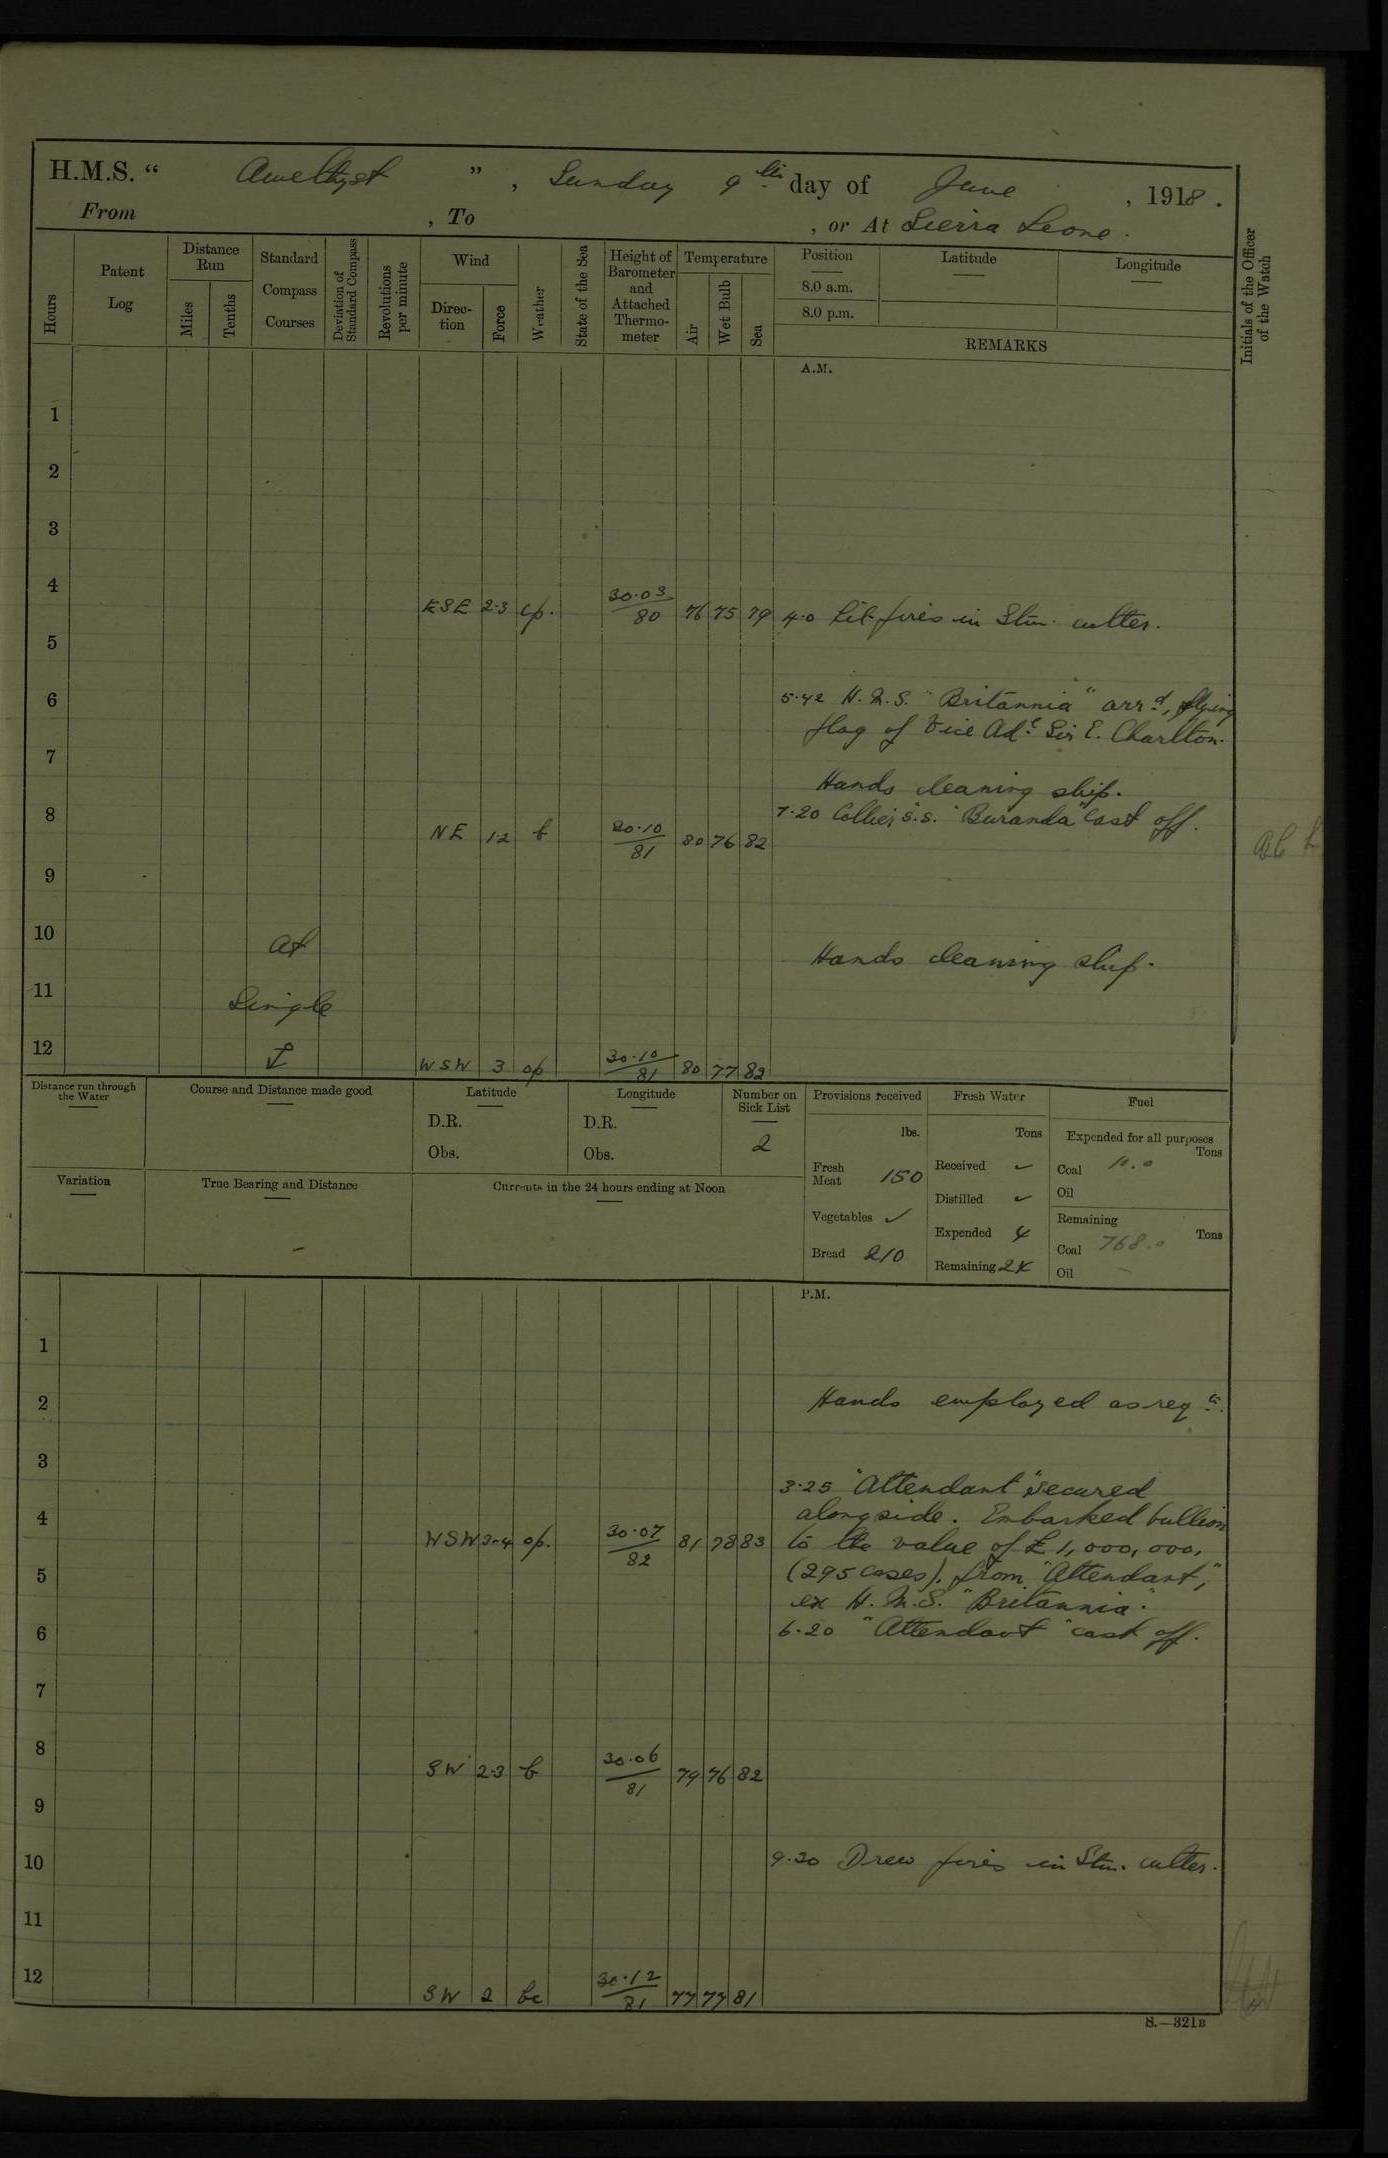
On 31st May 1918, Amethyst left Bahia, Brazil to return to Devonport.[48]. On the way home, she met HMS Britannia off the coast of Sierra Leone and 295 cases of gold bullion (worth an estimated £1 million)[49]. The following day (10th June 1918) Vice Admiral Sir Edward Charlton, the outgoing commander in chief of the Cape of Good Hope Station boarded and his flag was transferred from Britannia[50]. He left the ship when it arrived at Devonport on 25th June[51]. A less pleasant occurrence on the return home was a possible outbreak of the flu pandemic going on at the time. Prior to arriving in Gibraltar the ship's log records 4 crew sick but after arrival this grew rapidly, peaking a week later with 40 crew reported sick.
On 1st July 1918, Amethyst left Devonport for Barrow-in-Furness[52] where she went into dry dock for the remainder of the war.
Post World War I
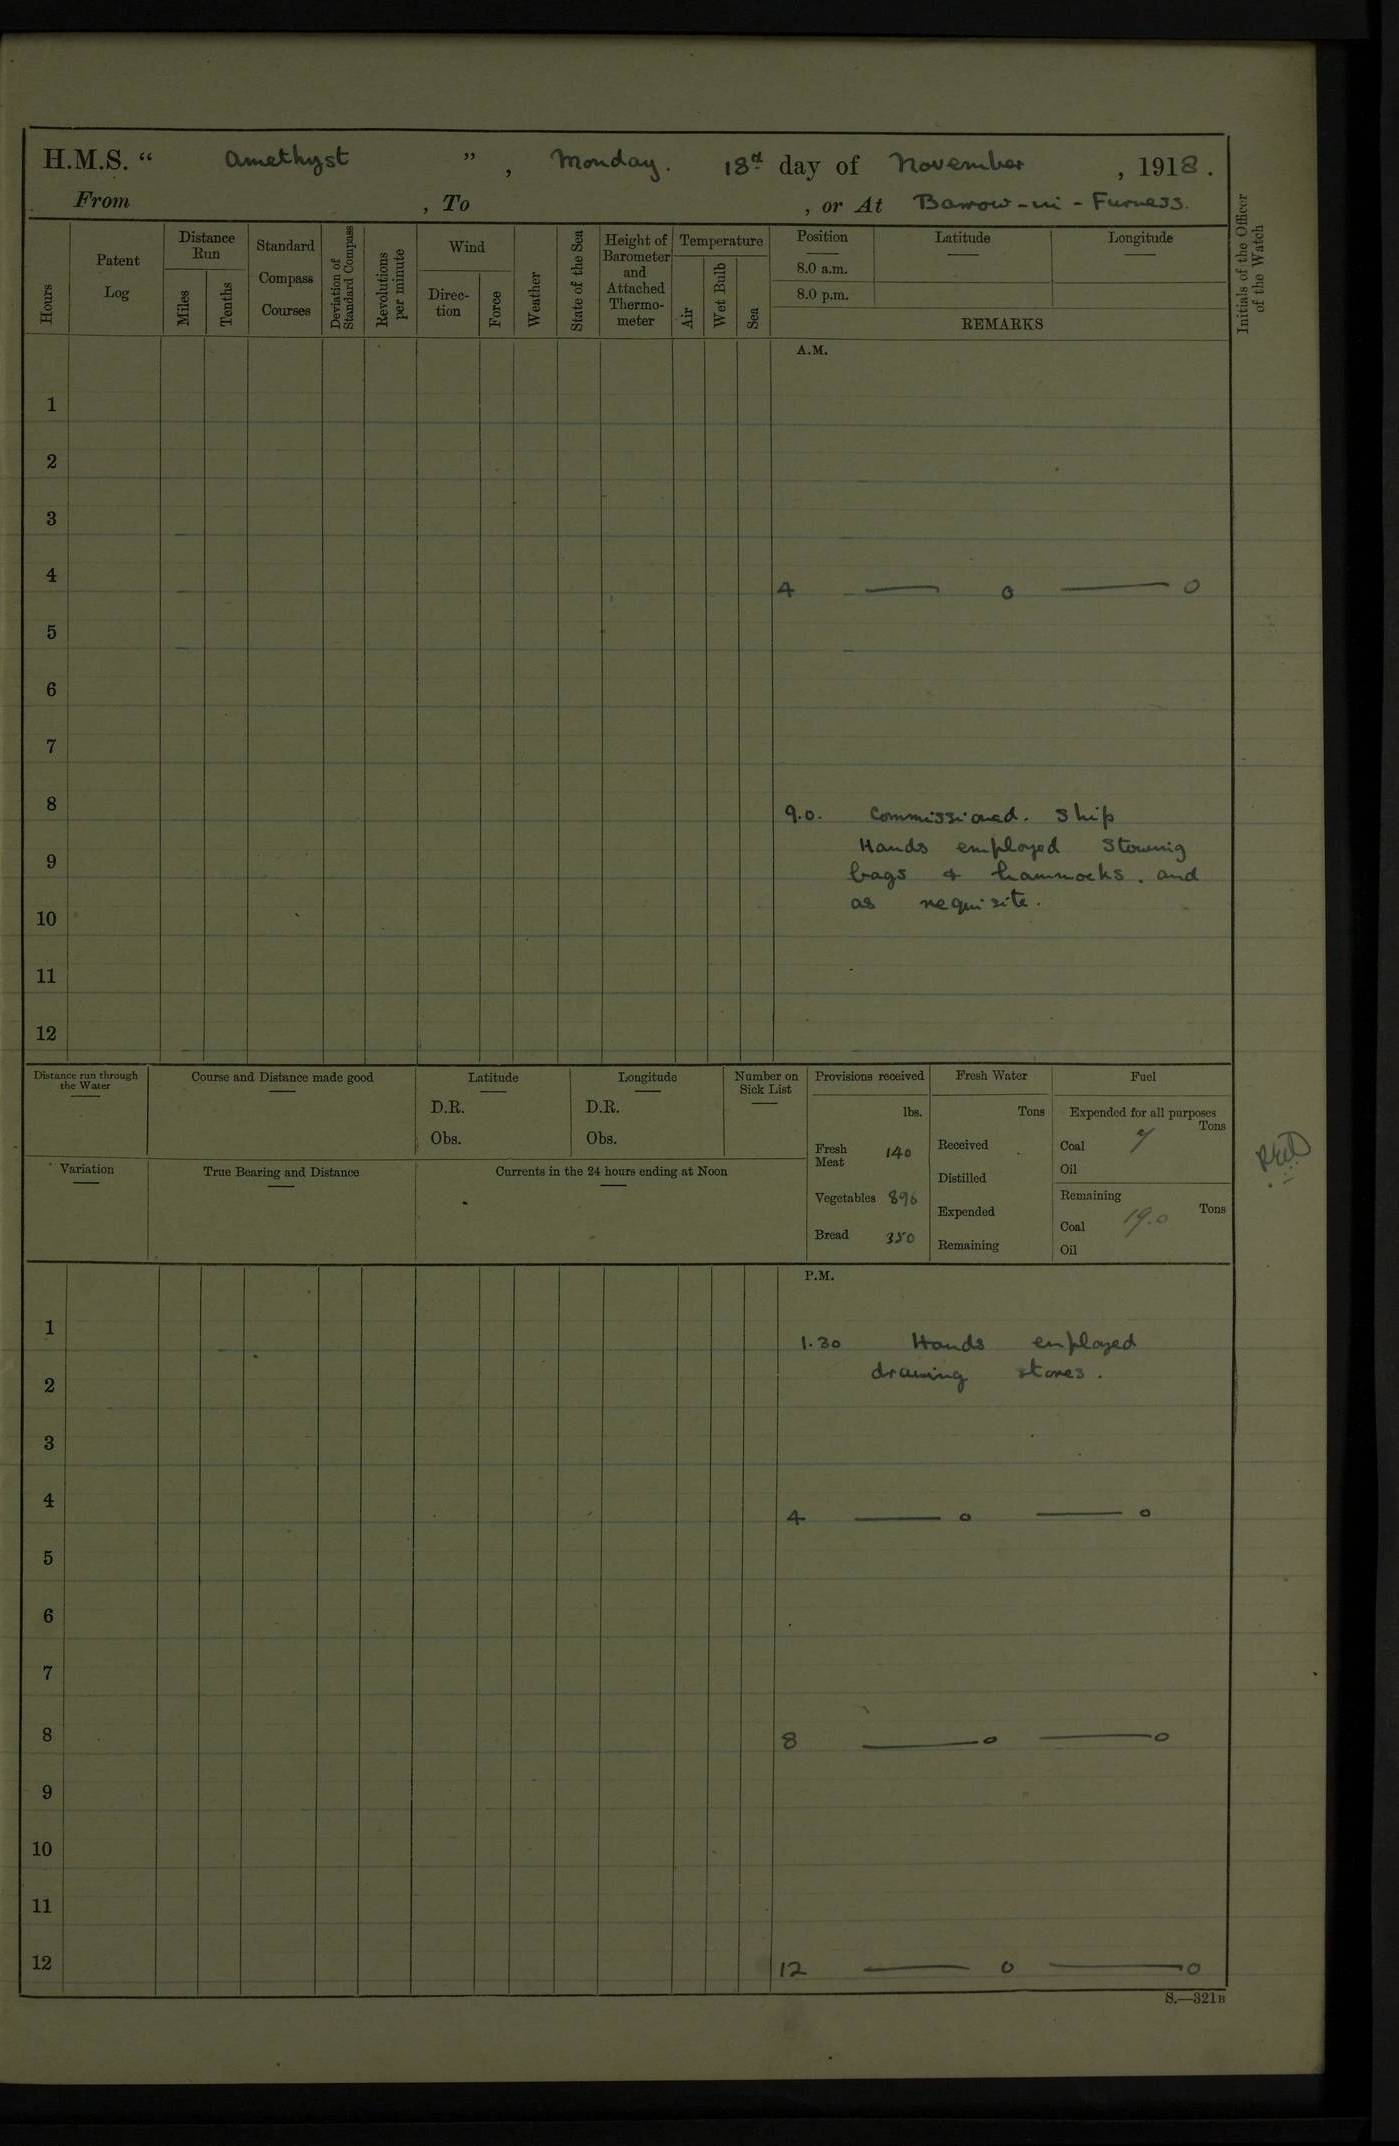
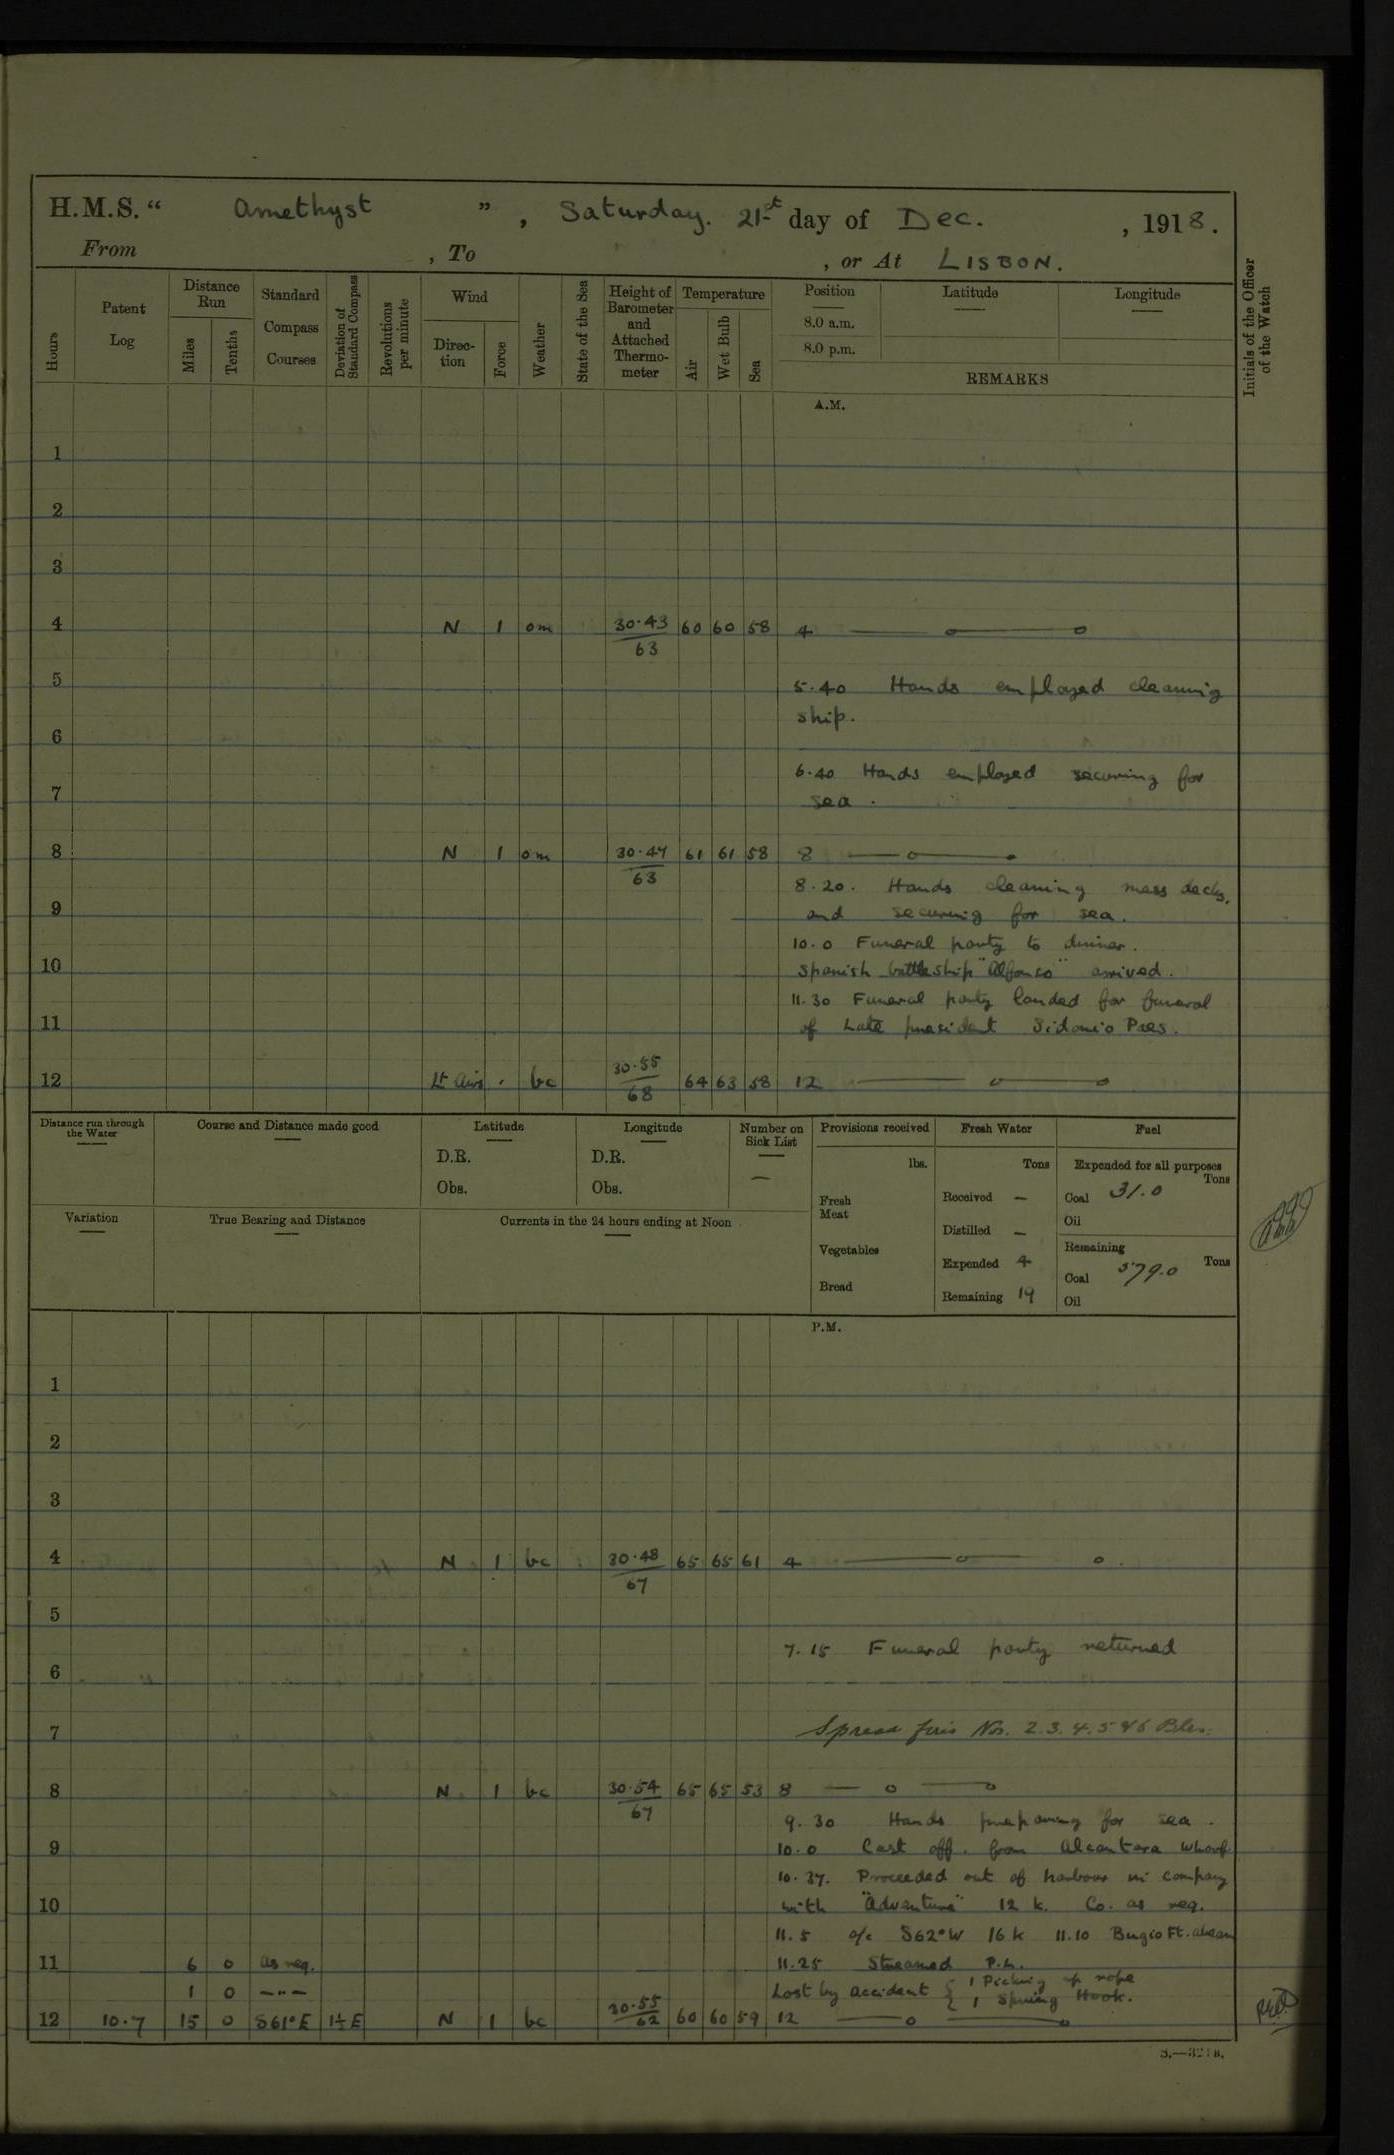
Amethyst was recommissioned on 20th November 1918[53]. On the way to Gibraltar she stopped in Lisbon for the funeral of the Late President of Portugal, Sidónio Pais on 21st December[54].
The end came for Amethyst on the 10th February 1919 when the last of her crew left her at Malta.[55]
She was sold for scrap in 1920.
References
- ^ Ship's log: http://oldweather.s3.amazonaws.com/ADM53-33548/ADM53-33548-005_1.jpg
- ^ Ship's log: http://oldweather.s3.amazonaws.com/ADM53-33548/ADM53-33548-007_0.jpg
- ^ Ship's log: http://oldweather.s3.amazonaws.com/ADM53-33548/ADM53-33548-007_1.jpg
- ^ Ship's log: http://oldweather.s3.amazonaws.com/ADM53-33548/ADM53-33548-008_0.jpg
- ^ Ship's log: http://oldweather.s3.amazonaws.com/ADM53-33548/ADM53-33548-008_1.jpg
- ^ Ship's log: http://oldweather.s3.amazonaws.com/ADM53-33548/ADM53-33548-009_0.jpg
- ^ Ship's log: http://oldweather.s3.amazonaws.com/ADM53-33548/ADM53-33548-009_1.jpg
- ^ Ship's log: http://oldweather.s3.amazonaws.com/ADM53-33548/ADM53-33548-010_0.jpg
- ^ Ship's log: http://oldweather.s3.amazonaws.com/ADM53-33548/ADM53-33548-010_1.jpg
- ^ Ship's log: http://oldweather.s3.amazonaws.com/ADM53-33548/ADM53-33548-012_0.jpg
- ^ Ship's log: http://oldweather.s3.amazonaws.com/ADM53-33548/ADM53-33548-014_0.jpg
- ^ Ship's log: http://oldweather.s3.amazonaws.com/ADM53-33548/ADM53-33548-035_0.jpg
- ^ Ship's log: http://oldweather.s3.amazonaws.com/ADM53-33548/ADM53-33548-035_1.jpg
- ^ Ship's log: http://oldweather.s3.amazonaws.com/ADM53-33548/ADM53-33548-036_0.jpg
- ^ Ship's log: http://oldweather.s3.amazonaws.com/ADM53-33548/ADM53-33548-041_1.jpg
- ^ Ship's log: http://oldweather.s3.amazonaws.com/ADM53-33548/ADM53-33548-042_1.jpg
- ^ Ship's log: http://oldweather.s3.amazonaws.com/ADM53-33548/ADM53-33548-049_0.jpg
- ^ Ship's log: http://oldweather.s3.amazonaws.com/ADM53-33548/ADM53-33548-050_1.jpg
- ^ Ship's log: http://oldweather.s3.amazonaws.com/ADM53-33548/ADM53-33548-054_1.jpg
- ^ Ship's log: http://oldweather.s3.amazonaws.com/ADM53-33548/ADM53-33548-058_1.jpg
- ^ Ship's log: http://oldweather.s3.amazonaws.com/ADM53-33548/ADM53-33548-059_0.jpg
- ^ Ship's log: http://oldweather.s3.amazonaws.com/ADM53-33548/ADM53-33548-059_1.jpg
- ^ Ship's log: http://oldweather.s3.amazonaws.com/ADM53-33548/ADM53-33548-062_1.jpg
- ^ Ship's log: http://oldweather.s3.amazonaws.com/ADM53-33548/ADM53-33548-076_1.jpg
- ^ Ship's log: http://oldweather.s3.amazonaws.com/ADM53-33548/ADM53-33548-077_1.jpg
- ^ Ship's log: http://oldweather.s3.amazonaws.com/ADM53-33548/ADM53-33548-085_0.jpg
- ^ Ship's log: http://oldweather.s3.amazonaws.com/ADM53-33548/ADM53-33548-088_0.jpg
- ^ Ship's log: http://oldweather.s3.amazonaws.com/ADM53-33548/ADM53-33548-122_0.jpg
- ^ Ship's lost: http://oldweather.s3.amazonaws.com/ADM53-33548/ADM53-33548-127_1.jpg
- ^ Ship's log: http://oldweather.s3.amazonaws.com/ADM53-33548/ADM53-33548-128_0.jpg
- ^ Ship's log: http://oldweather.s3.amazonaws.com/ADM53-33548/ADM53-33548-232_1.jpg
- ^ Ship's log: http://oldweather.s3.amazonaws.com/ADM53-33548/ADM53-33548-261_0.jpg
- ^ Ship's Log: http://oldweather.s3.amazonaws.com/ADM53-33549/ADM53-33549-052_1.jpg
- ^ Ship's log: http://oldweather.s3.amazonaws.com/ADM53-33549/ADM53-33549-079_1.jpg
- ^ Ship's log: http://oldweather.s3.amazonaws.com/ADM53-33549/ADM53-33549-081_1.jpg
- ^ Ship's log: http://oldweather.s3.amazonaws.com/ADM53-33549/ADM53-33549-082_1.jpg
- ^ Ship's log: http://ahoy.tk-jk.net/MaraudersWW1/Moewe.html
- ^ Ship's log: http://oldweather.s3.amazonaws.com/ADM53-33549/ADM53-33549-080_1.jpg
- ^ Orama ship's log: http://oldweather.s3.amazonaws.com/ADM_53-53475/ADM%2053-53475-007_1.jpg
- ^ HMS "Macedonia" log: http://oldweather.s3.amazonaws.com/ADM_53-47706/ADM%2053-47706-012_0.jpg
- ^ Ship's log: http://oldweather.s3.amazonaws.com/ADM53-33549/ADM53-33549-088_0.jpg
- ^ Ship's log: http://oldweather.s3.amazonaws.com/ADM53-33549/ADM53-33549-142_1.jpg, http://oldweather.s3.amazonaws.com/ADM53-33549/ADM53-33549-143_0.jpg
- ^ Ship's log: http://oldweather.s3.amazonaws.com/ADM53-33549/ADM53-33549-154_0.jpg
- ^ Ship's log: http://oldweather.s3.amazonaws.com/ADM53-33549/ADM53-33549-170_1.jpg
- ^ Ship's log: http://oldweather.s3.amazonaws.com/ADM53-33549/ADM53-33549-172_1.jpg
- ^ Ship's log: http://oldweather.s3.amazonaws.com/ADM53-33549/ADM53-33549-191_1.jpg
- ^ Ship's log: http://oldweather.s3.amazonaws.com/ADM53-33558/ADM53-33558-018_1.jpg
- ^ Ship's log: http://oldweather.s3.amazonaws.com/ADM53-33559/ADM53-33559-007_1.jpg
- ^ Ship's log: http://oldweather.s3.amazonaws.com/ADM53-33559/ADM53-33559-008_0.jpg
- ^ Ship's log: http://oldweather.s3.amazonaws.com/ADM53-33559/ADM53-33559-015_1.jpg
- ^ Ship's log: http://oldweather.s3.amazonaws.com/ADM53-33560/ADM53-33560-003_1.jpg
- ^ Ship's log: http://oldweather.s3.amazonaws.com/ADM53-33561/ADM53-33561-003_1.jpg
- ^ Ship's log: http://oldweather.s3.amazonaws.com/ADM53-33562/ADM53-33562-013_1.jpg
- ^ Ship's log: http://oldweather.s3.amazonaws.com/ADM53-33564/ADM53-33564-008_0.jpg