
BL 9.2-inch Mk IX – X naval gun
| Ordnance BL 9.2-inch gun Mk IX, Mk X | |
|---|---|
 Mk X gun facing north at Breakneck Battery on Gibraltar January 1942. | |
| Type | Naval gun Coast defence gun |
| Place of origin | United Kingdom |
| Service history | |
| In service | 1899–1956 |
| Used by | Royal Navy Royal Garrison Artillery, Royal Artillery from 1922 Royal Australian Artillery |
| Production history | |
| Manufacturer | Elswick Ordnance Company Vickers Beardmores[1] |
| Variants | Mk IX, Mk X, Mk XIV |
| Specifications | |
| Mass | Mk IX: 27 tons barrel & breech Mk X: 28 tons[2] |
| Barrel length | Mk IX: 35 ft 10 in (10.922 m) Mk X: 35 ft 9 in (10.897 m) bore (46.7 cal)[2] |
| Shell | 380 lb (170 kg)[2] |
| Calibre | 9.2-inch (233.7 mm) |
| Breech | Welin interrupted screw |
| Elevation | -20° to 15° (on Mark V Barbette mount) |
| Traverse | 360° (on Mark V Barbette mount) |
| Muzzle velocity | 2,643 ft/s (806 m/s)[3] |
| Maximum firing range | 29,200 yd (26,700 m)[4] |
The BL 9.2-inch Mk IX and Mk X guns[note 1] were British breech loading 9.2-inch (234 mm) guns of 46.7 calibre, in service from 1899 to the 1950s as naval and coast defence guns. They had possibly the longest, most varied and successful service history of any British heavy ordnance.
History
[edit]The Mk IX/X guns succeeded the BL 9.2-inch Mk VIII naval gun and increased the bore length from 40 to 46.7 calibres, increasing the muzzle velocity from 2,347 to 2,643 feet per second (715 to 806 m/s).
The Mk IX was designed as a coast defence gun, with a three-motion breech. Only fourteen were built and the Mk X, introduced in 1900 and incorporating a single-motion breech and changed rifling, succeeded them. As coastal artillery, the Mk X remained in service in Britain until 1956, and in Portugal until 1998. A total of 284 of the Mark X version were built by Vickers, of which 25 examples are known to survive today, all except one fitted on barbette mounts. The exception is a gun in Cape Town, South Africa on a disappearing mount. Another four guns manufactured by Elswick Ordnance Company survive, mounted in turrets.
The 9.2-inch Mk XI gun introduced in 1908 increased the bore length to 50 calibres in an attempt to increase the velocity still further, but proved unsuccessful in service and was phased out by 1920. The Mk X was hence the final Mark of 9.2-inch guns in widespread British Commonwealth service.
The BL 9.2 also affected the development of radar. Immediately before the Second World War, an army team developed a surface-scanning radar to detect enemy ships in the English Channel. By chance, in July 1939 one of these radars was being tested while the 9.2-inch battery at Brackenbury Battery outside Harwich was firing. The radar team noticed odd returns on their displays, and realised that these were due to the waterspouts caused by the shells exploding in the water creating a vertical surface off which the signals reflected. The use of radar to accurately spot the fall of shells was rapidly developed, and was widespread by the war's end.[5]
Design
[edit]

These were medium-velocity wire-wound guns with Welin interrupted screw breeches.
Naval service
[edit]Royal Navy
[edit]
Mark X guns were mounted on :
- Cressy-class armoured cruisers commissioned from 1901
- Drake-class armoured cruisers commissioned from 1902
- Duke of Edinburgh-class armoured cruisers commissioned from 1906
- Warrior-class armoured cruisers commissioned from 1907
- King Edward VII-class battleships commissioned from 1905
- M15-class monitors M15, M16, M17, M18 from 1915
Greek Navy
[edit]
Four guns of 45 calibres (414 inches or 10.5 metres) bore produced by Elswick Ordnance Company[6] were mounted in two twin turrets on the Greek cruiser Georgios Averof in 1910, instead of the 10-inch (25 cm) guns mounted on her sisters of the Pisa-class in Italian service. These were similar to the four Vickers 45-calibre export model guns used by Britain as railway artillery on the Western Front in World War I under the designation BL 9.2-inch gun Mark XIV. They fired the same 380-pound (170 kg) shell using the same 120-pound (54 kg) cordite charge as the British service Mk X gun, and it may be assumed that its performance was very similar.
British coastal deployments
[edit]

,_St._David%27s,_Bermuda_in_2011.jpg)

These were 'counter-bombardment' guns designed to defeat ships up to heavy cruisers armed with 8-inch (203 mm) guns. They were deployed in the fixed defences of major defended ports throughout the British Empire until the 1950s.
Their role was to defeat enemy ships attacking the ships in a port, including warships, alongside or at anchor in the port. However, where guns covered narrows, such as the Dover Straits, the Straits of Gibraltar, or the Narrows of Bermuda, they also had a wider role of engaging enemy ships passing through the straits. Normally deployed in batteries of two or three guns, a few major ports had several batteries positioned miles apart.
There were several marks of mountings and a battery had extensive underground facilities in addition to the guns visible in their individual gun-pits. Together with the 6-inch (152 mm) Mk VII, they provided the main heavy gun defence of the United Kingdom in World War I. Three Mk IX and 53 Mk X guns were in place as of April 1918.[7]
Mounting
[edit]The Mounting Barbette Mark V (the original mounting with Mark IX and X guns) gave a maximum elevation of 15 degrees, and maximum range of 21,000 yards (12 mi; 19 km). This and some modified to Mark VI (30 degrees and 29,500 yards [27 km]) were manually powered, the projectile and propelling charge were manually hoisted to loading level, the projectile manually loaded and rammed, and traverse and elevation were by handwheels. There was an elevated platform around the breech area for the gun detachment commander (No 1) and some detachment members, and a Gun shield to the front. The ordnance and mounting together weighed some 125 tons, they were well balanced and the handwheels needed very little effort to move the gun.[8]
However, the Mark VII mounting appeared in the 1930s and in 1939 a simplified version, Mark IX. Both were hydraulically powered and the platform was enclosed in a roofed gun house with three sides (and rear with Mark IX). The hydraulics meant that both projectile and propelling charge could be hoisted in a single load. With Mark VII and IX the maximum elevation was increased to 35 degrees to give a maximum range of 36,700 yards (33.6 km).[8]
Installation
[edit],_Rear_view,_St._David%27s,_Bermuda_in_2011.jpg)
Each gun mounting was installed on a central cast-steel pedestal in an open concrete gunpit 35 feet (11 m) in diameter and 11 feet (3.4 m) deep. The gun and mounting weighed 125 tons. A very narrow gauge rail track was embedded around the gunpit floor. A trolley was manhandled around the track between the two ammunition lifts (one for projectiles, one for propelling charges) and the rear of the gun (this position varied depending on where the gun was pointed).[8]
Below the gun pit were the separate ammunition bunkers for projectiles and shells with direct access to the ammunition lifts. These bunkers had an access road leading to them for ammunition re-supply. The guns presented only a very small target above ground level, guns and gunpits were camouflaged.
Organisation
[edit]Two or three guns comprised a named battery position with the guns manned by a Heavy Battery. For example, in 1940 Madalena and Bijemma batteries, both with 9.2 in Malta were manned by 6 Heavy Battery RA of 4 Heavy Regiment RA.[9]
Increasing ranges led to new centralised control arrangements. Fortress observation posts, equipped with rangefinders and directors were sited 4,000–10,000 yards (3.7–9.1 km) apart to give observation of all the sea area within range. They reported enemy ship bearings and distances to the 'fortress plotting centre' (FPC) where the attackers' positions and courses were plotted, converted to coordinates and then assigned as targets to batteries by the fire commander. The details were telephoned to batteries. The battery plotting room used a coordinate converter to turn the coordinates into bearings and elevations and transmitted them to the guns where pointers were matched by changing the guns’ traverse and elevations.[10]
The observers also reported fall of shot relative to the targets, the FPC used an encoder to convert these into a clock code, which the battery converted to its left/right, add/drop corrections. Various types of radars integrated into the fire command soon became widespread in WW2 and enabled effective night engagements.[10]
Deployments
[edit]The following table summarises the deployment of 9.2-inch guns.[11][12][13][14] It is possible that some 1914 guns were still the older marks. * indicates deployment was not completed until after 1940. A third Canadian battery was not completed until after World War II. The three guns in the Imperial fortress colony of Bermuda remained in battery through the Second World War (and are still in situ), but were not actively utilised. More were requested by the Governor and military General Officer Commanding (GOC), Lieutenant-General Sir Denis Kirwan Bernard, to be sent to the Bermuda Garrison during the war, but the build-up of United States Army Coast Artillery Corps batteries in Bermuda from 1941 as part of the United States armed forces' Bermuda Base Command rendered this unnecessary.
| Port | Country/territory | World War I | World War II |
|---|---|---|---|
| Dover | United Kingdom | 5 | 6 |
| Medway & Thames | United Kingdom | 4 | 2 |
| Harwich | United Kingdom | 0 | 2 |
| Tyne | United Kingdom | 2 | 1 |
| Tees & Hartlepool | United Kingdom | 0 | 1 |
| Humber | United Kingdom | 0 | 2 |
| Solent | United Kingdom | 14 | 6 |
| Portland | United Kingdom | 6 | 4 |
| Plymouth | United Kingdom | 8 | 6 |
| Milford Haven | United Kingdom | 4 | 2 |
| Forth | United Kingdom | 6 | 3 |
| Cromarty | United Kingdom | 3 | 0 |
| Lough Swilly | Ireland | 2 | 0 |
| Queenstown | Ireland | 4 | 0 |
| Berehaven | Ireland | 2 | 0 |
| Gibraltar | Gibraltar | 14 | 8 |
| Freetown | Sierra Leone | 2 | 2 |
| St. George's | Bermuda | 3 | 0 |
| Kingston | Jamaica | 1 | 0 |
| Valletta | Malta | 16 | 7 |
| Cape Town | South Africa | 2 | 7 |
| Simonstown | South Africa | 3 | 3 |
| Durban | South Africa | 0 | 3* |
| Port Louis | Mauritius | 2 | |
| Colombo | Sri Lanka | 4 | 2 |
| Trincomalee | Sri Lanka | 0 | 2 |
| Singapore | Singapore | 5 | 6 |
| Hong Kong | Hong Kong | 0 | 8 |
| Sydney – North Head | Australia | 0 | 2 |
| Sydney – Cape Banks | Australia | 0 | 2 |
| Port Kembla – Drummond Battery | Australia | 0 | 2 |
| Newcastle | Australia | 0 | 2 |
| Fremantle – Rottnest Island | Australia | 0 | 2 |
| Fremantle – Garden Island[15] | Australia | 0 | 2* |
| Darwin – East Battery | Australia | 0 | 2 |
| Halifax | Canada | 0 | 3* |
| Vancouver Island | Canada | 0 | 2* |
| Auckland – Stony Batter | New Zealand | 0 | 2* |
| Auckland – Whangaparaoa | New Zealand | 0 | 2* |
| Wellington – Wrights Hill Fortress | New Zealand | 0 | 2* |
Portugal has several surviving examples, with live firings as recently as 10 December 1998. The Portuguese refer to these guns as 23.4 cm guns, made by Vickers.[16]
Deployment on railway trucks
[edit]
In 1916 Elswick adapted a small number of Mk X guns, 2 Mk X variants originally intended for coast defence in Australia, and 4 45-calibre Vickers export guns (under the designation 9.2-inch gun Mk XIV) and mounted them on Mk 3 railway truck mountings for service on the Western Front in France and Belgium.[17]
Belgian coast
[edit]From 1917 several Mk X guns were deployed ashore on the section of the Belgian coast still held by the Allies, near Nieuport. They were part of the "Royal Naval siege guns" under the command of Admiral Sir Reginald Bacon, and were used for attacking German heavy gun batteries.
Other deployments
[edit]In the 1950s, Canadian guns were transferred under NATO auspices, to Portugal (Azores) and Turkey. It is unclear if any UK guns were also transferred.
Surviving examples
[edit]


Of the original ninety-eight 9.2-inch guns that did service worldwide during WWII, only twenty-nine remain. Of these twenty-nine, thirteen are in South Africa, the De Waal Battery No. 3 gun being the only gun in the world that has been restored as a moving display.
- Australia
- two 9.2-inch guns in the Oliver Hill Battery on Rottnest Island, off Fremantle, Western Australia. One, known as the H1 Gun, is restored; its companion H2 Gun is awaiting restoration
- Bermuda
- two Mk X guns on St. David's Island, on Mark V Barbette mounts, at St. David's Battery, overlooking the Narrows Channel that leads to St. George's Harbour, in Bermuda, as well as to the Royal Naval Dockyard, Bermuda, the Great Sound, Hamilton Harbour, and Murray's Anchorage. The battery forms part of Great Head Park, and there is public access.[18]
- one Mk X gun, previously at Fort Victoria on St. George's Island, since relocated to the Bermuda Maritime Museum at the Royal Naval Dockyard to make way for a hotel development,[19] and was emplaced (though not on its mount) for display in the Keep of the fortified dockyard in 2021, after eleven years of storage.[20]
- Gibraltar
- three 9.2-inch guns, one each at O'Hara's Battery,[21] Lord Airey's Battery[22] and Breakneck Battery
- Greece
- four 234 mm (9.2 in) guns, mounted in pairs in turrets on the Greek armoured cruiser Georgios Averof, now a museum ship in Faliron Bay near Athens.
- Portugal
- three 9.2-inch guns in good condition at Bateria da Raposa, Fonte da Telha, near Almada.
- one 9.2-inch gun of the original three of the Alcabideche battery, near Cascais, is partly preserved and accessible (but no entry) to pedestrians, in the centre roundabout of the staff and services parking at the back of the new Cascais Hospital. All of these guns were part of the post- World War II coastal defences of Portugal developed under the Barron Plan.
- South Africa
- three 9.2-inch guns in the Da Gama Battery on the Bluff, Durban
- one 9.2-inch gun in a unique disappearing mount in Fort Wynyard, Green Point near central Cape Town
- three 9.2-inch guns in the Apostle Battery above Llandudno, Cape Town
- three 9.2-inch guns in the De Waal Battery on Robben Island off Cape Town, one restored to full operation (see below)
- three 9.2-inch guns in the Scala Battery near Simon's Town, Cape Town
- United Kingdom
- one Mk X Gun at the Imperial War Museum Duxford ex Spur Battery, Gibraltar, transferred in Project Vitello
The official opening of the restored De Waal Battery on Robben Island, near Cape Town, South Africa, took place on 4 March 2011. The ceremony involved the unveiling and demonstration of the No 3 Gun of the battery of three Ordnance BL 9.2in Coast Defence Guns. The gun in question, an "Ordnance BL 9.2in Coast Defence Gun on a Mk VII mounting", has been restored as a moving display, with all the hydraulics working, enabling the turret to be fully traversed through 360°, the gun being elevated to 25° and the loading/ramming mechanism fully operational. Plans are afoot to restore the nearby Scala Battery at Simon's Town on the mainland as a static display.[23]
On Western Australia's Rottnest Island the H1 gun and associated underground resources are open to visitors as a static display.
On 10 December 1998 the Portuguese Coast Artillery fired the last shots from the 6th Battery of its "Fonte da Telha" 9.2-inch (23.4 cm) guns. The fate of the several Coast Artillery Regiment batteries and their weapons has not yet been determined, but it is known that it is the intent of the Army to conserve one for the future Museum of Coast Artillery.
British ammunition up to World War I
[edit]Shells up to and including World War I were not streamlined, typically having fairly blunt noses of 2 CRH.
-
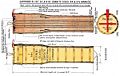 Early 51½ lb ½ charge cordite Mk I size 44 & 3¾ cartridge
 -
 1914 60 lb ½ charge cordite MD size 37 cartridge
 -
 Mk IV common pointed shell
 -
 MK VIIA armour-piercing shell, land use
 -
 Mk V capped armour-piercing shell, naval & land use


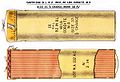
British World War II ammunition
[edit]World War II ammunition was somewhat streamlined, typically with ballistic caps of 4 or 5/10 CRH, but still retained square bases rather than the tapered type base typical of projectiles for more modern guns in use in World War II. "Super" charges of 124 pounds cordite SC 205 were available, which boosted the muzzle velocity to 2,872 feet per second (875 m/s)[6]
-
 Shell handling at North Head, Sydney, 1944. Note ballistic caps
 -
 Women munitions workers making cordite cartridges, World War II


See also
[edit]Weapons of comparable role, performance and era
[edit]- 10"/40 caliber gun Mark 3 - contemporary US Navy weapon
- 10-inch gun M1895 - contemporary US Army coast defence weapon
- Canon de 240 L Mle 1884 - contemporary French coast defence, siege, and railway weapon
Notes
[edit]- ^ Mk IX = Mark 9, Mk X = Mark 10. Britain used Roman numerals to denote Marks (models) of ordnance until after World War II. Hence these were the ninth and tenth models of BL 9.2-inch gun.
References
[edit]- ^ Official History of the Ministry of Munitions 1922, Volume X, Part 1, page 73. Facsimile reprint by Imperial War Museum and Naval & Military Press 2008. ISBN 1-84734-884-X
- ^ a b c Text Book of Gunnery 1902, Table XII Page 336
- ^ 380 lb shell, with 103 lb cordite Mk I propellant size 44 (originally) (Text Book of Gunnery 1902), or 120 lb cordite MD size 37 (1914 onwards). Hogg & Thurston 1972, page 165
- ^ Hogg & Thurston 1972, page 165
- ^ Wilcox, David (2014). Army Radar. Reveille Press. p. 130.
- ^ a b DiGiulian
- ^ Farndale 1988, page 404
- ^ a b c Hogg 1998 pg 168
- ^ Maurice-Jones 1957 pg 256
- ^ a b Maurice-Jones 1957 pg 215
- ^ Maurice-Jones, 1957, pgs 219–224, 229, 246, 251, 256
- ^ Nicholson, 1972, pgs 448, 453, 468, 480
- ^ Horner, 1995, pg 204
- ^ Northling, 1987, pg 343-348
- ^ "Scriven Battery site (WW2) - Wikimapia". wikimapia.org.
- ^ "OS ÚLTIMOS DISPAROS DO "MURO DO ATLÂNTICO" PORTUGUÊS - Operacional". www.operacional.pt.
- ^ Hogg & thurston 1972, page 168-169
- ^ Admin. "St David's Battery at Great Head Park Bermuda". www.bermuda-attractions.com.
- ^ "Gun on the move". The Royal Gazette. City of Hamilton, Pembroke, Bermuda. 20 August 2009. Archived from the original on 28 July 2014. Retrieved 30 March 2023.
- ^ "The Big Gun gets new home after renovation work". The Royal Gazette. City of Hamilton, Pembroke, Bermuda. 4 November 2021. Retrieved 30 March 2023.
- ^ "9.2-inch Mk X B.L. Gun". March 2000.
- ^ "9.2-inch Mk X B.L. Gun". March 2000.
- ^ von Zeil, Glenn (24 January 2012). "Robben Island diversifies rich historical attractions by adding restored World War II De Waal Battery". Department of Defence. Archived from the original on 3 December 2013. Retrieved 2 December 2013.
Bibliography
[edit]- Text Book of Gunnery, 1902. LONDON : PRINTED FOR HIS MAJESTY'S STATIONERY OFFICE, BY HARRISON AND SONS, ST. MARTIN'S LANE Archived 12 July 2012 at archive.today
- General Sir Martin Farndale, History of the Royal Regiment of Artillery : Forgotten Fronts and the Home Base 1914–18. London:The Royal Artillery Institution, 1988
- Hogg, I.V. (1998). Allied Artillery of World War Two. The Crowood Press, Malborough. ISBN 1-86126-165-9
- Hogg, I.V. and Thurston, L.F. (1972). British Artillery Weapons & Ammunition 1914–1918. Ian Allan, London. ISBN 0-7110-0381-5
- Maurice-Jones, Colonel K. W. (1957). The History of Coast Artillery in the British Army. Royal Artillery Institution, Woolwich.
- Horner, David M. (1995) The Gunners – A History of Australian Artillery. Allen & Unwin, St Leonards. ISBN 1-86373-917-3
- Nicholson, G.W.L. (1972). The Gunners of Canada The History of the Royal Regiment of Canadian Artillery, Volume II 1919–1967. McClelland and Stewart, Toronto.
- Nothling, C.J. (1987). Ultima Ratio Regum Artillery History of South Africa. Government Printer, Pretoria. ISBN 0-621-10217-2
- Tony DiGiulian, British 9.2"/47 (23.4 cm) Mark IX
- Tony DiGiulian, British 9.2"/47 (23.4 cm) Mark X
External links
[edit]- Handbook of the 9.2-inch B.L. guns, Marks ix. x and xv, (Land service), for 1902 at State Library of Victoria
- Handbook of the 9.2-inch B.L. guns, Marks ix. x and xv, (Land service), for 1906 at State Library of Victoria
- Handbook of the 9.2-in. B. L. guns, mark IX, "C" mark IX and marks X, Xv and X*, on carriages, garrison, barbette, marks IV, V, Va, Vb, VI, VIa land service, 1923 at State Library of Victoria
- Handbook of the 9 2-inch B.L. Guns, Mark ix "C" Mark ix, and Marks x,x, and x. 1912 at State Library of Victoria
- History of Apostle Battery
- Video of Gun 3 of the De Waal Battery on Robben Island
- More video of Gun 3 of the De Waal Battery on Robben Island