Bismarck-class battleship
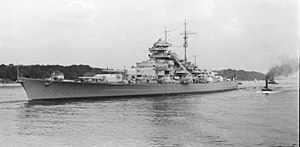 Bismarck in 1940
| |
| Class overview | |
|---|---|
| Name | Bismarck class battleship |
| Operators | Kriegsmarine |
| Preceded by | Scharnhorst-class |
| Succeeded by | H class battleship (planned) |
| Completed | Bismarck, Tirpitz |
| Lost | Bismarck, Tirpitz |
| General characteristics | |
| Type | Battleship |
| Displacement | *list error: list item missing markup (help)
41,700 t (41,000 long tons; 46,000 short tons) standard
42,900 t (42,200 long tons; 47,300 short tons) standard |
| Length | list error: <br /> list (help) 241.6 m (793 ft) waterline 251 m (823 ft) overall |
| Beam | 36 m (118 ft) |
| Draft | 9.3 m (31 ft) standard[Note 2] |
| Propulsion | list error: <br /> list (help) 12 Wagner superheated boilers; 3 geared turbines; 3 three-blade propellers
150,170 shp (111.98 MW)
|
| Speed | 30 knots (35 mph; 56 km/h) |
| Range | *list error: list item missing markup (help)
8,525 nmi (15,788 km; 9,810 mi) at 19 kn (35 km/h; 22 mph)
|
| Complement | list error: <br /> list (help) 103 officers 1,962 enlisted men[Note 1] |
| Armament | list error: <br /> list (help) 8 × 38 cm (15 in) SK C/34 (4 × 2) 12 × 15 cm (5.9 in) (6 × 2) 16 × 10.5 cm (4.1 in) SK C/33 (8 × 2) 16 × 3.7 cm (1.5 in) SK C/30 (8 × 2) 20 × 2 cm (0.79 in) FlaK 30 (20 × 1) |
| Aircraft carried | 4 × Arado Ar 196 |
| Aviation facilities | 1 double-ended catapult |
The Bismarck class was a pair of battleships built by the German Kriegsmarine shortly before the outbreak of World War II. The ships were the largest warships built by the German Navy and the heaviest capital ships ever completed in Europe. Bismarck was laid down in July 1936 and completed in September 1940, while her sister Tirpitz's keel was laid in October 1936 and work finished in February 1941. The two ships were broadly similar to the World War I-era Bayern class, in that they mounted a similar main battery and were protected by a similar armour arrangement.
Both ships had short service careers. Bismarck conducted only one operation, Operation Rheinübung, a sortie into the North Atlantic to raid supply convoys sent from North America to Great Britain. During the operation, she destroyed the British battlecruiser HMS Hood and damaged the new battleship Prince of Wales in the Battle of the Denmark Strait. After a three-day chase, the Royal Navy destroyed the ship; the exact cause of her loss is uncertain, due to claims by survivors from Bismarck that they scuttled their ship.
Tirpitz's career was less dramatic; she was sent to Norwegian waters in 1942, where she acted as a fleet in being, threatening the convoys from Britain to the Soviet Union. She was repeatedly attacked by Royal Navy midget submarines and Royal Air Force bombers. Ultimately, Lancaster bombers hit the ship with three Tallboy bombs, which caused extensive internal damage and capsized the battleship. Tirpitz was broken up for scrap between 1948 and 1957. However, a large portion of the bow remains where it sank in 1944.
Bismarck class design
A series of conceptual designs were begun in 1932 to determine the ideal characteristics of a battleship built to the 35,000 long tons (36,000 t) limit of the Washington Naval Treaty. These early studies determined that the ship should be armed with eight 33 cm (13 in) guns, have a top speed of 30 kn (56 km/h; 35 mph), and have strong armour protection.[2] The actual design work for what became the Bismarck class was begun in 1933 and continued until 1936.[3] In June 1935, Germany signed the Anglo-German Naval Agreement, which allowed Germany to build battleships at a ratio of 35 percent to the total tonnage of the Royal Navy.[4] At the time, France, which had begun a program of naval expansion, was viewed as the most likely threat, not Great Britain. As a result, Bismarck and Tirpitz were intended to counter the new French battleships being built at the time.[5] A series of questions needed to be answered during the design process, including the calibre of the main battery, the propulsion system, and armour protection.[6]
The deciding factor for the adoption of 38 cm (15 in) guns for Bismarck and Tirpitz was the decision of the French Navy to arm its four Richelieu class ships then under construction with 38 cm pieces. It was decided that four twin turrets would provide the best solution to distribution of the main battery, as it would provide equal firepower forward and aft, as well as simplify fire control. The naval constructors examined diesel geared drive, steam drive, and turbo-electric drive engines; the last system was the preferred choice, as it had been extremely successful in the two American Error: {{sclass}} invalid format code: 6. Should be 0–5, or blank (help)s and the French passenger ship Normandie.[7]
The design staff were also required to provide sufficient range to the new battleships; they would have to make long voyages from German ports to reach the Atlantic, and Germany had no overseas bases where the ships could refuel.[8] Due to the numerical inferiority of the German fleet and the assumption that naval battles would take place at relatively close range in the North Sea, the Bismarck design placed great emphasis on stability and armour protection. Very thick vertical belt armour was adopted, along with heavy upper-citadel armour plating and extensive splinter protection in the bow and stern of the ships.[6]
The displacement of Bismarck and Tirpitz were limited by the capabilities of existing infrastructure in Kiel and Wilhelmshaven, and the Kaiser Wilhelm Canal. On 11 February 1937, the Construction Office informed Grossadmiral Erich Raeder that the ships could not displace more than 42,000 long tons (43,000 t) due to the constraints of the harbour and canal depths. The Office also expressed a preference for building a third vessel and remaining within the 35,000-ton treaty limit.[9] Admiral Werner Fuchs, the head of the General Command Office of the Oberkommando der Marine, advised Raeder and Adolf Hitler that a series of modifications would be necessary to reduce the displacement to ensure the new ships met the legal requirements of the London Naval Treaty. Japan, however, refused to sign the new treaty, and so on 1 April 1937 an escalator clause permitting treaty signatories to build ships up to a limit of 45,000 long tons (46,000 t) went into effect. The final design displacement of 41,400 long tons (42,100 t) was well within this limit, so Fuchs's modifications were discarded.[10]
General characteristics
The Bismarck class battleships were 251 m (823 ft) long overall and 241.6 m (793 ft) long at the waterline. The ships had a beam of 36 m (118 ft), and a designed draft of 9.3 m (31 ft); the draft at standard displacement was 8.63 m (28.3 ft), and 9.9 m (32 ft) at a full load. The ships had a designed displacement of 45,950 metric tons; their standard displacement was 41,700 metric tons, and when fully laden, the ships displaced 50,300 metric tons. The ships had a double bottom for 83 percent of the length of the hull, and twenty-two watertight compartments. The ships were 90 percent welded construction.[3] The stern, however, was weakly constructed; this would have significant consequences on Bismarck's only combat mission.[11]
The ships were very stable, primarily because of their wide beam. The ships suffered from only slight pitching and rolling, even in the heavy seas of the North Atlantic. Bismarck and Tirpitz were responsive to commands from the helm; they were capable of manoeuvring with rudder deflections as small as 5°. With the rudder completely over, the ships heeled only 3°, but lost up to 65% of their speed. However, the ships handled poorly at low speeds or when travelling in reverse. As a result, tugs were necessary in confined areas to avoid collisions or grounding. The ships had a standard crew of 103 officers and 1,962 enlisted sailors. The ships carried a number of smaller boats, including three picket boats, four barges, one launch, two pinnaces, two cutters, two yawls, and two dinghies.[12]
Propulsion
The Bismarck class ships both had three sets of geared turbine engines; Bismarck was equipped with Blohm & Voss turbines, while Tirpitz used Brown, Boveri, and Co. engines. Each set of turbines drove a 3-bladed screw that was 4.7 m (15 ft) in diameter.[3] Robert Ballard, the discoverer of Bismarck, noted that the adoption of the three-shaft arrangement caused serious problems for Bismarck. The centre shaft weakened the keel, especially where it emerges from the hull. Ballard stated that a four-shaft arrangement would have allowed a greater ability to steer the ship using only propeller revolutions than the three-screw system.[13]
At a full load, the high and medium-pressure turbines ran at 2,825 rpm, while the low-pressure turbines ran at 2,390 rpm. The ships' turbines were powered by twelve Wagner ultra high-pressure oil-burning boilers. The two ships had different fuel stores; Bismarck was designed to carry 3,200 tons of fuel oil, but could store up to 6,400 tons of fuel in a normal configuration; with extra fuel bunkers, the fuel carried could be increased up to 7,400 tons. Tirpitz was designed to carry 3,000 tons of fuel, and with additional bunkers, was able to store up to 7,780 tons. The powerplant had a full power specific fuel consumption of .325 kg of fuel per hour; at 19 knots, Bismarck could steam for 8,525 nautical miles (15,788 km), and Tirpitz had a maximum range of 8,870 nautical miles (16,430 km).[3]
The turbines were initially intended to use electric transmission, and would have produced 46,000 hp (34,000 kW) apiece. However, the geared turbines were lighter, and as a result had a slight performance advantage. The geared turbines also had a significantly more robust construction.[1] The ships mounted eight 500 kW diesel generators arranged in four pairs, five 690 kW turbo-generators, and one 460 kW, the last of which was connected to a 400 kVA AC generator. Another 550 kVA diesel generator provided additional AC power. The electrical plant provided a total 7,910 kW at 220 volts.[12]
Armament
Main battery
Bismarck's and Tirpitz's main battery consisted of eight 38 cm (15 in) SK C/34 guns in four twin turrets, Anton and Bruno in a superfiring pair forward of the superstructure and Caesar and Dora aft.[14] The turrets allowed elevation to 30°, which gave the guns a maximum range of 36,520 m (39,940 yd). The guns fired 800 kg (1,800 lb) projectiles at a muzzle velocity of 820 meters per second (2,690 ft/s).[15] The main battery was supplied with between 940–960 shells total, for approximately 115–120 shells per gun.[12] As with other German large-calibre naval rifles, these guns were designed by Krupp and featured sliding wedge breech blocks, which required brass cartridge cases for the propellant charges. Under optimal conditions, the rate of fire was one shot every 18 seconds, or three per minute.[16] The gun turrets were electrically trained and the guns were hydraulically elevated. Gun elevation was controlled remotely. The turrets required each gun to return to 2.5° elevation for loading.[17] Tirpitz was eventually provided with time-fuzed shells to combat the repeated Allied bombing attacks.[18]
Secondary battery

The ships' secondary battery consisted of twelve 15 cm (5.9 in) SK C/28 guns mounted in six twin turrets.[5] The 15 cm gun turrets were based on the single-gun turrets used aboard the Scharnhorst class. They could elevate to 40° and depress to −10°; they had a rate of fire of around six shots per minute.[18] The 15 cm guns fired a 45.3 kg (100 lb) shell at a muzzle velocity of 875 m/s (2,871 ft/s). At maximum elevation, the guns could hit targets out to 23,000 m (25,000 yd).[15] As with the main battery guns, Tirpitz's 15 cm guns were later supplied with time-fused shells.[18]
The decision to mount low-angle 15 cm guns has been criticized by naval historians, including Anthony Preston, who stated that they "imposed a severe weight penalty", while American and British battleships were being armed with dual-purpose guns.[19] Naval historians William Garzke and Robert Dulin note that "the use of dual-purpose armament would have possibly increased the number of anti-aircraft guns, but might have weakened the defense against destroyer attack, which German naval experts deemed more important."[20]
Anti-aircraft battery
As built, Bismarck and Tirpitz were equipped with an anti-aircraft battery of sixteen 10.5 cm (4.1 in) C/32 65-calibre guns in eight twin mounts, sixteen 3.7 cm (1.5 in) C/30 guns in eight dual mounts, twelve 2 cm (0.79 in) guns in individual mounts.[5] The 10.5 cm guns were the same weapons as used aboard the Scharnhorst class, and were mounted on the first superstructure deck. After Bismarck was sunk in 1941, two amidships guns on Tirpitz were moved forward so as to provide them with better fields of fire. The sixteen guns were guided by four fire-control directors, two just aft of the conning tower, a third positioned aft of the main mast, and the fourth directly behind turret Caesar. Tirpitz's directors were covered by protective domes, though Bismarck's were not.[21]
The ships' 37 mm 83-calibre guns were twin mounted and placed in the superstructure. The mounts were hand-operated and automatically stabilized for roll and pitch.[22] These guns were supplied with a total of 32,000 rounds of ammunition. Bismarck and Tirpitz were initially armed with twelve 20 mm guns in single mounts, though these were augmented over time.[12] Bismarck received a pair of quadruple gun mountings, for a total of twenty 20 mm guns. Over the course of her career, Tirpitz's 20 mm battery was increased to 78 guns in single and quadruple mountings.[22]
Armour
The Bismarck class ships had an armoured belt that ranged in thickness from 220 to 320 mm (8.7 to 12.6 in); the thickest section of armour covered the central portion, where the gun turrets, ammunition magazines, and machinery spaces were located. This portion of the belt was capped on either end by 220 mm thick transverse bulkheads. The ships had an upper deck that was 50 mm (2.0 in) thick, and an armoured deck that was between 100–120 mm (3.9–4.7 in) thick amidships, and tapered down to 60 mm (2.4 in) at the bow and 80 mm (3.1 in) at the stern.[3] The deck was mounted low in the hull, however, which reduced the volume of internal space protected by the armoured citadel. This contrasted with contemporary British and American designs that featured a single thick armoured deck mounted high in the ship.[11]
The forward conning tower had a 200 mm (7.9 in) thick roof and 350 mm (14 in) thick sides, while the range finder had an armoured roof 100 mm (3.9 in) thick and 200 mm (7.9 in) thick sides. The aft conning tower had much lighter armour: the roof was 50 mm (2.0 in) thick and the sides were 150 mm (5.9 in), while the aft range finder had a 50 mm (2.0 in) thick roof and 100 mm (3.9 in) sides.[3] The main battery turrets were reasonably well-protected: the turret roofs were 130 mm (5.1 in) thick, the sides were 220 mm (8.7 in) thick, and the faces were 360 mm (14 in) thick with 220 mm (8.7 in) thick shields.[3] However, these armour thicknesses were less than those of contemporary British (King George V) and French (Richelieu) designs. Conversely, the secondary battery was better-protected than most rivals.[23] The 15 cm (5.9 in) gun turrets had 35 mm (1.4 in) thick roofs, 40 mm (1.6 in) sides, and 100 mm (3.9 in) fronts. The 10.5 cm (4.1 in) guns had 20 mm (0.79 in) shields.[3]
Construction
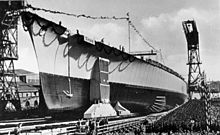
Bismarck was laid down at the Blohm & Voss shipyard on 1 July 1936.[5] The ship was assigned construction number 509, and the contract name Ersatz Hannover, as a replacement for the old battleship Hannover.[3] The ship was launched on 14 February 1939, with Adolf Hitler in attendance. The granddaughter of the ship's namesake, Otto von Bismarck, christened the ship.[24] As with other German capital ships, Bismarck was originally built with a straight bow. Experiences with other ships, however, revealed the necessity of a clipper bow, which was installed on Bismarck during the fitting-out process.[25] The ship was commissioned into the fleet on 24 August 1940, with Kapitän zur See Ernst Lindemann in command. Three weeks later, the ship left Hamburg for trials in the Baltic Sea, before returning in December for final fitting-out work. Further trials and tests were conducted in the Baltic in March and April; Bismarck was placed on active status the following month.[26]
Tirpitz's keel was laid at the Kriegsmarine dockyard in Wilhelmshaven on 20 October 1936,[5] under construction number 128. She had been ordered under the contract name Ersatz Schleswig-Holstein to replace the obsolete battleship Schleswig-Holstein.[3] Tirpitz was named for Grand Admiral Alfred von Tirpitz, the architect of the High Seas Fleet before World War I. His daughter, Frau von Hassel, christened the ship on 1 April 1939. Fitting out work lasted until February 1941;[27] Tirpitz was commissioned into the fleet on the 25 February.[12] A series of trials were then conducted, first in the North Sea and then in the Baltic.[28]
Service history
Bismarck
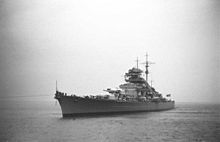
After Bismarck joined the fleet, plans were drawn up for a sortie into the North Atlantic. The operation initially called for a force composed of Bismarck, Tirpitz, and the two Error: {{sclass}} invalid format code: 6. Should be 0–5, or blank (help)s. Tirpitz was not yet ready for service by May 1941, and Scharnhorst was being overhauled. The force was reduced to Bismarck, Gneisenau, and the heavy cruiser Prinz Eugen. Gneisenau, however, was damaged by a British bombing raid on the port of Brest, so it was decided that only Bismarck and Prinz Eugen would conduct the operation. Admiral Günther Lütjens was placed in command of the pair of ships.[26]
Early on the morning of 19 May, Bismarck left Gotenhafen, bound for the North Atlantic.[29] While on the trip through the Danish Belt, Bismarck and Prinz Eugen encountered the Swedish cruiser HMS Gotland; the sighting was passed through the Swedish Navy to the British naval attaché in Stockholm.[30] The British Royal Air Force conducted aerial reconnaissance of the Norwegian fjord in which Bismarck and Prinz Eugen had stopped to confirm the sighting. While in Norway, Admiral Lütjens inexplicably failed to replenish the approximately 1,000 long tons (1,000 t) of fuel Bismarck had spent on the first leg of the voyage.[31]

By 23 May, Bismarck and Prinz Eugen had reached the Denmark Strait. That evening, the British cruisers Suffolk and Norfolk briefly engaged Bismarck before dropping back to shadow the German ships.[32] At 06:00 the following morning, observers aboard Bismarck spotted the masts of the battlecruiser Hood and the new battleship Prince of Wales.[33] The British ships steamed directly towards Bismarck and Prinz Eugen, before attempting a turn to bring the two forces on a roughly parallel course. During the turn, at least one of Bismarck's 38 cm shells penetrated one of the aft ammunition magazines aboard Hood, which caused a catastrophic explosion and destroyed the ship.[34] There were only three survivors from Hood's crew of 1,421. The German ships then concentrated their fire on Prince of Wales, which was forced to withdraw. Bismarck, however, did not emerge unscathed; a direct hit on her bow from Prince of Wales caused Bismarck to take in some 2,000 long tons (2,000 t) of water. The ship was also leaking oil, which made it easier for the British to track her.[35]
After retreating, Prince of Wales joined Norfolk and Suffolk; the ships briefly engaged Bismarck at around 18:00 that same day. Neither side scored a hit.[36] By this time, 19 warships were involved in the chase.[37] This included six battleships and battlecruisers and two aircraft carriers, along with a number of cruisers and destroyers.[38] After the second engagement with Prince of Wales, Lütjens detached Prinz Eugen to continue the operation while Bismarck sailed for port.[39] Shortly before midnight on the 24 May, a group of Fairey Swordfish torpedo bombers from 825 Naval Air Squadron on Victorious attacked Bismarck. One torpedo struck the ship amidships, though without doing any serious damage. The shock from the explosion, coupled with Bismarck's manoeuvring at high speed, did damage the temporary repairs that had stopped the flooding from the earlier battle damage. Her speed was reduced to 16 kn (30 km/h; 18 mph) to slow the flooding while repair teams fixed the reopened wounds.[40]
Early on the 25 May, Bismarck doubled back past her pursuers in a wide circle. The manoeuvre successfully shook off the British ships, which turned west in an attempt to find the ship. Despite the manoeuvre, Admiral Lütjens was unaware that he had evaded the British, and so sent a series of radio transmissions, which were intercepted by the British and used to gain a rough fix on his position.[38] Due to the damage his ship had sustained, Lütjens decided to make occupied France rather than continue his mission. On the morning of 26 May, a Coastal Command PBY Catalina flying boat spotted Bismarck some 690 nmi (1,280 km; 790 mi) to the north-west of Brest; she was steaming at a speed that would put her under the protective umbrella of German aircraft and U-boats within 24 hours. The only British forces close enough to slow her down were the aircraft carrier Ark Royal and her escort, the battlecruiser Renown.[41] At approximately 20:30, a flight of fifteen Ark Royal's 820 Naval Air Squadrons Swordfish torpedo bombers launched an attack on Bismarck. Three torpedoes were believed to have struck the ship; the first two torpedoes failed to do serious damage to the ship, but the third hit jammed Bismarck's rudders hard to starboard. The damage could not be repaired, and the battleship began turning in a large circle, back towards her pursuers.[38]
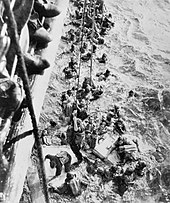
An hour after the Swordfish attack, Lütjens transmitted the following signal to Naval Group Command West: "Ship unable to manoeuvre. We will fight to the last shell. Long live the Führer."[42] At 08:47 the following morning, the battleship Rodney opened fire, followed directly by King George V.[43] Bismarck replied three minutes later, though at 09:02 a 16 inch shell from Rodney destroyed the forward turrets.[44] A half an hour later, Bismarck's rear turrets were silenced as well.[45] At around 10:15, both British battleships had ceased fire, their target a burning wreck. The British were running dangerously low on fuel, but Bismarck had not yet been sunk. The cruiser Dorsetshire fired several torpedoes into the crippled ship, which then took on a severe list to port. At approximately the same time as Dorsetshire's attack, engine room crew detonated scuttling charges in the engine rooms.[46] There is still significant debate as to the direct cause of Bismarck's sinking. Regardless, only 110 men were rescued by the British before reports of U-boats forced them from the scene.[47] A further five men were rescued by German vessels.[48]
Tirpitz
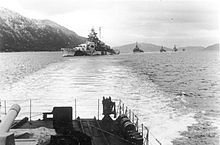
Tirpitz's first action following her commissioning into the Kriegsmarine was to act as a deterrent to a possible Soviet attempt to break out their Baltic Fleet following the German invasion of the Soviet Union. The ship was joined by the heavy cruiser Admiral Scheer and the light cruisers Leipzig, Nürnberg, and Köln. The force patrolled off the Aland Islands for a few days before returning to Kiel.[49] On 14 January, Tirpitz left German waters for Norway, arriving on the 17th.[50]
On 6 March, Tirpitz, escorted by three destroyers, launched a raid on the British convoys to the Soviet Union.[49] The Germans attempted to intercept convoys PQ-12 and QP-8,[50] but the inclement weather prevented them from finding the convoys.[49] The British, however, managed to locate Tirpitz. The aircraft carrier Victorious launched a strike composed of twelve Fairey Albacore torpedo bombers. The aircraft were repulsed without having scored any hits on the German ships. Tirpitz and the destroyers were back in port by 12 March.[50] The close call prompted Hitler to mandate that Tirpitz was not to attack another convoy unless its escorting aircraft carrier were sunk or disabled.[51]
Over the next two months, the British RAF launched a series of unsuccessful bombing raids against Tirpitz while she was moored in the Faettenfjord. The first, composed of 34 Handley Page Halifax bombers, took place on 31 March. Two followed closely in succession a month later, on 28 and 29 April. The first attack was conducted by 43 Halifax and Avro Lancaster bombers, the second by 34 Halifax and Lancaster.[50] A combination of heavy German anti-aircraft fire and poor weather caused all three missions to fail.[49] Over the summer and into late 1942, Tirpitz underwent a refit in the Faettenfjord, which lacked dockyard facilities of any type. As a result, the work was done incrementally; a large caisson was built to allow the rudders to be replaced.[52] Naval historians William Garzke and Robert Dulin stated that "the repairs to this ship were one of the most difficult naval engineering feats of World War II."[53]
In January 1943, Tirpitz emerged from the lengthy overhaul, after which she was transferred to Altafjord. Here, she participated in extensive training operations with Scharnhorst and the heavy cruiser Lützow, which lasted until the middle of the year.[54] In early September, Tirpitz, Scharnhorst, and ten destroyers bombarded the island of Spitzbergen, which served as a British refuelling station. The two battleships destroyed their targets and returned safely to Altenfjord; this was the first time Tirpitz fired her main guns in anger.[55] On 22–23 September, however, six British midget submarines attacked Tirpitz while at anchor. Two of the submarines successfully planted explosive charges against the battleship's hull, which did serious damage. Tirpitz had been successfully neutralized.[54] Over the next six months, a workforce of some 1,000 men effected the needed repairs, which were finally finished by March 1944.[56]
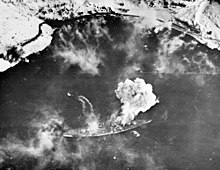
The British resumed the series of air attacks almost immediately after repairs were completed. On 3 April, the Royal Navy launched Operation Tungsten, during which 40 fighters and 40 Barracuda bombers from six carriers attacked the ship. They scored 15 direct hits and two near misses, which caused heavy damage, killed 122 men, and wounded 316 more. The Royal Navy attempted to repeat the attack three weeks later on the 24th, but had to call the operation off due to inclement weather. Operation Brawn, another carrier-launched attack, followed on 15 May, but again weather interfered. Another carrier strike was attempted on 28 May, but it too was canceled due to poor weather conditions. Operation Mascot, which was to be conducted by Victorious, Furious, and Indefatigable on 17 July, was canceled due to heavy fog.[57]
The Royal Navy launched the Operation Goodwood series in late August. Goodwood I took place on 22 August, with 38 bombers and 43 fighters from five carriers. The attackers failed to score any hits, however. Goodwood III followed two days later, with 48 bombers and 29 fighters from Formidable, Furious, and Indefatigable. The bombers made two hits on the ship, which did only minor damage. The last Royal Navy operation, Goodwood IV, followed on 29 August. Thirty-four bombers and 25 fighters, launched from Formidable and Indefatigable, attacked the ship, though fog prevented them from scoring any hits.[57]
The task of sinking Tirpitz now fell to the RAF, which performed three airstrikes armed with new 5,400 kg (11,900 lb) Tallboy bombs.[57] The first attack, Operation Paravane, came on 15 September, when a force of 27 Lancasters dropped a single Tallboy each; the bombers succeeded in hitting Tirpitz directly in the bow with one of the bombs. The bomb completed penetrated the ship and exploded directly under her keel. This caused some 1,500 t (1,500 long tons; 1,700 short tons) of water to flood the ship; Tirpitz had again been disabled.[58] A month later, on 15 October, Tirpitz was moved to Haaköy Island off Tromsø to be used as a floating artillery battery. Two weeks later, on 29 October, the British launched Operation Obviate, which consisted of 32 Lancaster bombers. Only a near miss was achieved, though it caused Tirpitz to take in more water. The last attack, Operation Catechism, took place on 12 November. Thirty-two Lancasters attacked the ship and scored a pair of direct hits and a near miss. The bombs detonated one of Tirpitz's ammunition magazines and caused the ship to capsize. Casualties were high: 1,204 men were killed in the attack. Another 806 men managed to escape the sinking ship, and a further 82 were eventually rescued from the capsized hulk.[50] The wreck was gradually broken up for scrap between 1948 and 1957.[59]
Notes
- Footnotes
- Citations
- ^ a b c Gröner, pp. 33–35
- ^ Garzke & Dulin, p. 203
- ^ a b c d e f g h i j Gröner, p. 33
- ^ Maiolo, pp. 35–36
- ^ a b c d e Sturton, p. 44
- ^ a b Garzke & Dulin, pp. 204–205
- ^ Garkze & Dulin, p. 204
- ^ Garzke & Dulin, pp. 205–206
- ^ Garzke & Dulin, p. 206
- ^ Garzke & Dulin, p. 208
- ^ a b Preston, p. 151
- ^ a b c d e Gröner, p. 35
- ^ Ballard, p. 232
- ^ Gröner, pp. 34–35
- ^ a b Garzke & Dulin, p. 275
- ^ Garzke & Dulin, p. 274
- ^ Garzke & Dulin, p. 278
- ^ a b c Garzke & Dulin, p. 279
- ^ Preston, p. 152
- ^ Garzke & Dulin, p. 297
- ^ Garzke & Dulin, p. 280
- ^ a b Garzke & Dulin, p. 282
- ^ Breyer (1973), p. 300
- ^ Williamson, p. 21
- ^ Williamson, pp. 21–22
- ^ a b Williamson, p. 22
- ^ Williamson, p. 35
- ^ Williamson, pp. 35–36
- ^ Bercuson & Herwig, p. 63
- ^ Bercuson & Herwig, pp. 65–67
- ^ Bercuson & Herwig, p. 71
- ^ Williamson, p. 23
- ^ Williamson, pp. 23–24
- ^ Bercuson & Herwig, pp. 147–153
- ^ Williamson, p. 24
- ^ Garzke & Dulin, p. 227
- ^ Garzke & Dulin, p. 229
- ^ a b c Williamson, p. 33
- ^ Bercuson & Herwig, pp. 176–177
- ^ Garzke & Dulin, pp. 229–230
- ^ Garzke & Dulin, p. 233
- ^ Bercuson & Herwig, p. 266
- ^ Bercuson & Herwig, p. 288
- ^ Bercuson & Herwig, pp. 289–290
- ^ Bercuson & Herwig, p. 291
- ^ Garzke & Dulin, pp. 245–246
- ^ Williamson, pp. 34–35
- ^ Garzke & Dulin, p. 246
- ^ a b c d Williamson, p. 36
- ^ a b c d e Breyer (1989), p. 25
- ^ Garzke & Dulin, p. 253
- ^ Garzke & Dulin, p. 255
- ^ Garzke & Dulin, p. 256
- ^ a b Williamson, p. 37
- ^ Garzke & Dulin, p. 258
- ^ Williamson, pp. 37–38
- ^ a b c Breyer (1988), p. 26
- ^ Williamson, p. 39
- ^ Sturton, p. 45
References
- Ballard, Robert (2007). Robert Ballard's Bismarck. Edison, NJ: Chartwell Books. ISBN 9780785822059.
- Bercuson, David J.; Herwig, Holger H. (2003). The Destruction of the Bismarck. New York: The Overlook Press. ISBN 1585673978.
- Breyer, Siegfried (1973). Battleships and Battle Cruisers 1905–1970. New York: Doubleday.
- Breyer, Siegfried (1989). Battleship "Tirpitz". West Chester, PA: Schiffer Publishing Ltd. ISBN 0887401848.
- Garzke, William H.; Dulin, Robert O. (1985). Battleships: Axis and Neutral Battleships in World War II. Annapolis, MD: Naval Institute Press. ISBN 9780870211010.
- Gröner, Erich (1990). German Warships: 1815–1945. Annapolis, Maryland: Naval Institute Press. ISBN 0-87021-790-9. OCLC 22101769.
- Maiolo, Joseph (1998). The Royal Navy and Nazi Germany, 1933–39 A Study in Appeasement and the Origins of the Second World War. London: Macmillan Press. ISBN 0312214561.
- Preston, Anthony (2002). The World's Worst Warships. London: Conway Maritime Press. ISBN 0851777546.
- Sturton, Ian, ed. (1987). Conway's All the World's Battleships: 1906 to the Present. London: Conway Maritime Press. ISBN 0851774482. OCLC 246548578.
- Williamson, Gordon (2003). German Battleships 1939–45. Oxford: Osprey Publishing. ISBN 9781841764986.
