Exploded-view drawing
| Part of a series on |
| Graphical projection |
|---|
 |
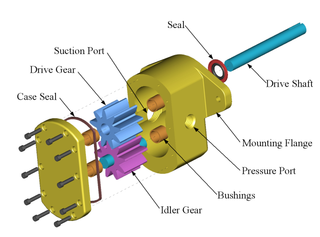
An exploded view drawing is a diagram, picture, schematic or technical drawing of an object, that shows the relationship or order of assembly of various parts.[1]
It shows the components of an object slightly separated by distance, or suspended in surrounding space in the case of a three-dimensional exploded diagram. An object is represented as if there had been a small controlled explosion emanating from the middle of the object, causing the object's parts to be separated an equal distance away from their original locations.
The exploded view drawing is used in parts catalogs, assembly and maintenance manuals and other instructional material.
Usually, the projection of an exploded view is normally shown from above and slightly in diagonal from the left or right side of the drawing. (See exploded view drawing of a gear pump to the right). It is slightly from above and shown from the left side of the drawing in diagonal.
Overview


An exploded view drawing is a type of drawing, that shows the intended assembly of mechanical or other parts. It shows all parts of the assembly and how they fit together. In mechanical systems usually the component closest to the center are assembled first, or is the main part in which the other parts get assembled. This drawing can also help to represent the disassembly of parts, where the parts on the outside normally get removed first.[2]
Exploded diagrams are common in descriptive manuals showing parts placement, or parts contained in an assembly or sub-assembly. Usually such diagrams have the part identification number and a label indicating which part fills the particular position in the diagram. Many spreadsheet applications can automatically create exploded diagrams, such as exploded pie charts.
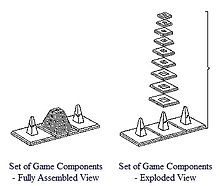
In patent drawings in an exploded views the separated parts should be embraced by a bracket, to show the relationship or order of assembly of various parts are permissible, see image. When an exploded view is shown in a figure that is on the same sheet as another figure, the exploded view should be placed in brackets.[1]
Exploded views can also be used in architectural drawing, for example in the presentation of landscape design. An exploded view can create an image in which the elements are flying through the air above the architectural plan, almost like a cubist painting. The locations can be shadowed or dotted in the siteplan of the elements.[3]
History

Together with the cutaway view the exploded view was among the many graphic inventions of the Renaissance, which were developed to clarify pictorial representation in a renewed naturalistic way. The exploded view can be traced back to the early fifteenth century notebooks of Marino Taccola (1382–1453), and were perfected by Francesco di Giorgio (1439–1502) and Leonardo da Vinci (1452–1519).[4]
One of the first clearer examples of an exploded view was created by Leonardo in his design drawing of a reciprocating motion machine. Leonardo applied this method of presentation in several other studies, including those on human anatomy.[5]
The term "Exploded View Drawing" emerged in the 1940s, and is one of the first times defined in 1965 as "Three-dimensional (isometric) illustration that shows the mating relationships of parts, subassemblies, and higher assemblies. May also show the sequence of assembling or disassembling the detail parts."[6]
See also
References
- ^ a b United States Patent and Trademark Office (2005), General Information Concerning Patents § 1.84 Standards for drawings (Revised January 2005). Accessed 13 Feb 2009.
- ^ Michael E. Brumbach, Jeffrey A. Clade (2003). Industrial Maintenance. p.65
- ^ Chip Sullivan (2004) Drawing the Landscape. p.245.
- ^ Eugene S. Ferguson (1999). Engineering and the Mind's Eye. p.82.
- ^ Domenico Laurenza, Mario Taddei, Edoardo Zanon (2006). Leonardo's Machines. p.165
- ^ Thomas F. Walton (1965). Technical Data Requirements for Systems Engineering and Support. Prentice-Hall. p.170
