Neutral plane

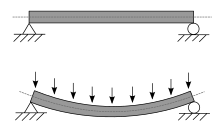
In mechanics, the neutral plane or neutral surface is a conceptual plane within a beam or cantilever. When loaded by a bending force, the beam bends so that the inner surface is in compression and the outer surface is in tension. The neutral plane is the surface within the beam between these zones, where the material of the beam is not under stress, either compression or tension.[1]
As there is no lengthwise stress force on the neutral plane, there is no strain or extension either: when the beam bends, the length of the neutral plane remains constant. Any line within the neutral plane parallel to the axis of the beam is called the deflection curve of the beam.
To show that every beam must have a neutral plane, the material of the beam can be imagined to be divided into narrow fibers parallel to its length. When the beam is bent, it is obvious that at any given cross-section, the region of fibers near the concave side will be under compression, while the region near the convex side will be under tension. Because the stress in the material must be continuous across any cross section, there must be a boundary between the regions of compression and tension at which the fibers have no stress. This is the neutral plane.[1]
Structural design
The location of the neutral plane can be an important factor in monocoque structures and pressure vessels. If the structure is a membrane supported by strength ribs, then placing the skin along the neutral surface avoids either compression or tension forces upon it. If the skin is already under external pressure, then this reduces the total force to which it is subject.
In the design of submarines this has been an important, although subtle, issue. The US Fleet submarines of World War II had a hull section that was not quite circular, causing the nodal circle to separate from the neutral plane, giving rise to additional stresses. The original design was framed internally: this needed trial-and-error design refinement to produce acceptable dimensions for the rib scantlings. The designer Andrew I. McKee at Portsmouth Naval Shipyard developed an improved design. By placing the frames partly inside the hull and partly outside, the neutral axis could be rearranged to coincide with the nodal circle once more. This gave no resultant bending moment on the frames and so allowed a lighter and more efficient structure.[2]
Metrology

The property of remaining a constant length under load has been made use of in length metrology. When metal bars were developed as physical standards for length measures, they were calibrated as marks made on a length measured along the neutral plane. This avoided the minuscule changes in length, owing to the bar sagging under its own weight.
The first length standards to use this technique were rectangular section solid bars. A blind hole was bored at each end, to the depth of the neutral plane, and the calibration marks were made at this depth. This was inconvenient, as it was impossible to measure directly between the two marks, but only with an offset trammel down the wells.

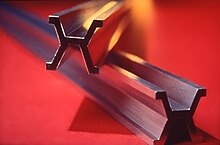
A more convenient approach was used for the international prototype metre of 1870, a bar of platinum-iridium alloy which served as the definition of the meter from 1889 to 1960. This was made with a splayed H-shaped cross section, called the Tresca section. One surface of the centre crossbar of the H was designed to coincide with the neutral plane, and the calibration marks defining the meter were scribed into this surface.[4]
See also
References
- ^ a b Wylie, C. Ray (1975). Advanced Engineering Mathematics, 4th Ed. New York: McGraw-Hill. p. 67. ISBN 0070721807.
- ^ Alden, John D., Commander (USN Ret) (1979). The Fleet Submarine in the U.S. Navy: A Design and Construction History. London: Arms and Armour Press. pp. 215, 217. ISBN 0-85368-203-8.
{{cite book}}: CS1 maint: multiple names: authors list (link) CS1 maint: ref duplicates default (link) - ^ "Bronze Yard Nº 11". National Institute of Standards & Technology.
{{cite web}}: External link in|publisher= - ^ L.W. Nickols (1966). "The Measurement of Length". Engineering Heritage. Vol. II. London: Heinemann. p. 2.
