Battle of Dyrrhachium (1081)
An earlier Battle of Dyrrhachium took place in 48 BC.
| Battle of Dyrrhachium | |||||||
|---|---|---|---|---|---|---|---|
| Part of the Byzantine-Norman wars | |||||||
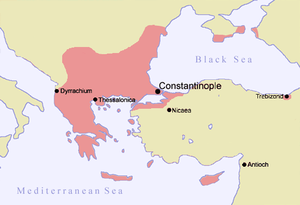
 The Byzantine Empire in 1081 AD. | |||||||
| |||||||
| Belligerents | |||||||
| File:Flag of the Byzantine Empire.svgByzantine Empire |
| ||||||
| Commanders and leaders | |||||||
|
Alexios I Komnenos George Palaiologos |
Robert Guiscard Bohemond of Taranto | ||||||
| Strength | |||||||
| 20,000[1] | 30,000[1][2] | ||||||
| Casualties and losses | |||||||
|
5,000 dead[3] 7,000 deserted[4] | Substantial[3] | ||||||
The Battle of Dyrrhachium or Siege of Durazzo took place on October 18, 1081 between the Byzantine Empire, led by the Emperor Alexius I, and the Normans of Southern Italy under Robert Guiscard, Duke of Apulia & Calabria. The battle was fought outside the city of Dyrrhachium, the Byzantine capitol of Illyria, and ended in a Norman victory.
Following the Norman conquest of Byzantine Italy and Saracen Sicily, the Byzantine Emperor, Michael VII betrothed his son to Robert Guiscard's daughter. When Michael was deposed, Robert took this as an excuse to invade the Byzantine Empire in 1081. His army laid siege to Dyrrhachium but his fleet was defeated by the Venetians. On October 18, the Normans engaged a Byzantine army under Alexios I Komnenos outside Dyrrhachium. The battle began with the Byzantine right wing routing the Norman left wing which broke and fled. Varangians mercenaries joined in the pursuit of the fleeing Normans but became separated from the main force and were massacred. Norman knights in the centre then attacked the Byzantine centre and routed it, causing the Byzantines to flee.
After the capture of Dyrrhachium in February 1082, the Normans advanced inland capturing most of Macedonia and Thessaly. However, Robert was forced to leave Greece following an attack on his ally, the Pope by the Holy Roman Emperor, Henry IV. Robert left his son Bohemond in charge of the army in Greece but Byzantine attacks eventually forced him to withdraw to Italy .
Background

The Normans first arrived in Southern Italy in 1015 from northern France and served local Lombard lords as mercenaries against the Byzantine Empire. As they were paid with lands, soon they were powerful enough to challenge Papal authority; in 1054 they defeated the Pope at the Battle of Civitate, forcing him to acknowledge their authority.[5] In 1059, the Pope made Robert Guiscard of the Hauteville family Duke of Apulia, Calabria and Sicily. However, most of Apulia and Calabria were in Byzantine hands, and Sicily was in Saracen hands.[6]
By 1071 Robert, together with his brother Roger, had taken over the last Byzantine stronghold in Italy, Bari. By the next year they conquered all of Sicily ending the Islamic Emirate of Sicily. In 1073, the Byzantine Emperor Michael VII sent an envoy to Robert offering the hand of his son Constantine to Robert's daughter Helena.[6][7] Guiscard accepted the offer and sent his daughter to Constantinople. However, in 1078, Michael was overthrown by Nicephorus Botaneiates, an event that destroyed any chances Helena had for the throne.[7] This gave Robert an excuse to invade the empire claiming his daughter had been mistreated, however his intervention was delayed by a revolt in Italy.[8]
Robert conscripted all men of servable age into the army, which he refitted.[9] Meanwhile, he sent an ambassador to the Byzantine court with orders to demand proper treatment for Helena and to win over the Domestic of the Schools, Alexios I Komnenos.[10] The results of these attempts remain unknown, but the ambassador fell under Alexios' charm and as he was returning to Italy, he heard of Alexios successful coup against Botaneiates.[9]
When the ambassador returned, he urged Robert to make peace, claiming that Alexios wanted nothing but friendship with the Normans. Robert had no intentions for peace; he sent his son Bohemond with an advance force towards Greece, then followed shortly after.[10][11]
Prelude
"Not being satisfied with the men who had served in his army from the beginning and had experience in battle, he formed a new army, made up of recruits without any consideration of age. From all quarters of Lombardy and Apulia he gathered them, over age and under age, pitiable objects who had never seen armour in their dreams, but then clad in breastplates and carrying shields, awkwardly drawing bows to which they were completely unused and following flat on the ground when they were allowed to march."
Anna Comnena describing Robert Guiscard's conscription.[12]
The Norman fleet of 150 ships set off towards the Byzantine Empire at the end of May 1081. The army numbered 30,000 men, backed up by 1,300 Norman knights.[11][13] The fleet sailed to Avalona in Byzantine territory; they were joined by several ships from Ragusa, a republic in the Balkans who hated the Byzantines.[11]
Robert soon left Avalona and sailed to the island of Corfu, which surrendered due to a small garrison. Having won a bridgehead and a clear path for reinforcements from Italy, he advanced on the city of Dyrrhachium, the capital and chief port of Illyria. The city was well defended, on a long, narrow peninsula running parallel to the coast but separated by marshlands. Guiscard brought his army onto the peninsula and pitched camp outside the city walls.[14] However, as Robert's fleet sailed to Dyrrhachium, it was hit by a storm and lost several ships.[11]
Meanwhile, when Alexios heard that the Normans were preparing to invade Byzantine territory, he sent an ambassador to the Doge of Venice, Domenico Selvo, requesting aid and offering trading rights in return.[11] The Doge, alarmed by Norman control of the Straits of Otranto, took command of the fleet and sailed at once, surprising the Norman fleet under the command of Bohemond as night was falling. The Normans counter-attacked tenaciously, but their inexperience in naval combat betrayed them. After the Venetian use of Greek fire, the Norman line scattered, and the Venetian fleet sailed into Dyrrhacium's harbour.[15]
Siege of Dyrrhachium
Robert was not discouraged by this naval defeat, and began his siege of Dyrrhachium. In command of the garrison at Dyrrhachium was the experienced general George Palaiologos, sent by Alexios with orders to hold out at all costs while Alexios himself mustered an army to relieve the city.[15]

Meanwhile, a Byzantine fleet arrived and – after joining with the Venetian fleet – attacked the Norman fleet, which was again routed. The garrison at Dyrrhachium managed to hold out all summer, despite Robert's catapults, ballistae and siege tower. The garrison made continuous sallies from the city; on one occasion Palaiologos fought all day with an arrowhead in his skull. Another sally succeeded in destroying Robert's siege tower.[15]
Robert's camp was struck by disease; according to contemporary historian Anna Comnena up to 10,000 men died, including 500 knights.[16] Even so, the situation of the Dyrrhachium garrison got desperate due to the effects of Norman siege weapons. Alexios heard about this while he was in Thessalonica with his army so he advanced in full force against the Normans. According to Comnena, Alexios had around 20,000 men; modern historians put the army's size between 18,000 to 20,000 men. It consisted of Thracian and Macedonian tagmata, which numbered around 5,000 men; the elite excubita and vestiaritae units, which numbered around 1,000 men; a force of so-called Manichaeans (Bogomil heretics organized into military units), which comprised of 2,800 men, Thessalian cavalry, Balkan conscripts, Armenian infantry and other light troops. As well as the native troops, the Byzantines were joined by 2,000 Turkish and 1,000 Frankish mercenaries, around 1,000 Varangians and 7,000 Turkish auxiliaries sent by the Seljuk Sultan of Rum.[15][17]
Battle
Initial moves

Alexios advanced from Thessaloniki and pitched camp on the River Charzanes near Dyrrhachium on 15 October.[15][18] He held a war council there and sought advice from his senior officers; among them was George Palaiologos, who had managed to sneak out of the city.[1] A majority of the senior officers, including Palaiologos, urged caution, noting that time was with the Emperor. Alexios, however, favoured an immediate assault, hoping to catch Guiscard's army from the rear, while they were still besieging the city. Alexios moved his army to the hills opposite the city planing to attack the Normans the next day.[1][18]
Guiscard, however, had been informed of Alexios' arrival by his scouts and on the night of the 17 October, he moved his army from the peninsula to the mainland. Upon learning of Guiscard's move, Alexios revised his battle plan. He split his army into three divisions, with the left wing under the command of Gregory Pakourianios, the right wing under and the command of Nikephoros Melissenos, and himself in command of the centre. Guiscard formed his battle line opposite Alexios', with the right wing under the command of the Count of Giovinazzo, the left under Bohemomd and Guiscard facing Alexios in the centre.[1][19]
The Varangians had been ordered to march a bit in front of the main line with a strong division of archers a little behind them.[1] The archers had been commanded to move in front of the Varangians and fire a volley before retreating behind them. The archers continued this tactic until the army neared contact.[19][20]
As the opposing armies closed in, Guiscard sent a detachment of cavalry positioned in the centre to feint an attack on the Byzantine positions. Guiscard hoped the feint would draw up the Varangians; however, this plan failed when the cavalry was forced back by the archers. The Norman right wing suddenly charged forward to the point where the Byzantine left and centre met, directing its attack against the Varangian left flank. The Varangians stood their ground while the Byzantine left – including some of Alexios' elite troops – attacked the Normans. The Norman formation disintegrated and the routed Normans fled towards the beach. There, according to Comnena, they were rallied by Guiscard's wife, Sikelgaita, described as "like another Pallas, if not a second Athena".[20][21][19]
Byzantine collapse

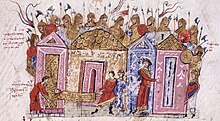
In the meantime, the Byzantine right and centre had been engaging in skirmishes with the Normans opposite them. However, with the collapse of the Norman right, the knights were danger of being outflanked. At this point, the Varangians – mainly Anglo-Saxons who had left England after the Norman conquest – joined in the pursuit of the Norman right. With their massive battle axes, the Varangians attacked the Norman knights, who were driven away after their horses panicked. The Varangians soon became separated from the main force and exhausted so they were in no position to resist an assault. Guiscard sent a strong force of spearmen and crossbowmen against the Varangian flank and inflicted heavy casualties on them. The few remaining Varangians fled in the church of the Archangel Michael. The Normans immediately set the church on fire, and all Varangians perished in the blaze.[20][21][19]
"Alexios was undoubtedly a good tactician, but he was badly let down by the indisciplined rush to pursue the beat enemy wings, a cardinal sin in the Byzantine tactical manuals. He failed to take adequate account of the effectiveness of the of the Norman heavy cavalry charge, which punched through his lines with little resistance."
John Haldon's assessment of the battle.[22]
Meanwhile, George Palaiologos sortied out of Dyrrhachium but failed to save the situation. Worse, Alexios' vassal, King Constantine Bodin of Zeta, betrayed him. The Turks who had been lent to him by the Seljuk Sultan Süleyman I bin Kutalmish followed Constantine's example and deserted.[4]
Deprived of his left wing (still in pursuit of the Norman right), Alexios was exposed in the centre. Guiscard sent his heavy cavalry against the Byzantine centre. They first routed the Byzantine skirmishers before breaking into small detachments, then smashed into various points of the Byzantine line. This charge broke the Byzantine lines and caused them to route. The imperial camp, which had been left unguarded, fell to the Normans.[20][23]
Alexios and his guards resisted as long as they could before retreating. As they retreated, Alexios was separated from his guard and was attacked by Normans soldiers. While escaping he was wounded in his forehead and lost a lot of blood, but eventually made it back to Ochrid, where he regrouped his army.[20][4][19]
Aftermath
The battle was a serious defeat for Alexios. He lost around 5,000 of his men, including most of the Varangians. Norman losses are unknown but John Haldon claims they are substantial as both wings broke and fled.[3] George Palaiologos had not been able to re-enter the city after the battle and left with the main force. The defence of the citadel was left to the Venetians, while the city itself was left to an Albanian, Komiskortes.[24] In February 1082, Dyrrhachium fell after a Venetian or Amalfian citizen opened the gates to the Normans.[25] The Norman army proceeded to take most of northern Greece without facing much resistance. While Guiscard was in Kastoria, messengers arrived from Italy, bearing news that Apulia, Calabria and Campania were in revolt. He also learned that the Holy Roman Emperor, Henry IV, was at the gates of Rome and besieging Pope Gregory VII, a Norman ally.[4] Alexius had negotiated with Henry and given him 360,000 gold pieces in return for an alliance. Henry responded by invading Italy and attacking the Pope. Guiscard rushed to Italy, leaving Bohemond in command of the army in Greece.[26][27]
Alexios desperate for money, ordered the confiscation of all the church's treasure.[26] With this money, Alexios mustered an army near Thessaloniki and went to fight Bohemond. However, Bohemond defeated Alexios in two battles: one near Arta and the other near Ioannina. This left Bohemond in control of Macedonia and nearly all of Thessaly.[28] The Bohemond advanced with his army against the city of Larissa. Meanwhile, Alexios had mustered a new army and with 7,000 Seljuk Turks sent by the Sultan, he advanced on the Normans at Larissa and defeated them.[29][30] The demoralized and unpaid Norman army returned to the coast and sailed back to Italy.[31] Meanwhile, the Venetians had recaptured Dyrrachium and Corfu. These victories returned the Empire to its previous status quo and marked the beginning of the Komnenian restoration.[32]
References
- ^ a b c d e f Haldon, The Byzantine Wars, 134
- ^ Anna Comnena, The Alexiad, 1.16
- ^ a b c Haldon, The Byzantine Wars, 137
- ^ a b c d Norwich, Byzantium: Decline and Fall, 20
- ^ Norwich, Byzantium: Decline and Fall, 13
- ^ a b Norwich, Byzantium: Decline and Fall, 14
- ^ a b Anna Comnena, The Alexiad, 1.12
- ^ Norwich, Byzantium: Decline and Fall, 15
- ^ a b Norwich, Byzantium: Decline and Fall, 16
- ^ a b Anna Comnena, The Alexiad, 1.15
- ^ a b c d e Norwich, Byzantium: Decline and Fall, 17
- ^ Anna Comnena, The Alexiad, 1.13
- ^ Anna Comnena, The Alexiad, 1.17
- ^ Haldon, Byzantine Wars, 133
- ^ a b c d e Norwich, Byzantium: Decline and Fall, 18 Cite error: The named reference "Norwich18" was defined multiple times with different content (see the help page).
- ^ Anna Comnena, The Alexiad, 4.3
- ^ Anna Comnena, The Alexiad, 4.4
- ^ a b Anna Comnena, The Alexiad, 4.5
- ^ a b c d e Anna Comnena, The Alexiad, 4.6
- ^ a b c d e Haldon, The Byzantine Wars, 135
- ^ a b Norwich, Byzantium: Decline and Fall, 19
- ^ Haldon, The Byzantine Wars, 136-7
- ^ Anna Comnena, The Alexiad, 4.7
- ^ Anna Comnena, The Alexiad, 4.8
- ^ Anna Comnena, The Alexiad, 5.1
- ^ a b Norwich, Byzantium: Decline and Fall, 21
- ^ Anna Comnena, The Alexiad, 5.3
- ^ Anna Comnena, The Alexiad, 5.4
- ^ Anna Comnena, The Alexiad, 5.5
- ^ Anna Comnena, The Alexiad, 5.6
- ^ Anna Comnena, The Alexiad, 5.7
- ^ Norwich, Byzantium: Decline and Fall, 22
Sources
- Primary
- Anna Comnena, translated by E.R.A Sewter (1969). The Alexiad. London: Penguin Books. ISBN 0-14-044215-4.
- Secondary
- John Julius Norwich, (1995). Byzantium: The Decline and Fall. London: Viking. ISBN 0-670-82377-5.
- John Haldon, (2000). The Byzantine Wars. The Mill: Tempest. ISBN 0-7524-1795-9.
